July 31, 2009

Papertrey Pattern Pizazz

This month's Papertrey Senior Design Team challenge was to use four or more patterns on a project. You know that I love to make my own patterned paper so this challenge was a fun one for me. Today I'll be using Papertrey's Floral Fusion stamp set. Those that attended the CHA Super Show were able to acquire this stamp set at the Papertrey booth.

I started my project by cutting lots of 1" x 4" strips of Vintage Cream cardstock. Using Papertrey ink colors in Summer Sunrise, Ripe Avocado, Aqua Mist and Spring Moss, I stamped a different pattern on each of my cardstock strips. I also added in some fun polka dots from Polka Dots Basics II in Summer Sunrise ink.

By using a single stamp design and single ink color, I was able to create what looks like individual patterned paper that was cut up for each of my cardstock strips. I love the look of this because it looks like I chose papers that came from a coordinated paper pack. But for a fraction of the price. I could have also stamped full sheets of my patterns to create a one sheet wonder....this would be great if you needed lots more of the patterned paper.
Next, I assembled my cardstock strips onto 4.25" x 5.5" Kraft card fronts. I did not worry about spacing the strips perfectly, I went for a quirky look by just attaching them randomly. Edges of cards were inked with Vintage Cream ink.
Next up, I made some sentiments using images from Floral Fusion and Ripe Avocado ink. I used a scalloped rectangle punch and rectangle border stamps from Borders and Corners: Rectangles.
One of the hardest things about using lots of patterns on your projects is making it all look good. And not like a mismatched mess. One of the best ways to tie all of the elements together on your project is by matching items of the same/similar colors. Papertrey makes it super duper easy peasy to do this because of all of the coordinating products we offer. Today I'm matching up some buttons but you could easily match up inks to ribbon, cardstock, Copic markers, etc.
To finish up my cards, I let my patterned paper strips steal the show. I kept my sentiment pieces fairly small and used Vintage Cream Sheer Stripes ribbon that stayed neutral and sheer. My cards have FIVE different patterns on them, but they don't look to *busy* at all. Actually I think they look very soft and pretty, just the look I was going for.
So I hope you try your hand at combining patterns on your projects. Don't be afraid, you can do it! Here's some other samples I made some time ago. For these projects, I used Bitty Dot Basics patterned paper as my base paper, then stamped images on top.
Very different patterns and colors, but it all works because I used color and coordinating products to tie it all together.
Hope you give it a try! For even more inspiration on using multiple patterns on your projects, visit these Papertrey designers' blogs:

test post

July 30, 2009

Basic Grey meets Vintage Picnic

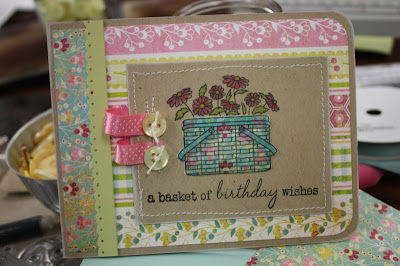
I loved the new Basic Grey Lemonade patterned paper the minute I saw it at my local scrapbook store. (Eclectic Paperie also carries it online). The colors are so fresh and fun but yet there's a hint of vintage to it too. I paired my paper up with the wicker basket, flowers and a birthday sentiment from Vintage Picnic. I stamped the basket onto a scrap of the patterned paper and paper pieced it. The flowers were stamped onto Kraft cardstock and colored with Copic Sketch markers. Vintage buttons in Spring Moss and Lemon Tart are tied with Rustic Cream Twine. Ribbon is Hibiscus Burst in the bitty dot pattern. Machine stitching gives a homespun feel to the card. Mini scallop edger punch is from EK Success.
Ohh, I'm just swooning over these pretty colors. Fall will be here before we know it so I have to get my fix of pretty flowers and fruit punchy colors.

July 28, 2009

Freaky Girl

I'm not sure what you call this little girl so I'm calling her Freaky Girl. I saw her at my local scrapbook store and she jumped into my shopping basket! She was just hanging there, staring at me along with all of this colorful Lemonade collection by Basic Grey. I think Freaky Girl is hard to find so good luck! Last I saw, Eclectic Paperie had her packaged up in a little bundle of stamps. Check it out HERE, EP also sells the Basic Grey Lemonade collection of papers and matching embellishments. I was like a little kid making these cards. Just for the sheer fun of stamping.....as Forrest Gump would say......for no particular reason.
If you want to try something new with your Copics, try stamping your images onto Kraft cardstock, then coloring. You just have to use a little more vibrant/darker colors so that they'll show up on the Kraft color. Use a little scrap of paper to test your colors first. And see that shimmer on my little red headed Freaky Girl (she looks like Josey who has more blond in her red hair)? I used Copic Spica markers to add some shimmer. My friend Pine likes to use a Star Dust pen and then smudge it before it dries. Thanks for the tip Pine! For this little card, I used a sentiment from Papertrey's Vintage Picnic and matched it up with a tiny envelope from Papertrey's Mailbox Greetings.
This time I colored Freaky Girl to look more like Jordan who has darker red hair. I love their little blushy cheeks.
I shimmered up her hair too and added a popped up heart, some buttons, ribbon and a little machine stitching. Polka dots on both cards are from Papertrey's Polka Dot Basics II. For each of the main image layers, I used a fine tip Copic Multi Liner in black to outline the squares and have the lines meet at both sides of the sentiments.

Time ran out for me, but Freaky Girl also has a friend. I call him Freaky Boy and I can't wait to color him for some little boy cards. If you click on that link at the beginning of my post, you can see Freaky Boy in that bundle of stamps that EP is offering. Oh boy, did I have some freaky fun stampin' up this little girl, she's SO dang cute!!

Okay friends, I've got to pack up my final stuff for CHA....then vacuum and dust (do you clean before you go on a trip?)......and do our Town Tuesday stuff before I head to Dawn's tonight......hair cuts, guitar lessons, pick up Jordan's new contacts.....oh, and go to McDonald's to see if Josey's new Itouch picks up the free WiiFii there. Priorities ya know. :) Have a great day. I'll be taking photos but won't be able to post while I'm at CHA. Maybe Nichole, Debbie, Dawn or Pine will though so be sure to check their blogaroonies. Later girls!

July 27, 2009

A cupcake wedding card...

My cousin's bride to be loves cupcakes. She bakes gourmet cupcakes and takes them to work almost weekly. After finding out that their wedding colors are pink and brown, I thought a cupcake themed wedding card in those sweet colors would be perfect. I paper pieced cupcakes using Papertrey's Cupcake Collection stamp set. By adding a little shading with a pink Copic marker on the cupcake liners and popping the frosting up with pop dots, the cupcakes take on a realistic look. Glitter finishes off the frosting for the festive occasion. The cupcakes are resting on a Spellbinders Labels Three die template, with a brown marker outline made while the die was still on the white cardstock. Two little hearts from Heart Prints float above the cute cupcakes.
Sentiments from the Cupcake Collection are along the bottom of the card. Sweet Blush Swiss Dot ribbon and October Afternoon patterned paper finish off the card front.
I made a custom sentiment for the inside of the card from Heartfelt Basics and a $1 alphabet set (cupcakes). I think it's perfect for this cupcake themed card. I think the cupcake loving bride will think this card is sa-weet!

July 25, 2009

Cucumber Salsa

Edit: You can read about Rotel HERE. It's a canned good found with the canned tomatoes. It's chopped tomatoes and chilies....with different levels of heat. Have you guys never had classic Rotel dip with Velveeta in the crock pot??? Salsa mix is in a pouch and is a dried mix of spices and dried vegetables. You mix it with tomatoes. Look in the canning section or possibly the aisle with all the packets of dried mixes. Someone asked if you could substitute tomatoes...sure, you can switch up the recipe any way you like. :)

Another question about envelopes......no, I don't make my own. I use Papertrey envelopes and recently my local scrapbook store has started carrying colored envelopes. I usually use the A2 size. Hope that helps.

I love collecting and sharing...and tasting....new recipes. I'm always on the look out for new recipes so I was very, very happy when my sister Karen told me about her Cucumber Salsa. I have picked buckets of cucumbers so far this summer and was in dire need of a recipe other than cucumbers and onions splashed with vinegar.

Cucumber Salsa to the rescue! I immediately tried the recipe and it was a hit! My sister warned me that everyone would want the recipe when they try it. Yep, it's true...I've already given the recipe to my mom and Eric's aunt.

Since it was a definite *keeper* recipe as we call them, I just had to make a recipe card. And Just Rite has scored big time with me with their new stamp set called Preserves Borders and Centers. The little basket of goodies that I colored with Copics has peppers, onions and cucumbers peeking out, perfect for my Cucumber Salsa recipe! The borders that go with the Preserves set are fabulous too. These stamps also make the cutest tags. I could easily see this being made into a tag to tie onto a basket of fresh garden goodness. Or in my case, I could slap it on the Walmart sack filled with veggies that I send with Eric every day to work. ;)

For the rest of my card, I used patterned paper from a new division of Daisy Bucket called Shabby Green Door. My local scrapbook store, Scrapbooks, Etc in Topeka, Ks, carries the goodies along with the Just Rite stamps. Recipe is printed on grid paper from Papertrey Ink (see left sidebar for recipe fonts). I used a Copic black multiliner to outline the recipe portion. Image is cut with Spellbinder's Circle Nestabilities die template and layered onto a Spellbinder's Picking Nestabilities die template. Here's the recipe for you to copy/print. Note: The salsa mix comes in a variety of brands. You can find it in the canning section at Walmart or possibly in the aisle with the dry mixes. I added a few extra cucumbers and some fresh tomatoes to mine because my salsa mix was pretty concentrated.

Cucumber Salsa
4 cucumbers (chopped, peeled & seeded)
1 salsa mix pouch (about 2-3 T)
2 cans Rotel, mild
1 Tablespoon dry Ranch Salad Dressing mix
1 Tablespoon sugar
1/4 cup vinegar
1 jalapeno, chopped
1 red onion, chopped
cilantro, if desired

Mix all ingredients together and chill several hours or overnight. Serve with tortilla chips.

Enjoy! I must go make some more of this now. It's best if it sits a while...just in time for me to get more tortilla chips tomorrow while in town.

July 24, 2009

Hen and Chickie

This little Buttermilk Hen image from Karen Lockhart just couldn't be cuter. I always wanted to be like Anna Wight and grow my own chickens but for now I'll settle for this cute little chick. I colored her with Copic Sketch markers to match the colorful Cosmo Cricket patterned paper. This paper is really fun if you want to get a mixy matchy look. I cut and embossed the Buttermilk Hen with a Spellbinder's Classic Circles Nestabilities die template, then layered the circle onto a Spellbinder's Scalloped Circles die template. Papertrey ribbon and buttons finish off the card.
And I just love to pair the Buttermilk Hen with Dawn McVey's cute *Thanks, Chickie* sentiment from Papertrey's Handwritten Notes. A perfect little card to add to my stash basket.
Another busy day planned....prepping for my trip, doing laundry, working in my stamp room, pickin' more cucumbers and zucchini (stay tuned for a recipe to use up some of those cucumbers you have growing out your ears).....entertaining the kids (Jordan and Josey have a great little diner called *Jordan's Diner* set up in the play room......the list goes on. As Dawn would say, *Later Chickies!*.

July 23, 2009

Pack your bag...

Are you taking a trip? Perhaps you're headed off to CHA next week? Hey, me too! If you've been to CHA, you know that you do a lot of walking...and looking...and chatting with friends...and walking...and picture taking, etc. So it's best to carry a light load. The first year I went, a took a rolling suitcase and had it stuffed with company catalogs. But when I got home, I realized that I didn't really need all that stuff. So now I travel lighter and just carry a little over the shoulder bag. If you really want a catalog here or there, you can do what I'm going to do.....stuff it in Dawn, Debbie, Nichole, or Pine's bag and make them carry it. LOL!! Or there's always companies that hand out little tote bags too. ;)

I'm busy working on projects that need to be done before I head out to Orlando next week...and spending time with my precious family....so I thought I'd just show you my bag today. What girl doesn't like to see a good bag right? I got these sweet little number on sale at Eddie Bauer. (I checked the website but couldn't find a link). It was on sale so it might be hard to find. First of all, I'm loving the colors. Kind of an army/olive green with orange.....so Eddie Bauer...and the orange is so hot right now.
The bag has a bazillion pockets and zippers and little compartments. The girls and I opened each little slot and I now have two little red headed helpers that want to help pack my bag for me. What do I carry? Let's see, I haven't made my exact list yet (I'm a list maker when it comes to packing for a trip).......but I'll for have my point and shoot camera, cash, ID's and credit cards, CHA information, lip gloss, small hand lotion, notepad, pen, hotel key card, business cards, gum, tylenol, cell phone, contact drops and who knows what else. I'd love to be able to shove a water bottle in there but that may have to be snuck into Pine, Dawn, Debbie or Nichole's bag. I'm sure they won't mind. ;)
It's tradition that every time I get a new bag for trips, I have to make a name tag. And it has to match and be a artsy and cutesy. I like to use these very hard baseball card collector's sleeves for my tags. They are very sturdy and can be punched with a Cropadile, good luck trying anything else to punch holes in that sucker though.

I used some of my favorite October Afternoonpatterned paper and some ribbon from my stash to embellish my tag. I put *Mish Mash* on the front tag using Papertrey's Borders and Corners Circles stamp set and spelled out my name with a $1 alphabet set.
The back of the tag is decorated with more of the same goodies. The tag has my cell phone number on it...buuuuut I had to hide it from you so that you don't all call me while I'm at CHA. There's lots of booths to look at people, I can't be texting and what not the entire time. ;) Notice all the winkin' going on here. Lots of fun stuff!
Seriously though, if you see me at CHA, come say *HI MISH!*. I'd love to meet you!! I'll be sporting my new green and orange bag....across the shoulder, all cool like.

Now. Someone asked how I pack for a weekend crop without requiring a U-Haul to get everything transported to the scrapping destination. Now don't hate me when I tell you that I take ONE big rolling tote and ONE desktop organizer tote (I have the All My Memories pink and brown one with all the pockets....love pockets).

That's it, no clean underwear or nothin'! Just kidding...but when the girls and I get together for a cropping weekend, it's not a fashion show. We might not change our clothes for two days! And then we might go out to eat in those same clothes at some fast food place. It's all good. It's all about the scrappin' and getting those pages done!

Now back to the packing. How do I only take two bags to a 3-4 day crop? Don't hate me again. I am VERY organized and take a fair amount of time to get ready for a crop. I only do this about twice a year so I MUST be ready to crop right when I sit down at my cropping table.

Here's what I do:
-Get all photos developed and organized into categories.
-Buy giant 13" baggies (or page protectors) and place photos inside...by category,event, etc. You place lots of photos in each bag but be ready to just use 4-5 photos or less. You don't need to scrap the entire bunch to capture the memory. Less is more. Save the rest for something else and file away in a photo box.
-Into each bag: place 2 pieces 12 x 12 solid cardstock (I do 2 page layouts), extra cardstock for layering (I don't layer photos much, takes too much time), patterned paper, ribbon, buttons, embellishments
-Label each bag with a sticky note, notecard, etc...this is the who, what, where, when information or journaling notes you want to remember.
-If you have a layout in mind or inspiration clippings from a magazine, tuck that inside the bag too. Having layout ideas in advance help you get started right away. Bring an idea book..I like Becky Higgins sketches, CK Magazine ideas,etc.
-Place all the page packets in your rolling tote, standing up vertically. Sit your tote right by you at the crop. You are now ready to reach in and grab a bag and get to work. Put unused materials right back in the bag and put all of it away when you get home.
-Place general scrapping supplies in your smaller tote...adhesive, scissors, paper trimmer, cropadile, ruler, etc.
-When you get home, share your pages with the family, and then put them into albums immediately. Don't let them sit around.

That's it. That's what I do. I don't spend time at the crop sorting photos and seaching for papers or supplies to use. I use what I bring, borrow what I need if someone can help out, make a trip to the scrapbook store for adhesive refills, etc. I usually complete 20-40 (12 x 12) pages at a crop. I'm using a new system of *blended* scrapbook pages now so I hope to get even more done at my next crop in November. Blended pages are when you use page protectors that are divided into sections. Sometimes you just drop in your photos and don't do much scrapbooking, other times you save a few sections for some scrapbooked areas. It's a great concept that I'm loving SO much.

Okay, that's all for now...gotta get back to work. Have a great day!

July 22, 2009

Pretty Pumpkins

This year we planted lots of different pumpkin seeds in the viney patch. They're just starting to grow and are the cutest little things. So I was excited when I saw this cute combo from JustRite's new Autumn Blessings stamp set. It's got the perfect sentiment and beautifully illustrated pumpkins. I think it will be fun to send out cards like this with photos of our pumpkin patch this fall.

This week, JustRite is sponsoring the sketch over at CPS. I wanted to play along and came up with the card design below. I used papers from Papertrey and K and Company for the soft orange-y background. If you'd like to play along, just visit the CPS link. You can view the sketch (it's posted on the left side). After you've created your card, you can upload it at the Mr. Linky place listed at the CPS site. Then everyone can click on your link to see your creation. Fun stuff!
I colored my pumpkins with Copic Sketch markers, using the background papers as color inspiration. I die cut and embossed the image with a Spellbinder's Oval Nestabilities die template. I then adhered my main image to a Spellbinder's Scalloped Oval Nestabilities die template. The snippet of ribbon and buttons was added to keep with the theme of card sketch.
The CPS sketches are great inspiration if you're in need for some new ideas. Plus you gets tons of ideas from the talented CPS designer's samples.
Above are the Copic colors I used to color my image.

We got over an inch of rain the other day so I'm anxious to see what's been cookin' in the garden. Nothing like a good rain to make a garden grow! Stay tuned tomorrow...I'll show you my cute new CHA bag with tag........and I'll have tips for packing for a weekend crop (by request). Well I'm off to work in the stamp room on some projects for CHA. Be back soon!

July 19, 2009

Summer Sittin'

One of my favorite things about summer time is just sittin' around, relaxin' and doing everything at a leisurely pace. Now that our ball season is over, it's all about having fun and enjoying the summer days before school starts back up.

I love this metal Vintage Garden Chair image of Karen Lockhart's. My folks have 2 of them sitting right on their front porch and we sit in them every time we visit. I colored the chair image using Copic Sketch markers. I used a fun and flowery patterned paper from Cosmo Cricket for my color inspiration. I stamped the sentiment *the joys of summer* from Papertrey's Day at the Beach stamp set. In the photo below, you can see that my chair is all shiny. I got this look by applying Ranger Glossy Accents to my colored image. Love that look! My image is cut and embossed with a Spellbinder's Nestabilities Circle die template. Base paper is PTI Kraft, edges inked with Fresh Snow.

Are you doing some sittin' this summer? Catching up on any good books? I hope you're carving out some time to just relax and have fun!!

July 18, 2009

Monogrammed Wedding Card

Good morning all you lovely people. I woke up way too early for a Saturday. Eric was clanging around in kitchen fixing his usual Saturday morning eggs. Today we have Eric's cousin's wedding to go to. The girls are the guest greeters/gift takers and will be sporting long dresses in lemon color with a scarlet ribbon around the waist. Josey is not thrilled about wearing this dress, after all it is not a t-shirt with a sports logo on it and long sports shorts. She'll live though. The gang all went to town for something or other but later on I'll be removing the blue toe nail polish and painting little piggies with a more wedding appropriate scarlet color. Then it's on to doing the girls' pretty red hair. Josey informed me that the girls' have never been to a wedding!! That never even dawned on me before, how did that not ever happen?

Anyway, I made a wedding card to go along with my other gifts and thought I would share it today. My color choices match the wedding colors, I used Lemon Tart and Scarlet Jewell paper and accessories. This card really shows how you can mix and match your stamp sets. For the base card I used Polka Dot Basics II, Life and Heartfelt Basics. Kind of an eclectic card but not too overwhelming. Then for the focal point of my card, I used a leftover monogrammed circle using the couple's initial from their last name. Underneath it, I used my favorite loopy circle from Borders and Corners Circles to add some oomph to the monogram. I then tied my card with pretty ribbon in Lemon Tart. Vintage buttons in Scarlet Jewel and Lemon Tart were tied with Rustic Cream Twine and placed randomly on the card front. Now I've got to go find a matching gift bag to package all my gifts, including my two monogrammed card sets I made this week. Often times for gifts, I like to attach the wedding card right to the front of my packaging...especially cards like this that match the wedding colors so well. You always know that your card is going to be one of a kind when you create it yourself.

Well, I'm off to iron our wedding outfits and then go see how many cucumbers multiplied last night in the garden! Have a great weekend everyone!!

July 17, 2009

With Gratitude Cards

Hi everyone, are you ready for the weekend? I wanted to make one more set of cards for the wedding couple this weekend and this time I reached for some Papertrey stamps. I used Lisa Johnson's Life stamp set, Spiral Bouquet, Trajan Monogram and Borders and Corners Circles. My color inspiration came from the wedding colors which are pretty close to Scarlet Jewel and Lemon Tart. I used Scarlet Jewel for my base card, monogrammed accent and sentiment....and Lemon Tart Bitty Dots paper for the strip across the front and the Life flowers. You can zoom in on the photo above to see the Life flower portion of the cards.

For the monogrammed accents, I stamped a monogram letter *T* from the Trajan alphabet stamp set inside a circle border from Border and Corners Circles. I experimented with a Spellbinder's Classis Large Inverted Scalloped Squares die template. I love how you can get a whole different look when just a portion of the die cut shows through. I packaged my cards in a clear stationery box and tied it up with coordinating Lemon Tart Swiss Dot ribbon. A Scarlet Jewel button and Rustic Twine accent the tied bow.
I think personalized thank you cards make great wedding and shower gifts. Every bride has those special little notes she likes to send out......and they're even more special when it has the new initial of her last name.


Okay, wedding gifts done......check! Off to make more zucchini *somethings*. Enjoy your day!! And Happy Anniversary to my mom and dad!!!!!!!!!!!!

July 16, 2009

Monogrammed Stationery Set

JustRite Stampers is releasing some brand new products....and to celebrate, we're having a blog hop. For my projects today, I chose the Wood Stamper 1-3/16" with Bonus Damask Centers and 60 pot Font set to make a monogrammed stationery set of cards for a wedding gift.

I started out by selecting some Crate Paper patterned paper that coordinated from one set. I adhered my patterned paper to 4.25" x 5.5" cards fronts. Next, I stamped a monogram initial from the alphabet set and a border that comes with the damask/monogram alphabet stamp set. This set is a a very simple and classic set, perfect for creating stationery sets and monogrammed gift items. I then stitched some cardstock pieces with my sewing machine and cute some PTI Ripe Avocado ribbon into banner shapes.
I then assembled all my notecards to create a very handsome stationery set.
The monogrammed circles were adhered to scalloped punch Kraft circles and adhered to the card fronts with pop dots. I don't know a bride who doesn't love to show off her new last name. I think monogrammed cards make a great wedding gift!
I packed up the stationery set, which includes envelopes, in a Papertrey clear stationery box. I added a leftover monogrammed circle to the box front then fancied up the package with ribbon and a tied button. A perfect little gift for the new couple. There's lots more to see from the other designers but I wanted to mention the JustRite Christmas blog hop coming up in August. Stay tuned for more great products from JustRite!!

July 15, 2009

July Papertrey Releases and more...

Questions about Basic Grey stamps: I checked my new stamps and there is no specific stamp name, etc...they were $1.95 each and said *value* up in the corner..kinda like the $1 stamps we see everywhere. I too checked the BG website and did not find them. My local scrapbook store had them displayed with the new Lemonade collection of papers and accessories. I would inquire about them at your local scrapbook store or favorite online store that carries BG.

Hi all! I hope had fun shopping last night with Papertrey. There were some awesome sets and products released this month. Here's a few more of my projects:

A French Country themed card using In Bloom, Kraft cardstock, Vintage Buttons, Rustic Twine, white embossing, Polka Dot Basics II and ribbon colored with a Copic marker.
A little paper piecing and some grey shading with a Copic marker for even more dimension.
Here's a little card set using Mod Squad and some monogram letters.
Love how the circle punches worked so well with this image.
And a little shopping I did yesterday at my favorite local scrapbook store, Scrapbooks, Etc in Topeka, Kansas. THE nicest gals you'll ever find. Although I'm sure that Jackie was hiding new product from me and then called and left a message for me AFTER I got back home....almost an hour away. Just my luck. ;) I did leave with this little bundle of new goodies from Basic Grey (paper and stamps). Found some matching envelopes and a new Fiskars punch that I've been wanting for a while. Can't wait to play in my stamp room!

But first I have bizniss in the kitchen to take care of. Mom's coming over and we're going to can up some hotdog relish. It's my all time favorite relish. But don't even ask for the recipe because there's no way I can decipher her recipe unless I have her totally re-write it for me. I need to have her do that some day. I have oodles and oodles of cucumbers so I got about 20 of those used up today. Next up is what to do with all this zucchini!! Later gaters!!

July 14, 2009

Lockhart Cupcake Cards

Edit: You're right, it's Cosmo Cricket, not October Afternoon patterned paper. Thanks for the heads up. And for coloring, I use Palette Black Noir ink.

I'm loving this new Cosmo Cricket patterned paper. The colors are vintage like yet are so vibrant too. I thought it would be fun to pair the papers with Karen Lockhart's 3 Cupcakes stamps for some fun new cupcake colors. When you click on that red link, you can view all of Karen's collection of cupcake stamps..cute!I used Copic Sketch markers to color in my cupcake images. By using the pointy tips of the Sketch markers, I was able to add polka dots to the background and image border.
I finished off my sweet cards with Papertrey Vintage Buttons tied with Rustic Twine, Papertrey sentiments from the cupcake stamp set and glitter on the cupcake frosting.
I left the insides of my cards blank. This way, I can use the cards for general greeting cards instead of just for birthday cards. Into my stash these little cuties go.....I may have to pull them out for my own secret stash cuz I think they're so adorable. Have a SWEET day everyone!!

Oh, and click on Karen's link to see her latest summer release of stamps! I can't wait to use the rocking chair with the quilt. *gasp*

July 12, 2009

Out to Sea....come along with me

Edited to answer a question: I don't put my little cards in envelopes. They will fit into a standard A2 size envelope or you could slip them into a Papertrey Glassine Sack. I think they're cute enough that they don't need a envy. :)

Are you all enjoying the Papertrey count down this month? There are some GREAT new sets and products being released this month. Nichole is counting down to release day, so be sure to check out her blog to see what's cookin'. Today I'd like to show you some samples made with the new set called Out to Sea. Papertrey cruise attendees received this set and now it's available to everyone!

I started out with a birthday card which would be perfect for big or little guys. I stamped and paper pieced images from Out to Sea onto a punched, scalloped oval. The *Ahoy, Matey* sentiment and stars from Out to Sea, and a birthday sentiment from Birthday Basics were stamped onto a Kraft piece of cardstock that has been machine stitched, layered with Scarlet Jewel cardstock and finished off with tied buttons. Men of Life patterned paper, which has the cute little anchors, Enchanted Evening ribbon with twine ties, and polka dots from the awesome new Polka Dot Bascis II set finish off the base card. And if you think it's too girly to add ribbon to masculine cards, zoom in to check out idea on my card. I tied two long pieces of Rustic Jute Twine around a strip of Saddle Stitched Enchanted Evening ribbon.....nothing too girly about that at all.And if you're like me, I like to experiment with all the different images in a new stamp set. Here's a fun way to do just that. Punch scalloped ovals using the Giga Marvy punch. Stamp images from the Borders and Corners: Ovals stamp set using Scarlet Jewel ink.
Play around with various stamp image combinations. I used Scarlet Jewel and the new Enchanted Evening ink. Dress up the images with Spring Rain and Enchanted Evening Vintage Buttons tied with Rustic Jute Twine. Adhere the scalloped pieces to 3.25" x 3.5" pieces of stitched Kraft cardstock, inked with Fresh Snow on the edges. Anybody watch Gilligan's Island? Remember when Skipper would say to Gilligan, *Hey, Little Buddy*?
Add some stamped and computer generated sentiments to strips of Men of Life patterned paper and adhere to cardstock fronts. Finish off with various types of Enchanted Evening ribbon. YESSSSSSSSSSS, it's the new color this month! ;)
Put 'em all together and you've got yourself a nice little batch of single layer cards.
Perfect for lunch boxes, little love notes for the dear hubster, thank you notes to slip in a batch of fresh baked cookies......or tie one onto a package of Chips Ahoy chocolate chip cookies......or a package full of Life Savers. You can even adhere to them to full size cards later on. I love having a little stash of these cards in my basket, they come in so handy.

Thanks for visiting today.......and be sure to stop by Nichole's blog to see more samples.
Related Posts with Thumbnails