Showing posts with label Journals. Show all posts

June 5, 2012

My Pieces of Me Kit...

This Summer I've decided to cut down a bit on my work schedule while the girls are home from school.  I plan to do two things in particular....spend quality time with the girls and spend more time working on some "just for fun" projects for me.  

One of the projects that I'm particularly excited about is Maggie Holmes' Pieces of Me workshop that's currently offered at 2Peas.  It's theme is centered around creating a mini album that is all about YOU.  Little bits and pieces about who you are and what you love.  I sat down this morning and wrote two full pages of things I want to include in my album. There is a kit that 2Peas is offering to go along with the workshop but I opted to design my own using items from my shop.    I offered some of my kits up in the shop (sold out now) and you can see the details and fun inspiration photos in this post.  Here's what my main kit looks like:  
My album will be 4 x 8 and I'll be using lots of Instagrams  and typed lists.  As you can see in the main kit photo above, I chose a color scheme of soft robin's egg blue, a peachy orange, olive green, cream/white and Kraft + grey.  I decided to add to my main kit with a few other products I chose after I shopped my own stash of goodies.  I'm placing all my supplies in this wicker tray and will keep it out on table #2 in my work room.  My plan is to dabble with the album and work on it here and there.
Here's some of the supplies I've added to my main kit.  Spray mists from October Afternoon and Studio Calico.  I want to experiment with my supplies and see what fun techniques I can try.  Big splatters and masking is on the list.  
While shopping my stash, I reached for some of my favorite items.  Vintage button cards are high on the list.  I'll use baker's twine to tie individual buttons that are from the main kit.
Washi tape is a new obsession.  3 whole stacks that have colors that coordinate with my kit colors.  Love this stuff..
Small tags and die cuts to use for journaling or to layer small embellishments.  Love these from Banana Fish Studio.
Sacks of all kinds from my shop + little coin envelopes, etc.  These are perfect for tucking in receipts, journaling tags, extra photos, etc.
Little buttons and baubles that I hand picked from my stash.  I selected a few favorites that I've been hoarding.  Wood buttons are becoming a new favorite embellishments.  I see a trend developing with lots of wood items.  Or maybe I'm behind and just now noticing.  ;)
Tags and more tags for journaling.  I want to experiment with more layering and stitching on tags.  My sewing machine should get a work out for sure.  I'll also be using lots of my Grid Labels that I'll run through my vintage typewriter.  My handwriting is large so the typed journaling helps save space.
Vintage trims of all kinds, including laces, ric racs, pieces of old doilies, circles cut from cutter quilts, velvet trim, seam binding and more.  Definitely pieces of me.
Embossing powders.  These always get stuck in the corner just like Baby but I'm hoping to experiment with some fun techniques.  I thought these colors were just perfect for my album.
And last minute I realized that I'll need some more page inserts.  I reached for lots of neutrals + a few new My Mind's Eye Indie papers that I just picked up at Archivers last weekend.  I just shuffled them all together and will select papers randomly.  Lots of the patterns will be covered by the Instagrams and embellishments so I'm not worried about patterns being too bold.
And that's a wrap.  I tucked everything in my basket and it's ready to go.  I took some time last night and watched all of Maggie's videos and looked all the albums from the class contributors.  Way to represent, girls!  Awesome class and I highly suggest it if you're looking to do a little something for "just you".  

Note:  I've several emails for requests to re-stock my Summer Cottage Kit.  I'm sorry but I just don't have the albums, etc to recreate full kits.  But if you look at the top photo of today's post or go to my original post about my kit, you'll see that there are tons of items from my shop that are available as individual items.  You could easily stock up on tags, etc and make up your own kit in no time.  
I'm hoping to report my progress if it's something you'll be interested in.  Just let me know by leaving a comment....let me know if you're taking on this project, how you planned your album, what you plan to include.  I'd love to hear from you.  

In shop news:
Thank you for the Washi love, I'm ordering new rolls with every batch but if there's some in particular that you'd like a repeat of just let me know.  Also, look for a brand new batch of sacks coming soon.  I am fresh out of everything and have had lots of requests.  You got it!

Have a great day everyone!

May 30, 2012

Summer Cottage Mini Journal Kits

SOLD OUT KITS: The kits are now sold out in the shop. I've been asked if I can make anymore. I'm sorry to say that I don't have enough of the supplies on hand to do so. Most of the tags that I used are available in my shop + look for a few extras of the stamps to go up in the shop later today. Perhaps you could piece together a kit of your own making. Thanks so much to everyone who ordered a kit, enjoy!

I have something to share that's just been waiting for Summer to arrive. Each Summer when the girls are out of school I dream of a lazy days with lots of relaxing and doing lots of whatever I want. In reality my summers are not like that at all. They're full of work, ballgames, practices and lots of crazy girls running around our home. While I love all that, a girl can dream of that beautiful Summer cottage, tucked away in a far away spot. And so came about the idea for my Summer Cottage Mini Journal Kits.

Please note: I have taken time to provide the Pinterest links for each of the photos I used in my collages below. If you would like to pin a photo, please pin from the photo links provided below each collage (and not the actual collage) so that the proper credit is given to the original poster. :)

If I could have my own Summer cottage it would be reminiscent of the photos below. A place to hide away and call my own. Lots of little nooks to relax in, fresh picked bouquets everywhere and maybe a stack of books that I've been wanting to read........

Perhaps I'd write some letters or even a book, plan a little party out in the meadow, or have a little picnic for two.....

I'd be surrounded by beautiful things I love. Perhaps I'd ride my old bike into a quaint little town. Or maybe fire up my favorite old truck for a day of junkin'.

What would be your idea of a favorite Summer cottage? Whatever it may be it's fun to dream, right? Or maybe you do have a Summer cottage that you call your own. My Summer Cottage Mini Journal Kits are designed to hold all those picture perfect photos and mementos in one little spot. Use the journal to jot down your thoughts, add those little Instagrams.....photos from your garden or favorite spot on the porch....whatever your heart desires.
I've selected my favorite Summer colors for this kit and there are oodles of papers and embellishments tucked inside. Lots of tags, punched woodgrain pieces and a full roll of Washi tape from Freckled Fawn.
My favorite colors of mossy green, light aqua, sherbet orange and grey all come together. You'll have lots of fun using the 2 stamps from Banana Fish Studio. I'll show you how to use them in an informational post coming soon.
Use all the tags, lined cards, Grid Labels and more for journaling or to create your own accents. The Grid Labels are fun to run through a vintage typewriter...or stamp on them.
I've included a few stamped pieces too along with a Library Card, index tab punches, buttons and more.
I pulled out my stash of vintage sequins and buttons and plan on showing you soon how to make a beautiful layered butterfly to adorn the cover of your journal, perhaps. You must zoom in on the woodgrain pattern, it's so detailed.
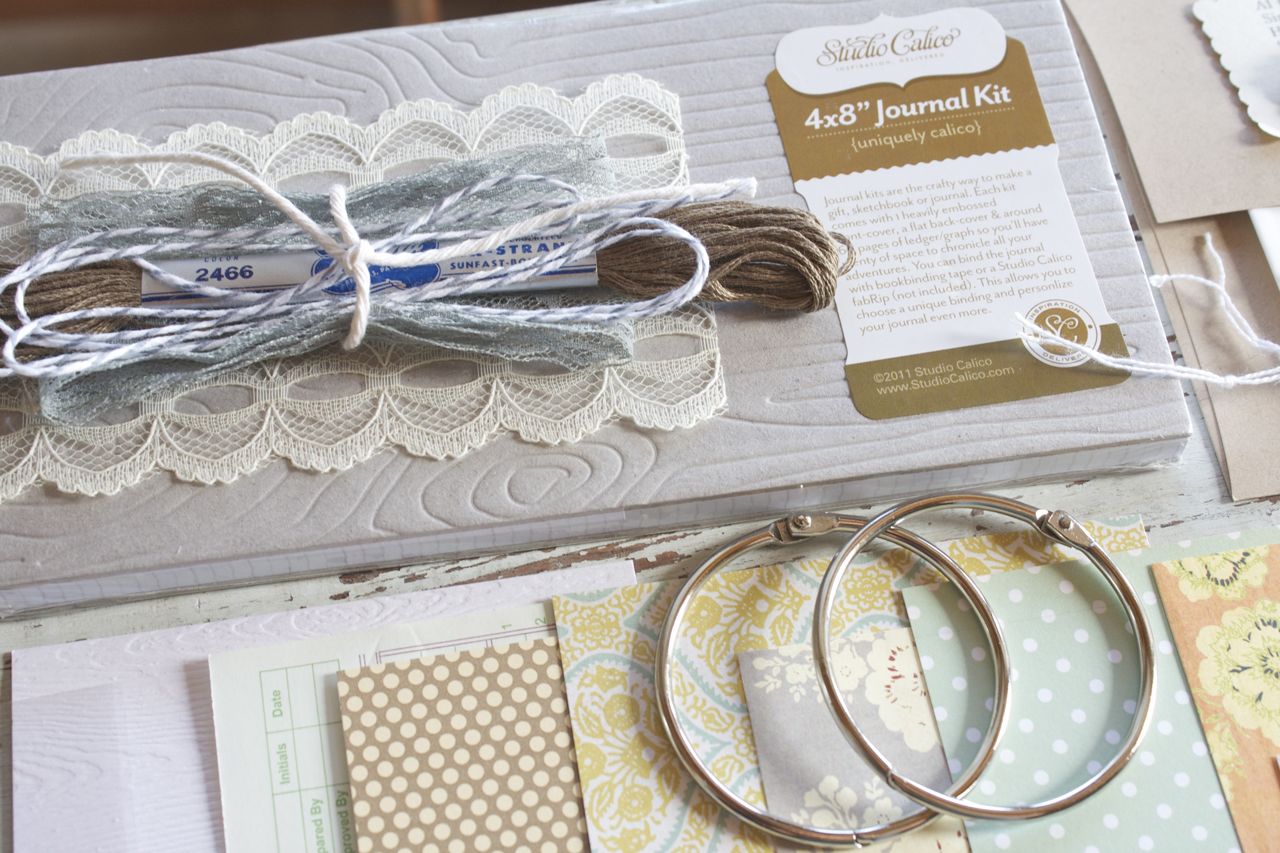
You'll receive a 4 x 8 woodgrain, chipboard journal. It's full of copy weight grid paper inside, perfect for creating a journal or diary of sorts. I've also included a bundle of vintage lace, a full skein of embroidery floss, and baker's twine to add a homespun feel to your pages. There are 2 giant 2" binder rings so that your journal can grow and grow this Summer. None of the pieces are punched but if you have a Crop-a-dile or regular hole punch, that will do the trick.
The kits are in the shop now and are in very limited quantities. They're going quickly already. I'll be back for lots of fun posts using this kit so stay tuned. I'm planning on using my personal kit for Maggie Holme's Pieces of Me class which is being offered at 2Peas. Kits will start shipping on Thursday in case you need one quickly. :) I'll be gathering up a few more items from my own stash to add to my kit and will be sharing those photos soon too. Lots of fun to come!
Thanks so much for stopping by and Happy Summer to you.

Note: Shipping boxes Internationally always involves a certain amount of guess work. If you order and your shipping is way high, I will be happy to refund a portion of the cost back to your PayPal account.

October 6, 2011

Holiday Journal Kit Sneak Peek

THE KITS ARE NOW SOLD OUT FOR THIS YEAR. THANK YOU SO MUCH FOR YOUR ORDERS.

Etsy shop update: Holiday Journals will be going up in the shop shortly in very limited quantities. Kits will ship late October.....once the kits are gone, that's it for this year's Holiday Journal. :) Please check out the new bags and coordinating tags in my first post today. Lots of goodies to help you with your packaging needs.

Hi there. I'm adding on to my original post about my Holiday Journal Kits. I have two more sneak peeks for you today. This photo features some of the little tags, stamped pieces, Washi tape, a skein of embroidery floss, a cute chevron bag + more of the Crate Paper pages, etc. I'm still creating and adding new items to the kit daily. You'll receive a nice selection of goodies to embellish your pages with. Album size will be 6 x 6 with two binder rings. Album will not come with hard covers so that's something you might want to think about, and I'll try to remember to show you my simple solution in an upcoming blog post.
And here you can see a sampling of the wonderful Elle's Studio products that you'll be receiving. You'll get a full sheet of numbers (1-31) so you can easily do a December Daily countdown for each page. Plus you'll receive 2 Christmas Lil' Snippets sheets + more round journaling tags + Christmas strips. Lots of Elle's goodies in this kit!
Blog posts to come: I've gone back and forth on how much to assemble on the journal pieces. I've decided to keep all the pieces and parts separated so that you can have as much creative freedom as you need when putting your albums together. We all have our different design styles and sizes and qty of photos we like to use so I wanted you to be able to assemble your journal as you wish. I'll be updating my Holiday Journal weekly and will be doing blog posts showing you tips on how to use different pages/elements from the kit. Please join me for a month of fun, starting in December. I'll have a blog post before then showing you my ideas for basic assembly, photo ideas and more. :)

My previous post:
Tis the season for thinking ahead to the holidays. With my recent love of creating mini albums, I've a got a Holiday Journal in the works that will be perfect for documenting your holiday season this year. The journal will be just the ticket if you follow along with Ali Edwards' December Daily event.

I wanted to create a Holiday Journal that would be holiday-like in style...but I didn't want it to scream Christmas red & green. So I searched until I came up Crate Paper's Peppermint Collection of patterned papers and accents. The colors and patterns were just what I was looking for. They definitely say holiday but the mixy matchy colors and paper patterns are generic enough in nature to work with every day events that happen in December also. To get a better view of the wonderful papers I'll be using, click on this link.
(image from Crate Paper)

So here's some sneak peeks of the kit contents so far. These photos show only a snippet of the kit contents. I'm working on lots more embellishments, all with a homespun flair. There will also be lots of tags and such from my Etsy shop + those new bags I had in my shop recently + lots of my ledger paper love + stamped goodies using Papertrey + Ali Edwards stamps.

Sneak peeks of Holiday Journal:

Ledger paper + airmail envelope + skein of embroidery floss for hand stitching + paper doily + assorted Crate Paper stickers.
More 6 x 6 patterned papers + stamped embellishments + vintage playing card + sampling of Washi tape.
Crate Paper journaling card + tags + trims.
Homespun garland embellishment + more tags + stickers.
Stitched notepaper bag pocket + stamped index card.
Sheet music + index dividers with tags + hand stamped embellishment + clips.
Cute, red chevron bag + small tags.
Misted envelope + stamped tickets + metal rimmed tag.
Coin envelopes + stamped embellishment + stamped index card with dates.
More Crate patterned paper + misted envelope using Studio Calico mask + snippet of Studio Calico fabRips.
An entire sheet of Elle's Studio Layered Number Cut Outs + more of Elle's Christmas Tags.

(image from Elle's Studio)

There's lots more to come as I will continue to work on the Holiday Journals within the next few weeks. :)

Pre-order details:
-6 x 6 album kit includes pre-punched pages + metal binder rings + embellishments
-also includes number sheet (1-31) to identify each countdown day in December
-full kit photos to be revealed on my blog at a later day
-Holiday Journal kit + any other items ordered as a pre-order will NOT ship until late October; please order shop items separately if you want something sooner.
-Holiday Journal kits will ship at the end of October; specific date will be announced on my blog at a later date
-to order a kit, purchase as a regular Etsy item from my shop.
-price of pre-order kit includes price of kit plus shipping at check out; I will keep track of your orders as soon as they come in
-please ask questions in the comments section or send me a note via an Etsy conversation

August 30, 2011

Gratitude Journal Update....

Hi guys. I'm back today with a new featured called Mish Mish Tuesday.....okay, just kidding. It's not a regular Tuesday feature....but I do think I'll stick with the Mish Mash Monday feature. It's a good way to post about everyday life stuff.

Today I am back though with an update to my Gratitude Journal. This is a great little kit that features over 80 pieces of pages and embellishments. Perfect to document the changing of the seasons, Fall photos, Halloween, Thanksgiving.....or just a journal to jot down your thankful thoughts.
I included a section in my journal for 2010. I did a little Fall photo shoot last year of some pretty trees and flowers and knew my Gratitude Journal would be the perfect landing spot for them.

The Gratitude Journal is 4" x 6" finished size, with lots of tags and smaller items. Since my photos are typically printed at 4" x 6" I used the photos to create the pages. I simply adhered two pages together and then punched two holes. A perfect way to add some bulk to your mini album without adding a ton of embellishments. For most of my pages, I added a smaller tag or journaling piece between two photo pages.
Here I used a Large Manila Parcel Tag as a journaling accent, adorned with a few butterfly accents.
More journaling on the back side of the tag with a few embellishments from the kit + the addition of some Washi tape.
Here, I made a smaller journaling page from patterned paper + a stamped button card for journaling.
And the backside which uses a label from the kit + more Washi tape plus a brad.
With this size of album + the beautiful photos, I don't think there needs to be a ton of embellishments. Just let the photos speak for themselves.
Here I've used a simple White Metal Rim Tag for a little bit of journaling. So many uses for these little tags, I love them.
Medium Parcel Tags like this yellow one are perfect for trying out spray mists. I added a Large White Tag by machine stitching it right to the yellow tag. I've updated my section of tags in the shop..lots of fun options for journaling and and card accents.
Here I've used a November 2010 calendar from Elle's Studio (I think) + the addition of a few accents at the bottom.
An index card is perfect for keeping your journaling nice and straight. I stitched on another Large White Tag and added an accent from the kit.
I'm going to keep my Gratitude Journal handy as I loved adding in the Fall photos. Think I'll do another Fall photo shoot this year + get some good Thanksgiving photos to add in to the 2011 section.

Side note: Little journals like this make me so glad that I scrapbook. When you're right in the midst of making current pages, you don't really think about how significant a few photos might be. It's not until later on.....like me looking at the beautiful Fall trees from last year......that you really appreciate all the photos you take and the memories you are making. I think I'm going to set out a special place to house all of my mini albums. They're just so easy and fun to thumb through.

Have you worked on your Gratitude Journal if you purchased one from the shop? I'd love to see your creations or works in progress. Just post a link in the comment section of this post. :)

August 17, 2011

Fall journal...recipe page + family page

Hi again. I'm back to show you a few pages from my Fall Mini Album Starter Kit that I embellished. I think it's always helpful to see before and after photos of how you can embellish your pages.

This first page that I embellished is actually the recipe card. Here is the before photo of the recipe card sitting blank in my mini album.
And here it is embellished + I moved the page to be adjacent to a more golden page.
This is a recipe that I always fix for family gatherings. The kiddos go nuts for this sweet & salty party mix. The typing was done with my vintage typewriter. You could easily hand write the recipe or print the recipe and adhere it...or get really creative and figure out the spacing and run the actual recipe card through your printer.
For adding details to the recipe card, I always look at the blank spaces that are leftover after the recipe is printed/typed. I used a ribbon + paper accent to add little notched strips to my recipe card. I then stitched around the entire card with brown thread using my sewing machine. Lastly, I used a little embellishment from a sheet that was in the kit to top off the card.
Now on to my next embellished page. A few posts back I showed you embellishments(shown below) that I made for my mini album using the new Gratitude Journal stamp set from PTI.
Today I'm going to use the butterfly button card that I created and add it to the back side of the recipe card. This is my completed page below. You can see that the stitching from the recipe card shows on this back side. I used that to my advantage instead of covering up the stitching. The stitching now is part of this page design.
I fancied up the butterfly button card a little bit by adding more ribbon from the kit + 1/2 of a punched cork label + a tied button from the little doodad sheet from the kit. I did a little stitching around two sides of the button card and left the ends a little long when I trimmed the threads.
A few splatters of Studio Calico Mr. Huey ink and my embellished page was almost finished. I used a little clip from the kit to accent the top of my page. It nestled just perfectly into the cut edge of my patterned paper.
For the page adjacent to this butterfly button card page, I'm planning on adding a 4 x 6 photo from our Thanksgiving dinner this year. Using the other 1/2 of the punched cork label that I used on the butterfly page I stamped the word *family* using my Hero Arts mini letter sets. To mix up the look of the word, I usually stamp my consonants in all caps and my vowels in all lowercase. Oh, how I heart these little letter stamps.
So here are the two pages side by side. The page with our family photo is actually an index divider page that comes in the kit. The plan is for my photo to be adhered to the page that measures 4 x 6, with the exception of the little tab that will stick out.
So that my photo will fit under the embellishments I'm using, I stitched the circle with the number 4 (for the # of members in my family) only on the tab part. The photo will be able to slide right under the circle embellishment. As for my stamped cork piece I will stitch that to the top of my photo (like shown above) after my photo is in place. In the meantime I'm using a small glassine sack to hold my cork embellishment until needed. I simply punched a hole so I could add it to my mini album and then sealed the end with some cute washi tape.
I hope you're inspired to create your own little mini album to celebrate the upcoming Fall season. My kit can be used for general Fall photos like leaves and trees and pumpkins...or it can become a gratitude journal...or a Thanksgiving mini book. So many possibilities. Mini albums are so much less intimidating than full blown scrapbooking. If you're new to scrapbooking but have been itching to give it a try, go for the mini albums. Kits are still available in the shop plus take a look around for other little tags, clips and tickets to add to your pages. Enjoy and thanks for stopping by!
Related Posts with Thumbnails