October 31, 2009

2009 Photo Finish Holiday Cards

We all love to send photos with our holiday cards. And I love to receive holiday cards that have a photo tucked inside too. Nichole has challenged the Papertrey gang to go one step further and incorporate the photo within the design of the card.

For my card, I used a copy of an old photo that I found while taking an Ali Edwards online scrapbooking class. The photo is of my siblings, me and my cousins. We always got lined up from shortest to tallest just as the photo shows. I'm going to make cards for all my siblings this year like this...I know they'll love to reminesce. I drew my color inspiration from the red, blue and green colors in the old photo. For the base card, I used Kraft cardstock and three strips of patterned paper. The green and blue papers are from the Friends Til The End collection and the red paper is from the Green Tea Leaves collection. I stamped the tree from Pine's Holiday Tree in Ripe Avocado ink then stamped on polka dots in Pure Poppy and Enchanted Evening. I added clear sequins to add some sparkle.
Because I stitched around my top layer of the card, I wanted to cover up the stitch lines on the inside. I cut a piece of Pure Poppy cardstock to fit and then punched a scallop edge along one short side, using a Fiskars border punch.
It gives a nice finished edge to my card...and on the inside, it leaves a place for me to attach this year's family photo. I can stamp or write my holiday message on the right side.
I hope you give this fun idea a try! For more inspiration, check out the other Papertrey girls' blogs:

Nichole Heady
Becky Oehlers
Heather Nichols
Lauren Meader
Lisa Johnson

The Office Kits...an update

Happy Halloween...just a quick note......The Office Kits sold out in like two minutes! Thank you for your orders. If you're in my Etsy shop looking around for an item, always check the sold items. If you see the item there but not in the regular shop section, then that means the item is sold out.

The big question.....will I have more? I hadn't planned on it......BUT I scored some more little boxes. So the answer is YES!!!!!!!!!! I'll announce the date here on my blog just as I did before. That worked out pretty well! When? I dunno yet.

Will I have more tote bags? YES. When? I dunnu yet, it will be a while for them. :)

Gotta run for Halloween fun! Later!!

Halloween Treats 2009

Happy Halloween!! It's one of my favorite days of the year. All the ghosts and goblins come out on this spooky night. The moon shines through the swaying trees, casting shadows on all the trick or treaters. The crisp cool air nips at your nose and the fallen leaves rustle under your feet.

I made lots of goodie bags for my girls, my nieces and nephews and some friends.
Very simple treat sacks, wrapped with a strip of patterned paper and tied up with a black and white checkered ribbon and circle tag. Letter stamps are from Hero Arts.
Super simple glassine sacks filled with a few candies and tied up with more checkered ribbon and a tag from Papertrey's 2009 Halloween Tag Collection.
The girls' treat sacks with the Papertrey tags I made a while back. Tags are attached to gift sacks with covered clothespins...one of my favorite things!
And a special little treat sack that I mailed to my nephew Nick. I used the one eyed monster from the Eek a Monster set from My Cute Stamps on the tag. That little monster is so cute for Halloween. I stamped the monster onto kraft cardstock, then stamped it another time onto patterned paper....cut it out with fine tipped scissors and adhered it to the tag. I made easy work of all the circle tags by using my Spellbinder's Circle Nestabilities die templates.
And this stole the show.......a 4 pack of Jones Soda in Blood Orange flavor. Of course, nothing ever happens at our house without drama. Josey stuck her first bottle in the freezer. I told her not to leave it in there very long or the bottle would break. She did just fine. Then Jordy comes along and wants to put a bottle in the freezer so hers will get nice and cold. Again, I warn her to not leave it in there very long. Well, the next morning I hear Jordan open the freezer and she says *uh ohhhhhhhhhh*. Sure enough, she forgot and left her bottle of pop in the freezer all night. Both ends blew out and now there is broken glass everywhere in my ice maker. Nice.
Well, I hope you have a spooktacular Halloween day! We're heading to town to get a few last minute supplies and groceries. Tonight my dad is taking the girls and a few of their friends on a hay rack ride through the country.....it will be chilly so we'll have blankets and hot cider ready. Then we'll have nachos and caramel apples before we head out to trick or treat. Oh and now I have to make donuts. Our lady that always makes the donuts isn't doing it this year...I have to carry on the tradition!

Tip for easy donuts: Take canned biscuits and cut a hole out of each biscuit with an apple corer. Fry biscuits in a little oil. Dip in cinnamon/sugar mixture. Serve hot. Yummo!

October 30, 2009

The Office Kit

THIS KIT IS NOW SOLD OUT.
THANK YOU FOR YOUR ORDERS!!

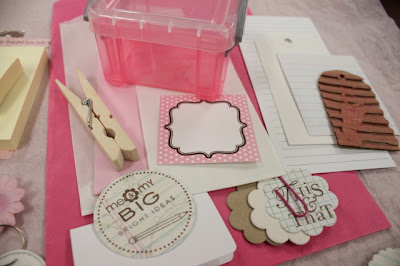
I know a lot of you love office supplies as much as I do. Look at all the goodies below...wouldn't it be fun if your office had fun supplies like this sitting out when you came to work? And the boss said, *Take whatever you want, help yourself?* Just think...you wouldn't have to hoard office supplies and sneak them home in your purse! ;) I thought it would be fun to put together a kit for the shop with an office supply theme. I'm calling it The Office Kit. Catchy name,huh? I picked pink for the main color(you'll see my inspiration in a little bit) and a little bit of brown. There will be flowers and buttons and a bundle of pretty ribbons......
Paper clips, fasteners, metal tags, file folder labels and glittery chipboard accents.......
And my favorite in the kit.....handmade embellishments in the shapes of labels and file folder tabs...adorable little accents all fancied up with stitched buttons, punched patterned paper circles, flowers and more. I've even throw in a few items that I stamped with images from Take Note.
Here's a close up of the handmade embellishments......I love making these little doo-dads so much. You'll be seeing lots more of these in the shop.
And the inspiration behind The Office Kit.....it's these cute little, pink boxes. They're called Really Useful Boxes. All of the tiny items from The Office Kit will be packaged up in on of these.
Fun story: After the girls were feeling better from having the flu, we got really cooped up. So one night I took the girls to town. They each got a Really Useful Box of their own. We later stopped at Sonic for a bite to eat. They girls had to split an order of onion rings (which they hate when I do that)...after dividing the onion rings up equally(can't have an uneven number so I get the leftover)......I looked in the back seat. There was Jordy with her onion rings nestled into her box with a napkin. I chuckled at her and she said *HEY, these are really useful boxes!!*
Below, is the photo of The Office Kit's total content.
I'll have a detailed list in my Etsy shop listing, but it's jam packed full of goodies. You'll get 4 x 4 patterned papers, 2 pieces of flowery fabric to experiment with, punched circles, sacks, sticky note pads, a clothespin, flowers, buttons and tags.........
A Really Useful Box will hold all the goodies...hand stamped tags using Take Note, a tag made of corrugated box scraps that's been sprayed with pink Glimmer Mist, Elle's Studio Tags.........
....my favorite, the little homemade doo-dads. They make me happy just looking at them. :)
And they're all packaged up with a pink and brown ribbon with a Take Note tag......and a pink gift sack. Perfect to keep for yourself or to give as a gift.
And as a bonus, I'll be taking a few items from the kit and showing you some fun samples here on the blogaroonie. I'll be making a fun embellished clothespin and giant paper clip bookmark, perfect for keeping loose notes together......small gift wrap ideas......covered sticky note pads.....cards and more.
Of course you can make whatever you want with The Office Kit, just use your creative ideas. How about taking photos of your office space, co-workers and the building you work in and make a little mini album? Make some gifts for all your co-workers with inexpensive candies and gift wrap. Give The Office Kit to a child who loves office supplies as much as we do, my daughters would love to create stuff for their locker using this kit. The ideas are a plenty, so check back if you purchase a kit. I'll be working on little projects over the weekend between all the Halloween festivities.
The kit will be posted in my Etsy shop later this afternoon.....let's say 4:30 Central Time. I know you all love a little advanced notice. :) Enjoy!!

October 29, 2009

Sip and relax..

Edit: Linda asked if the ribbon that I wrap around the card front shows on the inside of my card....or if I cover it up. I do not cover it up. Many times I stick an extra little note, a check that I owe someone, etc under that little snippet of ribbon. Hope that helps. :)

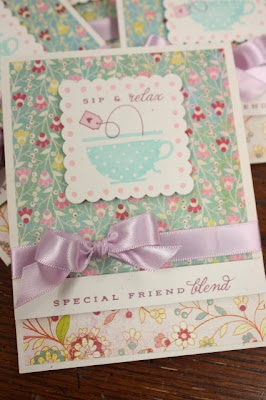
I love the pretty colors of these cards. I drew inspiration from the colors in the Basic Grey patterned paper I used. There's nothing like a pile of finished cards to make me happy. :) I used Papertrey stamps for my images...Tea for Two the sentiments and Everyday Classics(anniversary set) for the teacup.
I finished off the main image with a scalloped square punched that was stamped with a polka dot square border from Borders and Corners Squares. Ink colors I used were Aqua Mist for the teacup, Scarlet Jewel for the sentiment and tea bag and Sweet Blush for the polka dot square border.
For a quirky little touch, I added tied ribbon in Lavender Moon. I love to add those unexpected colors just to mix things up a bit.
It's dark and rainy here today....a perfect day to meet up with a friend....enjoy a cup of tea........and relax. :)

October 28, 2009

Caffeine and friends...

Once again, I've got some coffee themed cards to show you. This time of year I love to keep a stash on hand. For my cards I used JustRite Stampers Just A Little Caffeine Border and Centers stamp set to create my focal image. You'll notice on my stamped circles that I have some inky rings around the rims. I decided to use the center stamp only (not a border) and pressed the stamp into my ink pad. I like the graphic look of the inky circles...and it kinda reminds me of coffee rings too.
I finished off my card by adhering the circle embellishment to a punched scalloped square, stamped with Papertrey's Borders and Corners Square stamp set. Scarlet Jewel ribbon is from Papertrey and cardstock is from Basic Grey.

Hope you're having a great, caffeinated day!!

October 27, 2009

Trick or Treat Banner

Jordan and I did a fun Halloween craft a couple weeks ago before she got sick. Elle's Studio has some really fun Halloween downloads for Halloween banners and treat sacks. I got the Trick or Treat banner and had all the supplies ready for Jordan one day after school. At the link, you can see all of Elle's Studio newest products. There's some really cute stuff I need to order...especially items for my upcoming Daily December Album. The downloads are only $3.99 each, quite a good price...you'd never be able to purchase such a cute banner like this in the stores for that price. And if you don't have time this year, you can always save it for next year. I printed the banner letters out onto cream cardstock and had them cut out...ready to be embellished.
We laid out all the letters and then Jordan went to town with the embellishments. We used ribbons, buttons, epoxy stickers and a packet of K and Company Halloween stickers I got on sale last year after Halloween.
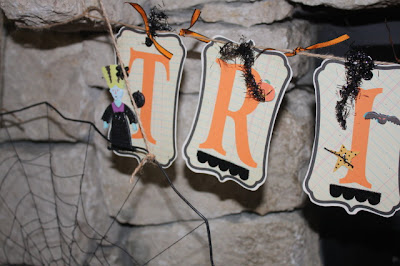
Here's a closeup of a few of the banner letters.
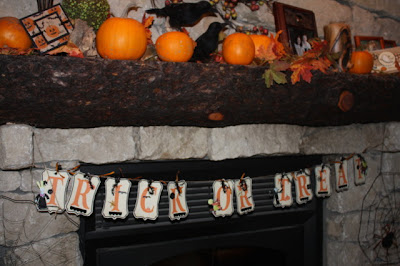
Jordan helped me hang our fun banner across the fireplace.
It's the perfect finishing touch to our Halloween decorating.
A few black crows keep watch on the fireplace mantel....
And we couldn't let our little punkins freeze so we had to bring them inside. :)
Are you all ready for Halloween? Josey and Jordan wanted to dress up as KISS band members but that idea got shot down. I think Jordan will be a vintage witch again this year. Josey has realized that most of her friends she hangs out with don't trick or treat anymore so she's bummed. I guess my girls are growing up....trick or treating has been such a fun tradition for us, I don't know what we'll do when they're too old for it. Maybe we'll move on to making a haunted house or something like that for the girls and their friends. All I know is that this year we're still trick or treating!!!
We always do it the same way...we meet up with Jordan's little friend Nick at the ball park...Eric drives the blazer behind us and keeps hot cocoa ready. Then we head to Debbie's house first, my old bus driver...she has hot homemade donuts ready and waiting. The we take the same route from house to house. I usually walk with the kids and carry a flash light. At one house, the kids walk by themselves down a little lane. It's customary for one of the adults to always be hiding somewhere when they come back. I think they've caught onto it though. Good times, great memories.

October 26, 2009

Tying a bow...

I get lots of questions on how I tie my bows so nicely. No need to reinvent the wheel.....Kristina Werner has a great video and it's just like how I tie my bows:

http://kwernerdesign.com/blog/2008/07/bowtying-made-easy.html

I'm putting a label on this called *bow tying tutorial*. If you need to refer back to it, simply go to the labels section on the left and click on the link.....you'll come back to this post each time.

Hope this helps!!

Kitten in a mitten..

I have been bizzeeeeeee in the crafty kitchen. I whipped up a few of these cutie pie cards using Karen Lockhart's new Kitten Mitten Star stamp image. All you cat lovers will like this one. You can check out Karen's other new Christmas stamps on that same page link. Lots of pretty Christmas colors from the October Afternoon patterned papers.
I pulled colors from those pretty papers and colored my kitten in a mitten to match with Copic markers. Edited for Copic colors: R85, R20, R29,YG25,BG13, W1, W3. Main image is finished with *just for you* Papertrey sentiment, tied button, little pink sequin, and layers of ribbon and scalloped punched cardstock.
Cards are topped off with fluffy Spring Moss bows from Papertrey.
There's a few of these left in my Etsy shop. :) Thanks for stopping by today!
A few notes:
That patterned paper that I used on the Lockhart cocoa card was from Imaginesce. I found it at my local scrapbook store.
At this time, I am not able to fill special request orders for Etsy items. I am planning on keeping the shop updated each week so hopefully you'll be able to snag a few goodies you like. Did you know that you can sign up at my Etsy shop to get email updates? That way you'll know right away when I post something new to the shop. Happy shopping! :)

October 24, 2009

Warm wishes and cocoa...

To everyone: Thank you for your prayers and well wishes for my sweet reds. They are fever free and doing so much better today. We ventured into town for a little change of scenery and some fresh air. They're still coughing and tire easily but they are definitely feeling better. They're also back to fighting with each other and being sassy redheads....so I know they are getting back to normal. ;)

For my mother-in-law's birthday, I gave her one of my signature gifts....the pretty coffee mug with matching place and cloth napkin. She loved it and said that all of the girls at her office would be jealous. You know how important that coffee is at the office. :)

And that's why I like to make cards like this one. Everyone loves cards that have coffee or cocoa on them. They just evoke that warm and fuzzy feeling you get when holding a warm cuppa goodness.
For my card, I used Karen Lockharts Itty Bitty Cocoa and Cookies stamp paired with some sentiment words from Papertrey. I colored my image with Copic markers, adding some grey shadow as an outline. I cut and layered my image with Spellbinders Rectangle and Scalloped Rectangle Nesties Die Templates. Tied buttons, patterned paper and a pretty ribbon finish off my card.
As the colder weather settles in, I find myself brewing up more and more cups of coffee...hot cocoa.... and my orange spiced tea. Yummmm, makes me warm all over. What's your favorite winter beverage, I'd love to know?

October 22, 2009

Red and Cream Holiday Inspiration

Every year come holiday time I find some sort of new inspiration for decorating and crafting. This year I am inspired by the color combination of red and cream/white. I'm in the process of assembling my Christmas Inspiration Station for this year, but in the mean time check out this photo below. I would love to have all those goodies in my stash for wrapping gifts. Or how about this photo below. I could totally turn my old white kitchen cabinet into a Christmas display of red and cream goodies. And look at the stockings....they remind me of illustrations in Jan Brett books.
That total Nordic look is what I'm talking about....lots of homespun goodness, items hand crafted from the heart....all nestled in a cozy cabin up in the mountains. Are you you picturing it now?
Little touches touches sprinkled here and there like the red and white pillow nestled on this comfy sofa below.
And these red and cream quilts totally make me swoon. I have it on my list to make a red and cream/white Christmas quilt some day. I think I'll start by collecting fabrics here and there and then some day sit down and put it all together. I just love the idea of switching out out bedspread to one of these beauties.
And check out the red and white ticking pillow.....and the Kraft colored pillow below with red embroidery..totally makes me think of my friend Pine.
Ohhhh, I bet you're in the mood to craft now before we even get to my project, right? All of those fun photos were from Country Living, Country Home and Pottery Barn. For even more inspiration, check out this magazine spread from an older issue of Country Home...so cozy and homespun looking.

With all that beautiful inspiration, let's see what we can cook up the crafty kitchen, eh? Basically, all you gotta do is pull out red and cream inks and papers...and lots of other mixy matchy embellishments like ribbon and buttons. Look at my little pile of goodies below..I used the 2009 Holiday Tags to create lots of circle embellishments. I simply stamped them with Pure Poppy ink and added punched snowflakes and tied Vintage Buttons. I also had fun experiment with stamping on ribbon. I used grosgrain ribbon and Pure Poppy ink to stamp right onto the ribbon. The stamps I used are all from the 2009 Holiday Tags Collection.
Then I used an E43 (Dull Ivory) Copic Sketch marker to do some solid lines along the ribbon. Love!
Here's a wintry card all assembled using the circle/snowflake embellishment on top of a giant snowflake from Snowfall. I used the Spellbinders Scalloped Octagon die template for a fun shaped background accent. The shape is perfect for the snowflakes.
For a quilty, homespun look I used a Quikutz texture plate with Pure Poppy cardstock then did a double line of stitching. The stamped ribbon makes a nice accent along the bottom of the card.
And here's one of my faves, some very Nordic looking mittens from the Snowfall set. I created them by stamping a round tag from the 2009 Holiday Tag Collection and then paper pieced a portion of the image onto some stamped mittens.
Paired up with another quilty cream background, a Pure Poppy ribbon, cute stamped snowflakes and one of my favorite sentiments from Snowfall......and a few lines of glittery goodness......and this is one cutie pie card.
And these are becoming one of my favorite gifts....wrapped candy bars. 5-1/2"square patterned paper(mine is from the Men of Life collection), some Scor-Tape and embellishments give a whole new look to candy bars.
Look how fancy they look all dolled up with Vintage Cream ribbon, an embellished holiday tag, snowflake punches, a sprig of green leaf ribbon......and lots of glittery goodness.
These would make decorations for your home......just nestle them into a wreath or bowl full of vintage Christmas ornaments.......and then hand them out to friends and neighbors who visit over the holiday season.
Oh, I could just create stuff endlessly using all my red and cream goodies. I should be all set come Christmas time. I hope you are inspired too. :) Thanks for stopping by.

On a side note: Last night my little Jordy collapsed. She has the flu and asthma on top of that so her symptoms are always worse when she's ill. She was out for what seemed an eternity as I scrambled to call 911. She woke up and was disoriented and couldn't see well. We rushed her to the emergency room where they gave her an IV bag of fluids. We were released and got home about midnight. She is doing so much better today and is fever free. Now Josey has the fever though. The flu is in full force here........please take care, drink LOTS of fluids to prevent dehydration and get lots of rest. I hope you all stay well.
Related Posts with Thumbnails