Showing posts with label Spellbinders. Show all posts

May 14, 2010

Big Fun Birthday Card

Hi friends and a happy Friday to you! Isn't it fun to just sit down and stamp? I love to pull out all of my fun stamps, papers and embellishments and just see what happens.

Today I have a cute little birthday card to share with you. I'm participating in JustRite's Friday Challenge sponsored by Spellbinders. This week's Friday Challenge is called KidsTime. And be sure to check out the May sale going on at JustRite right here.
I colored the cute little elephant from Let's Celebrate Decorative 2" Border & Center Set with my handy dandy Copic markers. I love to color elephants pink, they just look so cute and chubby that way. I cut my image and border out with a Spellbinder's Scalloped Square die template. Tied Vintage Buttons were added to the side with some loopy twine.
For the rest of my card I used papers from The Girls Paperie for the background. Along the bottom, I used some of my fun carnival tickets from my Etsy shop, stamped with Papertrey word stamps. I love all the uses for the carnival tickets...this time I thought the tickets and the cutie pie elephant went with kind of a carnival/circus theme. Wrinkle Ribbon in pink was tied around the card. A Tiny Tag with a cute flower stamp and pink sequin finish off the card. The Tiny Tags just add a finishing touch to the Wrinkle Ribbon.
Etsy News: I will be doing a big Etsy shop update by the end of the month, actual date coming soon. I will have more Wrinkle Ribbon colors, all colors of Carnival Tickets, Tiny Tags, Pretty Paper Pouches, Aprons.....and a whole bunch of new items. :) So stay tuned friends! Thanks so much for stopping by today.

January 24, 2010

Valentine Angel

One of Karen Lockhart's specialities is her darling angel stamps. Her new Valentine Angel is sweet as can be. I colored the Valentine Angel with Copic Sketch markers. I always like to color the angels with red hair. I colored the rest of the image to match the patterned papers. By Bo Bunny, I think. I used a Spellbinder's die to cut out my image. The background and sentiment stamps are from Pine's Simple Valentine stamp set from PTI.
And here are the Copic colors I used:
I hope you're having a great weekend. My brother went back to the hospital yesterday with heart complications. He suffered a heart attack last fall so we're always very worried about him. He should be home today but will need some major bypass surgery in the future.

It's times like these that always make you take a step back to look at what you're really thankful for. I just wanted to let you all know that your kind comments are always appreciated so much. It's so nice to come back to a post and see that you've left some comment love. Thank you so much, my friends.

November 27, 2009

Cream Cheese Potato Soup Recipe Card

Becky Higgins font can be found at her website. The link is on the right hand side: http://www.beckyhiggins.com/blog/

While finishing up this post Thanksgiving evening, I know that soup is about the last thing on our minds right now. But here goes! Hope you all had a wonderful Thanksgiving.

I haven't posted a recipe card forever, have I? I came across this recipe in a cookbook that I recently purchased at my scrapbooking retreat. The proceeds went to charity so I couldn't pass it up. I recalled my brother talking about a recipe that he raved over that had cream cheese and ham in it. I found the recipe in this cookbook so I had to try it. It's a keeper! We all loved the soup, especially now that the weather is getting colder outside. To create my 4" x 6" recipe card, I typed my recipe and printed it off onto cardstock. See left side bar for fonts, please, just scroll down. For my main *soups and stews* label, I used JustRite's Recipes Borders and Centers stamp set. I cut out the small circle using a Spellbinders Circle Nestabilities die template. I layered that onto a Spellbinders Pinking Circle Nestabilities die template in brown.

I then used patterns from October Afternoon to punch 1" squares of various papers. I adhered them to my recipe card then stitched around three sides of the card. I pinked the edges of the snippets of patterned paper that peek off the top of the recipe card.
To finish my recipe card, I used more October Afternoon paper and sticker strip of flowers. Machine stitching is along the sides and under the recipe title for some graphic line detailing.
I really love making these recipe cards. Hope you enjoy them too! Oh, and try the soup! If you want a cheesy taste, add a big chunk of Velveeta. At our house, it's real cheese. ;)
Edit: I forgot to paste in the recipe for you. Here ya go:
Cream Cheese Potato Soup
6 cups water
7 teaspoons chicken bouillon granules
2 pkgs (8ox) cream cheese, cubed
1 pkg (30 oz) cubed hash browns, thawed
1-1/2 cups cubed fully cooked ham
½ cup chopped onion
1 teaspoon dill weed
In a Dutch oven, combine water & bouillon. Add cream cheese; cook & stir til cheese is melted. Stir in remaining ingredients. Bring to a boil. Reduce heat; simmer, uncovered, for 18-20 minutes til veggies are tender. Nov 09
Big sale, check out this Just Rite announcement: It's a Black Friday 5 Day Sale...Take 20% off all JustRite Products (excluding November Releases). Sale starts November 26th- (Thanksgiving Day) and goes November 30th.

November 25, 2009

Basketball Bookmarks

Before I start my post for today, be sure to stop by on December 2! JustRite will be sponsoring a blog hop featuring last minute gift ideas. It's sure to be a fun time!
Now for my post. I thought I would start out by showing you some of the scrapbook pages I worked on at the scrapbooking retreat I went to recently. I worked on the girls' albums and did mostly their sports pages. Sports are huge to our family. I am so thankful to have two, over the top talented little sports nuts for daughters too.
So needless to say, I take a ton of photo at the games, always trying to get that perfect shot.
Then when it comes time to scrapbook, I am in photo heaven......and photo overload too! :) Lots and lots of photos but we LOVE to look at the albums.
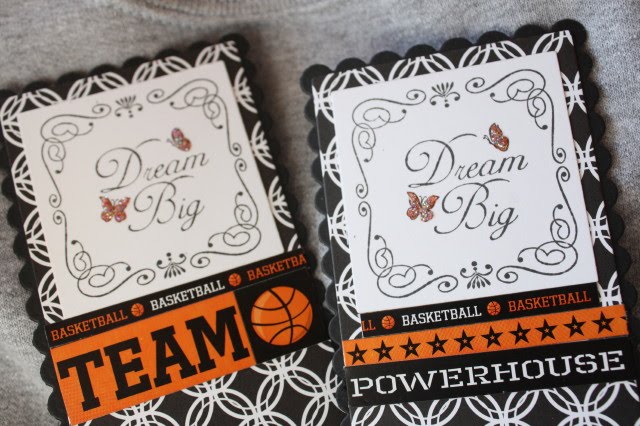
While I was still in sports mode, I wanted to create something for my girls. I decided to make them some book marks with their school colors and some basketball embellishments.
I found this great sentiment *Dream Big* by Just Rite that worked perfect for what I wanted to create. I used the new set called Just A Note Borders and Corners which fits into the new 2" Square Stamper. I also like the fun curly swirly border of the new 2" Frames set. I colored the little butterflies in with an orange Copic Sketch marker and then used Glossy Accents and some glitter to add a little bling.
I made my bookmark by cutting out a Classic Long Megabilities rectangle and Long Scalloped Megabilities rectangle using Spellbinders die templates. The longer shape is perfect for bookmarks. I finished off the bookmarks with Papertrey patterned paper and some basketball themed stickers.
For the back of the bookmarks, I added a white rectangle to match the size on the front. I wrote this note on the back to my girls: "Aim for the net but always keep reaching for the stars. You can do anything in life you want to do. Always keep reaching. Dream Big. Love Mom."

Before I go check out this Just Rite Announcement: It's a Black Friday 5 Day Sale...Take 20% off all JustRite Products (excluding November Releases). Sale starts November 26th- (Thanksgiving Day) and goes November 30th.

November 24, 2009

Christmas Goody Box

Today I'm using one of Karen Lockhart's new holiday stamps called Cookies for the Neighbors. It's a fun little image to color because it's full of Christmas cookies.....my favorites are frosted sugar cookies of the soft variety with fluffy frosting and sugar sprinkles. I colored the main image with Copic Sketch markers and then used a glitter pen to add shimmer to some of the cookies. To the main image, I added the Lockhart *celebrate the season* sentiment and a Papertrey sentiment from Peaceful Poinsettia. I stamped around the main image with Papertrey's Vintage Label in Pure Poppy. The image was cut with a Spellbinders Labels 1 die template. I love how the image is front and center on this card. So cute! On the inside of my card, I lined it with more Vintage Cream paper that I used for the main image. When my base card is a dark color, I sometimes like to line the inside with a lighter color so that writing shows up better. I stamped more Lockhart images on the inside and colored them with Copic Sketch markers. Using the green marker, I made some dots along the curly border. Shimmery pen was added for some holiday glitz.
Below are the Copic Sketch colors I used to color my image:
Hope you're ready for the holidays cuz here they come!! Have a great week everyone! Thanksgiving vacation starts tomorrow for us, woohoo!!

November 17, 2009

JustRite November Release

This month, JustRite Stampers has a new release of products. To celebrate, JustRite is doing a little blog hop to showcase some of the new products. And be sure to check the JustRite website for some big sales on Christmas themed stamps.

Today I'm using the Just A Note Centers and Borders stamp set to make some simple notecards. I started out by stamping my *just a note* and *just because* sentiments and circle borders onto cardstock. I really like these types of generic sentiments for notecards. They can be used for thank you notes, birthday cards, get well cards, etc. I then cut out the sentiments with a Spellbinder's Circle Nestabilities die template. I used a scallop punch to cut the bottom layer circles.
My paper that I used today is Nook and Pantry from Basic Grey. I love the fresh colors. I paired the yellow up with Papertrey Lemon Tart ribbon and the green is complimented by Papertrey New Leaf ribbon. For the *just because* notecards, I colored the tiny flowers in with Copic markers. Here's my green versions...
I love the scripty fonts on these stamps, so fresh and fun! Lots of different combinations you can make with the sentiments and circle border stamps.
And if you love the butterflies, here's what I did: Using my new Martha Stewart butterfly punch(I found mine at Michael's), I punched butterflies from Papertrey Spring Moss cardstock. Then I used scraps from the Basic Grey Nook and Pantry paper collection to punch more butterflies. I adhered two butterflies together just in the center. Then I flipped up the butterfly wings a little to make them 3-D. Green sequins finish off the butterfly bodies. Sooooooo pretty, don't you think?
Okay, be sure to do a little flitting around of your own and visit the other designers' blogs. I'm sure you'll be inspired:

November 11, 2009

Copic Fun!!

How about a little Copic fun today? First I have a fun new card to show you, then I have some Copic prizes to talk about. Let's get to the card first. Today I've used Karen Lockhart's new Candy Wreath stamp to create a whimsical holiday card. This image is chock full of wrapped peppermint candies. I colored the candy stripes with a Copic Sketch R29 red color and then finished up the twisted wrappers with a Copic Sketch BG11 color. To make the candies shiney, I added Ranger Glossy Accents. My image is cut and layered with Spellbinders Square and Scalloped Square Nesties die templates.
For some fun finishing touches, I cut Papertrey Rustic Snowflake patterned paper into strips and adhered them to my card front at a diagonal....keeping with my peppermint stripes theme. Finally, I took my same R29 Sketch marker and drew a red line down a long strip of white satin ribbon. It looks just like peppermint candy, don't you think? Love that look!
Now for the prizes. Copic has added some new regional certification instructors and is celebrating by giving away prizes on each of the blogs listed below!
Winner gets their choice of either an ABS-1 or any 12 Sketch Colors.
Please leave us a comment letting us know either how you use Copics/which Copic products you use/why you love them or why you wish you had Copics. One winner will be chosen randomly from each blog. In addition, Copic will be reading through the comments as well. From those comments, a few other winners will be selected based on a testimonial that we really like. That person will be contacted to use their story for our CHA booth and they would then be given an equal prize to the random winners. Make your comments good! There will probably be 2 or 3 winners chosen total. These will not be announced right away. The drawing begins on Wednesday, November 11, and ends on Saturday, November 14 at 9pm, CST. Good luck!

You can enter for the prizes by visiting and leaving comments at the following blogs:
me......right here :)

Note: If you left comments on my previous Candy Bar Wrapper post, I will make sure that those get to Marianne also. :)

November 8, 2009

Believe Gift Card Envelopes

Recently, I scored this entire giant spool of wide, vintage lace. I looooove to find treasures like this on my junking ventures. I created some beautiful gift card envelopes using the pretty lace and some Papertrey goodies.

I used Stocking Prints to create a sentiment tag and a paper pieced stocking. This is such a fun little set, I can't wait to ink it up again.

I created my tags by stamping my sentiment in Dark Chocolate ink onto creamy cardstock. I then cut my tags using Spellbinders Nestabilities ovals. The stocking was paper pieced with some pretty holiday paper. I tied my wide lace ribbon around some medium square envelopes that were covered with snowman patterned paper from my stash. The tags were tied to the lace with Martha Stewart red and white striped twin, with the addition of a little silver jingle bell.


Perfect for gift cards or money cards this holiday season. I always like to fancy up the gift cards since they come in such a small package. It's fun for the recipient to open a pretty little package.

November 4, 2009

Happiest of holidays...

Tis the season to be making Christmas cards. If you like to add colored images to your cards but also want to mass produce a bunch of cards, then Karen Lockhart's Itty Bitty images are just the ticket for you. The Itty Bitty images are usually around 1" tall but are still full of details that can be colored. For my Itty Bitty Wreath, I used traditional colors of Copic reds and greens to color my image. I stamped a Papertrey Christmas sentiment right beside the wreath and then cut both images out with a Spellbinder's Mega Deckled Rectangle Nesties die template. The embossed detail and the deckle edges really add a lot to the focal image. I made a few little snips on a strip of patterned paper to make an accent banner behind the main image.
For the base of my card, I used some holly printed patterned paper, dotted with clear EK Success sticker dots. A pretty ribbon in Aqua Mist finishes off the card.

So have you started your holiday card making for this season? I love it when a little stash of cards starts to pile up. I typically make a couple cards.....one for me and one to share in the shop. I think it's time to break out the Christmas music soon, whaddya think?

October 24, 2009

Warm wishes and cocoa...

To everyone: Thank you for your prayers and well wishes for my sweet reds. They are fever free and doing so much better today. We ventured into town for a little change of scenery and some fresh air. They're still coughing and tire easily but they are definitely feeling better. They're also back to fighting with each other and being sassy redheads....so I know they are getting back to normal. ;)

For my mother-in-law's birthday, I gave her one of my signature gifts....the pretty coffee mug with matching place and cloth napkin. She loved it and said that all of the girls at her office would be jealous. You know how important that coffee is at the office. :)

And that's why I like to make cards like this one. Everyone loves cards that have coffee or cocoa on them. They just evoke that warm and fuzzy feeling you get when holding a warm cuppa goodness.
For my card, I used Karen Lockharts Itty Bitty Cocoa and Cookies stamp paired with some sentiment words from Papertrey. I colored my image with Copic markers, adding some grey shadow as an outline. I cut and layered my image with Spellbinders Rectangle and Scalloped Rectangle Nesties Die Templates. Tied buttons, patterned paper and a pretty ribbon finish off my card.
As the colder weather settles in, I find myself brewing up more and more cups of coffee...hot cocoa.... and my orange spiced tea. Yummmm, makes me warm all over. What's your favorite winter beverage, I'd love to know?

October 22, 2009

Red and Cream Holiday Inspiration

Every year come holiday time I find some sort of new inspiration for decorating and crafting. This year I am inspired by the color combination of red and cream/white. I'm in the process of assembling my Christmas Inspiration Station for this year, but in the mean time check out this photo below. I would love to have all those goodies in my stash for wrapping gifts. Or how about this photo below. I could totally turn my old white kitchen cabinet into a Christmas display of red and cream goodies. And look at the stockings....they remind me of illustrations in Jan Brett books.
That total Nordic look is what I'm talking about....lots of homespun goodness, items hand crafted from the heart....all nestled in a cozy cabin up in the mountains. Are you you picturing it now?
Little touches touches sprinkled here and there like the red and white pillow nestled on this comfy sofa below.
And these red and cream quilts totally make me swoon. I have it on my list to make a red and cream/white Christmas quilt some day. I think I'll start by collecting fabrics here and there and then some day sit down and put it all together. I just love the idea of switching out out bedspread to one of these beauties.
And check out the red and white ticking pillow.....and the Kraft colored pillow below with red embroidery..totally makes me think of my friend Pine.
Ohhhh, I bet you're in the mood to craft now before we even get to my project, right? All of those fun photos were from Country Living, Country Home and Pottery Barn. For even more inspiration, check out this magazine spread from an older issue of Country Home...so cozy and homespun looking.

With all that beautiful inspiration, let's see what we can cook up the crafty kitchen, eh? Basically, all you gotta do is pull out red and cream inks and papers...and lots of other mixy matchy embellishments like ribbon and buttons. Look at my little pile of goodies below..I used the 2009 Holiday Tags to create lots of circle embellishments. I simply stamped them with Pure Poppy ink and added punched snowflakes and tied Vintage Buttons. I also had fun experiment with stamping on ribbon. I used grosgrain ribbon and Pure Poppy ink to stamp right onto the ribbon. The stamps I used are all from the 2009 Holiday Tags Collection.
Then I used an E43 (Dull Ivory) Copic Sketch marker to do some solid lines along the ribbon. Love!
Here's a wintry card all assembled using the circle/snowflake embellishment on top of a giant snowflake from Snowfall. I used the Spellbinders Scalloped Octagon die template for a fun shaped background accent. The shape is perfect for the snowflakes.
For a quilty, homespun look I used a Quikutz texture plate with Pure Poppy cardstock then did a double line of stitching. The stamped ribbon makes a nice accent along the bottom of the card.
And here's one of my faves, some very Nordic looking mittens from the Snowfall set. I created them by stamping a round tag from the 2009 Holiday Tag Collection and then paper pieced a portion of the image onto some stamped mittens.
Paired up with another quilty cream background, a Pure Poppy ribbon, cute stamped snowflakes and one of my favorite sentiments from Snowfall......and a few lines of glittery goodness......and this is one cutie pie card.
And these are becoming one of my favorite gifts....wrapped candy bars. 5-1/2"square patterned paper(mine is from the Men of Life collection), some Scor-Tape and embellishments give a whole new look to candy bars.
Look how fancy they look all dolled up with Vintage Cream ribbon, an embellished holiday tag, snowflake punches, a sprig of green leaf ribbon......and lots of glittery goodness.
These would make decorations for your home......just nestle them into a wreath or bowl full of vintage Christmas ornaments.......and then hand them out to friends and neighbors who visit over the holiday season.
Oh, I could just create stuff endlessly using all my red and cream goodies. I should be all set come Christmas time. I hope you are inspired too. :) Thanks for stopping by.

On a side note: Last night my little Jordy collapsed. She has the flu and asthma on top of that so her symptoms are always worse when she's ill. She was out for what seemed an eternity as I scrambled to call 911. She woke up and was disoriented and couldn't see well. We rushed her to the emergency room where they gave her an IV bag of fluids. We were released and got home about midnight. She is doing so much better today and is fever free. Now Josey has the fever though. The flu is in full force here........please take care, drink LOTS of fluids to prevent dehydration and get lots of rest. I hope you all stay well.
Related Posts with Thumbnails