
My blog post today is for those of you who have purchased a vintage watercolor palette from my shop and are wondering how to select pigments which order to place them in the palette. Here we go....photo heavy but I try to keep the chat concise and easy to follow along.


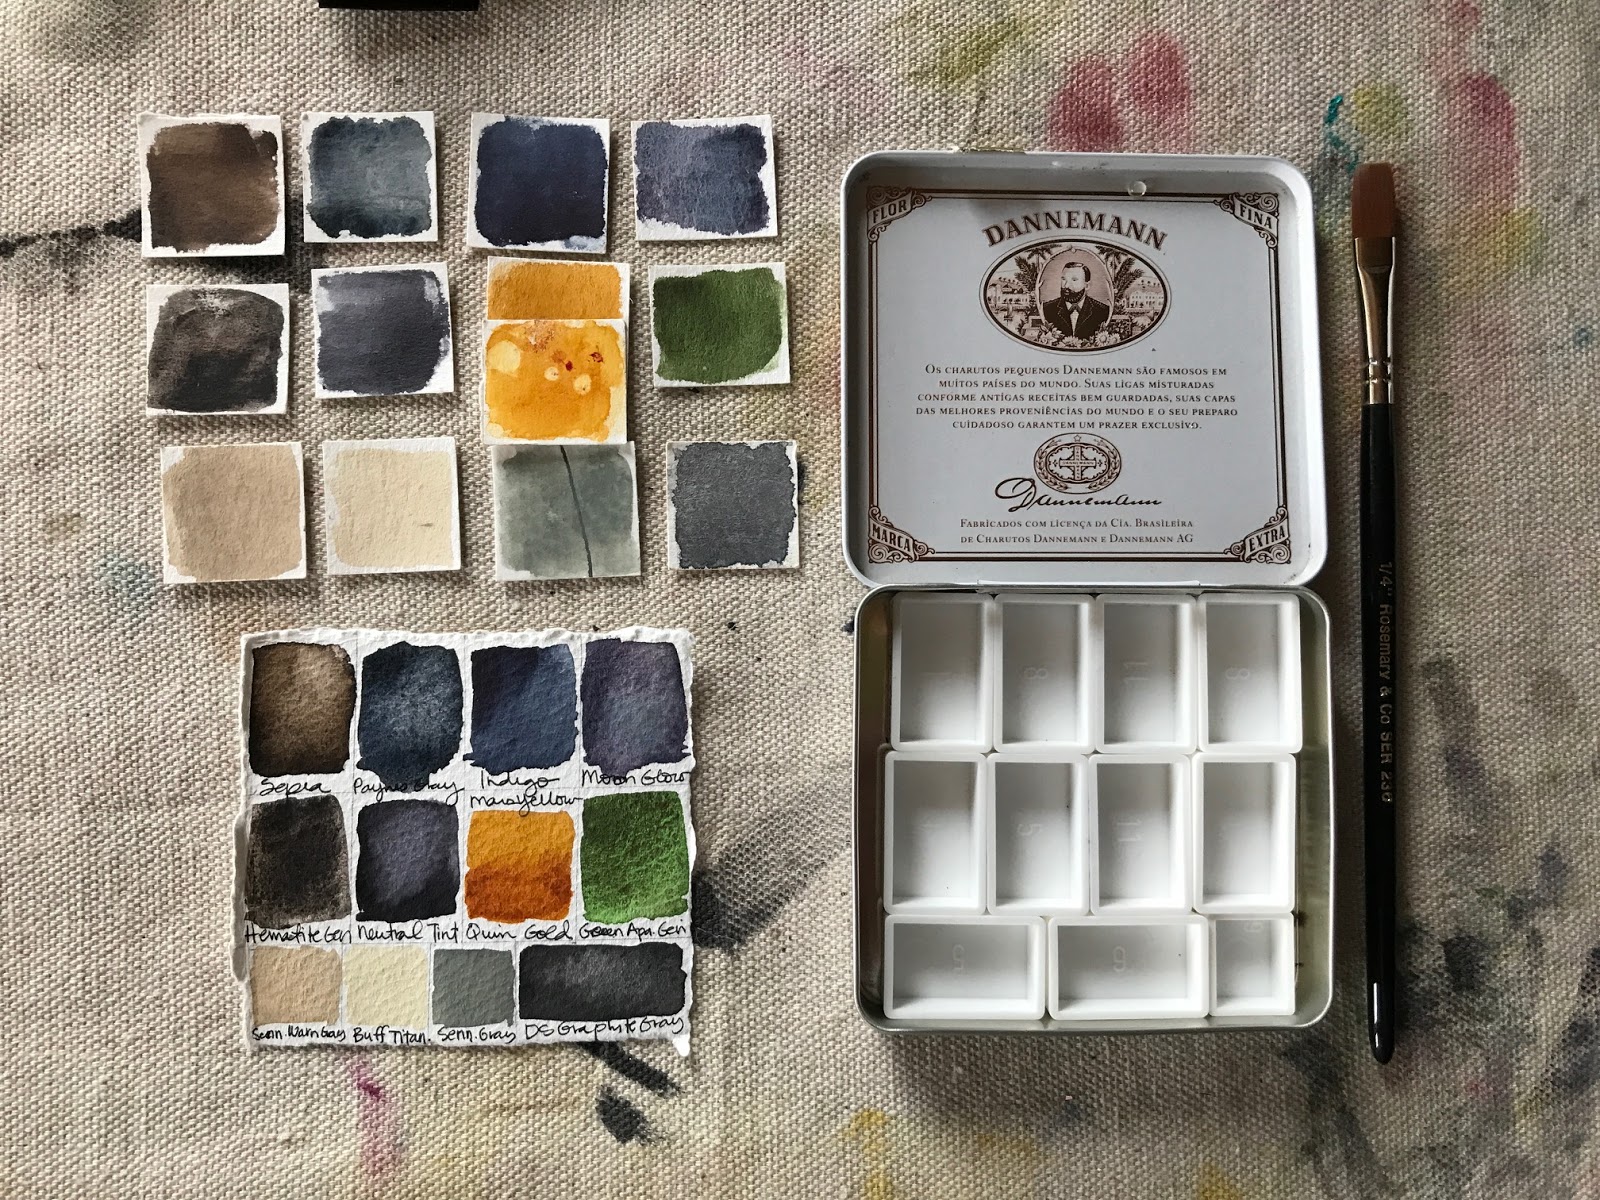
So here's my tried and true method for setting up a successful watercolor palette each and every time. My process takes out all the guess work as to whether you added the right colors in the right pans. Start by cutting 1" square (or use a square punch) pieces of watercolor paper. Using water and a 1/4" flat watercolor brush (Rosemary brushes are great), paint a color swatch for each color of watercolor that you have. Label the back of the swatch with the paint color and manufacture. You will keep these forever so don't throw them away.

Once you have made 1" color swatches for each of your paint colors, count how many pans you need to fill in your paint palette. I selected the colors below to fit in the palette I showed above. You can set your other paint tubes and swatches aside.

For storage I keep my 1" swatches in a Ziploc baggy. I keep another baggy full of blank 1" papers because I know I'll always purchase more colors in the future. Trust me, you'll get hooked too.

Next I arrange and rearrange my color swatches until I reach a good layout that I want to use for my palette. Take your time with this step, it will save you so much time if you get it right the first time you fill your empty paint pans. Some of the pans will have two colors in one pan because less is not always more for me and I'm indecisive as heck. Just squeeze two colors side by side. It's okay. Don't freak out.

Next I trim (or tear on the table edge or use a metal ruler) a piece of watercolor paper to fit inside the palette lid. I don't measure anything. I simply trace the lid onto the watercolor paper then tear the paper a bit smaller. I then eyeball it and draw on the approximate divisions of the pans. Again, I don't measure but just make tick marks with a pencil and then a straight piece of scrap paper to make the straight lines. If this makes you cringe and you need to measure and be perfect, then by all means please take the time to do that. I'd rather get to the painting part.

Now it's time to paint the color swatch chart that will fit inside the lid of the palette with closed (and your paints are dry). I start by using a very fine tip waterproof fountain pen to write the color names at the bottom of each color swatch space. This way you don't forget to leave space for the labels. Then I paint my color swatches in the order that I laid out the 1" color swatches.

To squeeze the paints into the pans, unscrew the lid and gently squeeze the paint into the pan. You can fill the pan entirely but I have learned from experience that I like to fill the pan about 1/2 full and leave a little area unfilled. This gives a little wiggle room for wetting down the paints and mixing your paints up. If you decide to fill the pans all the way full let them set several hours. You can then take a clean jar of water, dip your pinky finger in and make a small indentation into the paint. This makes a concave well and helps the water to puddle a bit in the middle of the paint.
Allow your palette to sit open and dry for 24-48 hours. It all depends on your climate, the brand of paints and how much paint is added. The paint will dry pretty solid and to rewet your palette when you are ready to paint you just use a small spray bottle filled with clean water. This reactivates the paint and you're then ready to create. Use the palette lid for mixing colors. Refill the paint pans as needed. Sometimes I decide I want another shade of a blue so I just squire in whatever color I want. I've learned that paint names don't really matter, it's what looks best for what you like to paint.

So here I have a my filled palette ready to go. As you can see I've about used up a lot of my paint tubes. To get the most out of the tube you can purchase paint tube wringers which squeeze out every last bit of paint.

For storing my paint tubes, I keep them in an old metal tool box in my studio. You don't need to keep them with your sketch kit unless you have some extra tubes you want to try.

Here are some of my vintage watercolor palettes that I've created for different uses. Why so many palettes? Well I love them for one and secondly each palette was created for a specific use. I have one for value studies, one for gouache, one for quick studies of landscapes and underpinnings, one that is a brighter color palette, etc. Once you get into your painting, you'll know more about what colors you might like to add or what different palettes you might want.

Beautiful right? My hopes are that you get your palettes fill and take them from the shiny new stage to the used and abused stage like mine below. The idea is to get creating right? Don't be an art supply hoarder. If you're going to buy supplies, use them! Make yourself that promise.
You might be asking why I didn't clean up my palettes for this photo. Don't be so quick to clean your palettes. All those beautiful dried, swirly mixes can be rewet and might just have the perfect mix you're looking for. I don't clean my palettes very often, I just start right where I left off. As you can see I also have a variety of sizes and shapes of palettes. I love collecting the old tins so check my shop often, you' never know what you'll find.

I'll leave you with some photos of my palettes in action.


Here is how one of my smaller palettes fit into my handmade travel sketch rolls. I add these to my shop from time to time but they sell quickly.

All of my supplies for sketching outside fit into the sketch roll and then I roll it up and secure with the attached ribbon.

Okay, whew. I hope this helps you get started with your beautiful art. Please let me know if you have any other questions or if there's any subjects you'd like me to cover. Like how to take your supplies outside to paint, how to pack them up, etc. I don't do blog posts too often but I post almost daily on Instagram. My username is MishWooderson over there. You can follow my Facebook page also. Thank you so much for stopping by today and if you've purchased one of my vintage palettes from my shop, I also thank you. Happy painting everyone!
I've also done a previous blog post about setting up a palette. You can check that out here.


