November 29, 2012

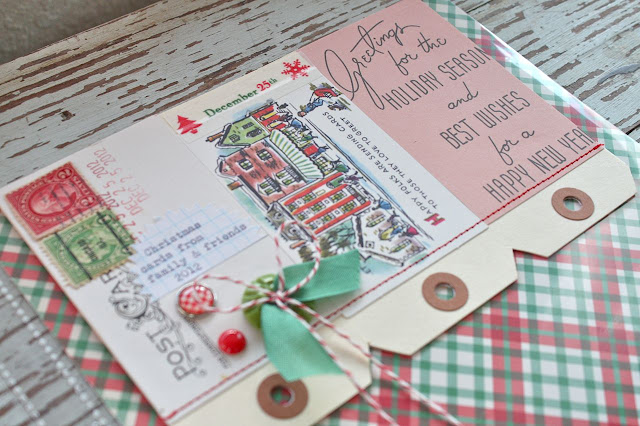
Project December .....Christmas card pocket with tag flap

December is almost upon us which means times are getting exciting for those creating a December Daily type album.  If you've been following my blog within the last month, you'll know that I'm doing Project + December.  I'll be combining my Project Life and December Daily all into my Project Life album.  In December, I'll have a Page at the left of my blog where you can simply click to find all my Project December posts in one spot.  I'll be updating my blog with my Project December posts weekly as I get the pages and inserts completed.  I'll also be having lots of other fun posts including my fireplace mantel makeover inspired by an antique shop visit, the much anticipated slow cooker posts + recipes, more Christmas cards + packaging and lots more.  I hope you'll join in on the fun!

So today I have one more pocket type insert to show you that I have ready and waiting for my Project December album.  My product picks are papers, buttons and vintage images from October Afternoon's Make it Merry collection, My Mind's Eye enamel dots, red & white baker's twine, parcel tags from my shop, vintage postage stamps, Washi tapes and an 8 x 10 Project Life page protector.  
First up I trimmed the red and green plaid paper to 8 x 10.  Next I adhered vintage October Afternoon images to some parcel tags.  
I adhered them to the OA poinsettia patterned paper then stitched over all three tags.  I embellished the postcard image with my vintage stamps + a date stamp with the 2012 Christmas date.  I finished the tags up with a brad, an enamel dot and a tied button.  
Using several of the Washi tape, I adhered the tag flap section to the 8 x 10 plaid paper.  Lots of layers of Washi tape should keep the flap adhered nicely.  I might add a photo under this flap, showing the cards all displayed or perhaps a list of who sent us cards this year in a typed list format.  
I inserted the 8 x 10 portion into the 8 x 10 page protector.  The page protector is what will create the clear pocket that I'll insert all of the holiday cards we receive.  I might tuck in the cancelled postage from envelopes too for fun.  
And that's it.  I love this one and can't wait for my pages to be filled with holiday goodness.  So tell me, how are you coming along with your December Daily album?  I would love to hear about it!

November 27, 2012

Project December 2012...floating items in clear pockets

I'm back today to share another page insert for my Project December.  This time I'm "floating" some items in the small pockets of a page protector.  When I first saw this die cut Santa from the October Afternoon Make it Merry collection I just loved it.  It's printed on both sides so it was just too cute to cover up.  I thought it would be the perfect time to experiment with tucking some items into clear pockets so that the pages behind could peek through and that my items would float around in the pockets.  
For the vintage Santa image I just trimmed a portion off so that it fit into the 4 x 6 pocket.  I added some of my vintage sequin/snow confetti mix + an October Afternoon button on the outside of the page protector.
Here you can see the back side of Santa with more confetti mix.
I also added more of the holiday confetti mix into a 3 x 4 slot along with some Studio Calico wood snowflakes + a candy can I made from pipe cleaners + a vintage postage stamp.
This is the back side where all the goodies still shine through.
Here is an example of what my page insert might look like.  I'll most likely have photos in some of these slots but you get the idea.  I might end up floating some of my photos and more embellishments too. I could easily slip in a small Instagram photo, add some holiday confetti and then stitch around the photo.  I just use my sewing machine and my signature red thread to close up any openings.
I'd love to hear some ideas of how you might use a floating page like this.  I think it would be fun to capture some items like our favorite Reese's trees wrappers.....perhaps you broke an ornament and could VERY carefully stitch in a few shards of the broken glass.....or a dried piece of pine from your tree.......maybe a few pieces of wrapping paper.....a few snippets of leftover fabric from a holiday dress you're making....or a quilt.....all the stamps from holiday cards you receive.  So many ideas to try, hope you enjoy!

November 26, 2012

Project December 2012...6 x 6 pocket pages

I hope you all had a wonderful Thanksgiving.  I enjoyed 2 great feasts with my family and had a great time watching lots of movies and just relaxing.  

All this week I'll be sharing the last of my Project December creations that I've pre-made to go into my December pages.  Today I'm sharing a 6 x 12 page protector that has (2) 6 x 6 pockets to hold receipts, tags, snippets of gift wrap, etc.  
Let me show you how I created this insert.  For product picks I'm using some October Afternoon and Studio Calico papers.  I've also selected a few Washi tapes + some stitched, grid vellum pieces from my Stitched in Red Kits.  
For my page protector I'm using a 12 x 12 protector that has (4) 6 x 6 sections.  This will be trimmed down for the final insert that will only have (2) 6 x 6 pockets.  To start, I trimmed down 2 pieces of patterned paper to 6 x8.  I scored the papers at 2"then folded the 2" flaps down.  These will become pocket flaps.
I used one of the grid vellum pieces and trimmed it in half. I typed my wording using my vintage typewriter.  I use a scrap piece of paper + strips of Washi tape to secure down small pieces of paper that I want to type on.  The Washi tape pulls up easily without tearing my finished product.
Next I stitched my typed pieces to pieces of 2 x 6 October Afternoon patterned paper.  I added some of my vintage sequins for a little holiday flair.
Each of these 2 x 6 pieces were added to the 2" flaps I created earlier.  I added festive paper clips to keep the flaps flat.
A red clip to match the red sequin and a green clip to match the green sequin.
Next it was time to trim down the 12 x 12 page protector.  I like my smaller than 12 x 12 inserts to have a defining line that sets it apart from the main 12 x 12 Project Life pages.  Creating a long strip of contrasting pattern is a great way to create a visual divider.  I've been doing this a lot and you'll see me use this technique in my regular Project Life pages when I blog those.

To create this strip I used some adhesive backed fabric strips from Studio Calico. I cut a 1" x 12" strip using my paper trimmer.  I then trimmed my page protector 1/2" wider just to the right of where my 6 x 6 pockets will be.  I then folded the 1" strip around the 1"x piece of page protector.
The wood grain fabric strip will show on the front of this pocket page and the back.  I used 2 lines of stitching in my signature red thread that I'm using throughout my holiday pages this year.  This creates a nice, sturdy edge to my 6 x 12 pocket page insert.
Here is the finished pocket page from the front view.  This will come to life when I fill it with receipts, tags and such.  The page protectors are an interactive part of becoming the pocket with flaps.  Nice and sturdy but totally see through.  And I think the fun part will be in years to come when we can open the flaps and take a peek inside.   I especially think the kiddos will enjoy this part of my albums.  I might even throw in a sprinkling of snow confetti mix too.

Tip:  Make a mental note to save lots of receipts, tags, wrapping paper, clothes tags, gift sacks, ads, magazine cover, etc for your December Daily.  I'm keeping a sturdy plastic envelope in my kitchen to collect the items and an in/out try on my work table for a daily deposit of papery goodness.  When it comes time to work on a page, I can sort through the items and pick & choose some pieces to use.  I think how cool it would have been to have the price tag for my beloved Hee Haw overalls I received as a kid!  Yes, we were as country as it gets, people. 
Here's the back side of the pocket page.  The patterns you see are the back, or "B", sides of the patterned papers used to create the pockets.  No need to add more papers and bulk to the pockets.  I'll most likely add some photos here.  Perhaps a photo collage created with the Diptic phone app.  Or this might be a great place to add a longer story for the page this page will butt up to.  Or if I want to make it really easy I can print a 6 x6 photo with some Phonto app journaling.  I'll add a little tag under the paper clips to make good use of those.  
This was a fun one!  I hope you enjoy.  I'm off to dust and put away all the Fall decor so that I can start decorating for the holidays.  I have a fun Winter fireplace transformation that I'll be sharing soon that was inspired by a recent junkin' trip.  Stay tuned....

November 22, 2012

Happy Thanksgiving!

Happy Thanksgiving to all of my wonderful readers who celebrate the holiday!!  I'll be spending the day at my in-laws with my family.....lots of great food, I'll be toting in the slow cookers, 7 of us + 5 doggies running around in the yard. We'll be watching the parade, lots of football and hopefully the fellas will let us squeeze in the movie What about Bob.  Good times.  So thankful for my family and all of you too.  

Over at the October Afternoon blog, I'm sharing this card as OA wishes you a Happy Thanksgiving.  
I'll be taking this one to my mom and dad on Friday.  Lots of fun OA paper, label, ribbon, button and the fun squirrel flash card.  Don't have a Thanksgiving stamp?  No worries, you'll be thankful you have an old typewriter nearby.  :)
I think it's always nice to take a hostess gift, even if it's just a little card or small gift.  I packaged my card up in a glassine sack and tied it up with some Fall-ish leaves.  
Very simple and took me about 5 minutes to assemble.
To keep it all together, I layered a paper doily with a confetti sack then topped it with two silk leaves.  Just staple them together and cover the staple with an enamel dot, sequin or button.  
For my little gift, I'm including a small Pumpkin Caramel Latte candle from Bath & Body. My very favorite ever...I bought all they had this season!
Okay, off to enjoy the festivities.  See you soon.

November 21, 2012

Project December 2012.....5 x 7 inserts

Hey there, thanks for joining me today.  I first want to say thank you to everyone who takes the time to leave comments.  I see that I get a LOT of pins to Pinterest boards so I know you are visiting my blog.  For those of you who make a special effort to leave me a note, I sincerely appreciate your thoughtfulness.  There are a few questions that need answered so I'm going to go back through my posts, make notes and come back soon with your answers.  :)

So for those that celebrate Thanksgiving, are you getting all prepared?  We are staying close to home because the girls have basketball practices and that is just fine with us.  We'll be going to both our folks' homes for 2 separate dinners.  I'm bringing crock pot goodness to one dinner (I'll be sharing my slow cooker adventures in December) and I need a dessert for the second dinner.  Good times!

Today I have some simply 5 x7 inserts to share for my Project December.  These are very, very simple right now but I have to say having these done ahead of time makes me very happy.  The possibilities for these inserts is just endless.  Let me share my thoughts.....
 I used patterned papers from my holiday product picks to create various 5 x 7 inserts.  There is a simple strip of patterned paper down the short side, stitched with my signature red thread for this holiday season.  The orientation of these 5 x 7 inserts can be vertical or horizontal.  I will be using Project Life's 5 x7 clear page protectors to hold these in my albums.
 The awesome thing about these inserts is that I can use them in so many ways.  Here's just a few ideas that I have rolling around in my mind:

1.  Use the inserts as shown below with Project Life 4 x 6 and 3 x 4 gird journaling cards. I could place a tiny Instagram photo on the grid cards and then tell a story.  Or just tell a longer story then add embellishments, etc.
2.  4 x 6 photos that I want to highlight might be added to the insert.  I could use my Phonto phone app to add journaling to the photo, then print and plop on the 5 x7 insert.
3.  I could add 2 small square collages of photos that I create using my Diptic phone app.  A nice little page to add more photos if needed.
4.  These could be used as photo or journaling mats and be added to a larger 8.5 x 11 size layout.
5.  I could stitch vellum over the insert to create a small pocket to hold movie tickets or perhaps a series of photos that I don't want to take up too much space.
6.  I could create a running list....for example, I could keep track of all of the holiday movies we watch, or all of my slow cooker meals during the month of December or a running calendar which becomes a month in review somewhat like my week in review inserts.
7.  One of these could be the very first insert in my December pages and could be used as a title page.  I could make a title that says something like "Holiday Happenings" or "December Events" and create some journaling that tells that I'll be adding in December events in with my Project Life pages.
8.  I could create recipe cards with these inserts, using my vintage typewriter to type up the recipe and then embellish the recipe card like I've done in the past.
Lots of possibilities here and I'm excited to see what happens with these 5 x 7 inserts.

Okay, I'm off to find that perfect dessert for Thanksgiving.  Tomorrow I'll be sharing a fun Thanksgiving card, October Afternoon style.  Then all next week I'll be sharing the rest of my Project December ideas.  Thanks for stopping by.  :)

November 20, 2012

Project December...embellished envelopes

Hey there, I'm back today and happy to report that it's like Friday for my girls.  Today is their last day of school before the Thanksgiving break and it couldn't come sooner. The girls have FIVE tests between them today.  Needless to say it was a little stressful around here last night.  Plus the girls are fighting off colds and many around here are already getting the flu bug.  It makes me very happy that my little family can be nestled in at home for some rest and relaxation. I rented some movies yesterday.....Christmas Vacation, What about Bob?, and the trio of Narnia movies...I'm looking forward to settling in with those.  

So all the Thanksgiving excitement means that the Christmas holiday is right around the corner.  I've still got lots to share with my Project December.  Today it's all about envelopes and fun ways to capture and store some holiday photos + memories.  I've taken four envelopes from my stash and covered them with October Afternoon Make it Merry patterned papers + some vintage dictionary paper.  Below you can see the envelopes with the flaps folded out.  My favorite is the pink envelope with the candy cane paper and the vintage doily.  I also added a journaling card from October Afternoon + a little red stitching + a vintage star burst sequin from my stash.  
 Here's the envelopes with the flap sides showing.  They're in the simplest form right now and will be embellished with buttons, baubles, journaling, tin pins, photos, etc as my Project December progresses. These might have holes punched and go "naked" into my album or I might insert them into a specially designed clear page protector.  That's the fun of it....seeing how it all ends up being used.

The envelopes can hold lists, extra photos, movie tickets, receipts, recipes, tags from clothing, snippets cut from gift sacks and wrapping paper.  The possibilities are endless.

Here's a few inspiring ideas from my Pinterest boards for capturing more memories.  Geralyn misted a Kraft envelope with snowflake masks and added fun lettering to the envelope flap. Her mini albums are so amazing and inspiring.
Link Here
Here's another clever way to use a colored vellum envelope from annmarielovespaper.  The link doesn't work if you follow the trail through Pinterest but it's a lovely little snippet of inspiration to share.
Link Here
Instead of envelopes, flat sacks would also work great for holding holiday memorabilia.  Lisa Truesdell created this clever insert to hold holiday shopping lists.  I've got a few kits in the shop that have fun sacks and tags that would make perfect pockets for a Daily December or Project Life album.  
Link Here
Boy, I kind of got lost in Pinterest Land while searching for inspiration.  I definitely have more ideas now to add to my Project December.  I hope you are gearing up for great holiday season.  My goal is to  enjoy this time with my family.  I'm not going to add extra stress this year.  It's just kind of silly to make this special time a burden.  I'm gonna live it up and have fun with my hubs and the 2 reds.  I hope you do the same.  :)

November 19, 2012

Project December...4 x 6 insert cards + Week in Review cards

Hi and welcome back today.  I'm sharing more of my Project December pieces.  Project December is my combination of Project Life and a Daily December.  I'll be uniting both in my ongoing Project Life album.  The fun all starts in December but I've got lots more to share so stay tuned for more fun projects.  

First up today is a bunch of stamped pieces that I have in a little tin.  I'll be reaching for these when I need to add a little something to an insert or photo.  Most of these stamps are from Ali Edwards' collections from Technique Tuesday.  You can find the Daily December set and the December Joys set at this link.  I also will be using a lot of the Story Cards that you'll find at that link too.  Love those!
Next I have my Week in Review cards for all the weeks of December already made. I used 3 x 4 cards from the awesome Gossamer Blue December Daily 2012 kit.  The 3 x 4 cards were cut from this sheet of This & That paper from Echo Park.  I stamped them all with the word December of some sort.  I also stitched on a manila tag with red thread to each card.  I will run these through my vintage typewriter to get a recap of the week's happenings.  So happy that these are all ready to go. 
Next up I have some 4 x 6 inserts that I'll be using for my regular Project Life weeks in December + these may wind up on a bigger scrapped page or in other divided inserts.  These might also become my weekly title inserts...like Week 50, 51, etc.  These inserts were made by simply stitching smaller journaling type cards or accents to already made 4 x 6 cards.  I used the Be Merry Journaling Cards from Elle's Studio.  Be sure to check out Elle's other lineup of holiday products.  I think I have one of everything in my stash.  Stay tuned to Elle's blog all of December.  I'll be joining a great lineup of guest designers that will be sharing our holiday projects using Elle's goodies.  
I also used Studio Calico's Wonderland journaling cards with the link right here.  I also used lots of October Afternoon Make it Merry collection pieces, including the Make a Card paper, the Make a List paper and lots of the little tidbits from various packages.  You can find the entire Make it Merry collection right here.  This is probably my favorite holiday collection of items ever!  And there's just about every kind of accent you would want from tin pins, to Washi tape to buttons to papers.  It's that good.
So how I went about creating my 4 x 6 cards was I just rummaged through my accents and matched up papers to the 4 x 6 cards.  I didn't think it over too much, I just grabbed pieces and started stitching them on.  Some of these cards will have tiny Instagram photos on them, some will be used just for journaling and some may have just the weekly dates on them with maybe some chipboard letters.  
Thanks for stopping by today.  I'll be back lots this week with more creations from my Project December.  :)  Oh and I went junkin' again, this time with the hubs and my littlest red.  It was holiday magic all over the place and I totally got some great inspiration for a holiday mantel.  I'll show you my inspiration photo from the antique shop and the finds I got to match + a trendy vintage item that I keep seeing pop up everywhere. Coming soon...

November 16, 2012

Project December....confetti list pocket

Folks, this is like a Christmas miracle because I never post this many days in a row!  I've got lots to show you before December hits.....then I'm taking a break and am going to enjoy the holiday.  Except I'll still be doing updates on my Project December progress, just not a post every day.  :)

Today's project is probably one of my favorites ever.  It's just fun and vintage-y and crafty...and me.  I'm really trying to embrace my holiday projects and just create for me.  I keep that in mind each time I sit down to craft something.  There's a lot of holiday projects happening out there right now and it could be easy to get caught up in the hoopla.  So I'm just doing what works best for me and I'm trying to add a little something unique to my work.  I'm sharing with you guys because it's fun and I like to have you come visit my little blog and maybe take away a spark of an idea for your own projects.  I'm not trying to post the most pages or win any awards.  I'm just creating for me and am really looking forward to spending the holidays with my family.....and then documenting it with stories + photos.  And that's good enough for me.  I hope you embrace those thoughts as you create your own projects this holiday season.  

Now enough mushy stuff and onto my favorite project.  Here's the product line up: Crate Paper list patterned paper....one of my favorite papers this holiday season cuz you know I love the lists....October Afternoon Make it Merry patterned paper, tags from my shop, tin pins from OA Make it Merry, clear cardstock sheet, vintage paper doilies, vintage sequins.   
What I envisioned for today's project was a pocket to hold various lists that I'll be making throughout this holiday season.  I sat down and made a list...see, told ya...love the lists.....of fun inserts and the things I wanted them to contain.  The list pocket came to life.  I started out by cutting the list patterned paper into an 8.5 x 11 piece.  I used one of my manila tags and ran it through my typewriter.  I then stitched the tag to my page leaving the strings loose.  I stapled on one of my precious vintage sequins than added a red dot thingy....what are those called again?  By My Mind's Eye...enamel dots?  Anyway, the tags make very simple work and I love the office supply look, especially paired with the ledger pattern.
It's getting good now.  I took the clear cardstock sheet and trimmed it down to form a clear pocket front.  Probably 4 or 5".  I trimmed down some Make it Merry patterned paper + the bottom part that is the manufacturing information (make it merry, make a list) + a vintage doily cut in half.  I stitched this all to my clear cardstock with red thread.  Again, the red thread will be a signature look for all of my holiday projects this season.
Next up I took some vintage sequins....very hard to tear into the little packages, I must say....and mixed up a batch of holiday confetti.  I used some foam stars, punched starts, glitter and fake snow stuff.  Holiday confetti soup.
Eeeeee, look at this.  I stitched my clear piece to the front of my ledger sheet.  I then dumped in some of my holiday confetti soup.  I added a Make it Merry tin pin for good measure.  When it's time to add a list torn from a grocery list or one that was wadded in my purse from a day of shopping....I'll tuck them in the pocket.  The confetti will peek out here and there.
My entire pocket piece will fit into an 8.5 x 11 sheet protector which will fit right into my Project Life album for 2012.  The back side has patterned paper so I can add more photos and stories there.  This page insert will most likely be layered in between my 12 x 12 regular Project Life pages with a few other inserts.  I'm thinking I'll have a few inserts for each week.  Oh how I love this.  Those vintage doilies were the best find EVER! So glad I didn't have to take my sister down for those.  Cuz I would have in a heart beat.
Okay, another fun page for the Project December book.  So glad you joined me today.

If you like the look of the vintage confetti, I have added a few Holiday Sequins and Snow Confetti Kits to the shop.  You just toss as much from each little sack together as you'd like to create your own holiday confetti soup.  You can put some in the little clear sacks or glassine bags then stitch to the tags or bags, layer, use on cards or pages...whatever your heart desires.  Enjoy!
I'm off to do a little catch up on my Project Life weeks.  Would really love to be all caught up by the time December rolls around.  We'll see...

November 15, 2012

Project December....altering wood embellishments

Wow, I have a bunch of stuff to share this holiday season.  If you've missed some posts, this year I'm combining my Project Life and Daily December all into my Project Life album.  You can scroll through my blog for lots of posts.  

Let's get right to today's project.  I have had some fun altering a few embellishments to add to my Project December pages and holiday projects in general.  It's always fun to challenge myself to make something unique to my albums.  This year along with the colors of red, aqua, green and buttery yellow I'm adding red stitching to all my papers + wood grain papers and accents will be sprinkled throughout.  So today I'm altering some wood veneer snowflakes, trees, arrows and hearts.  

First up if you want to add glitter to wood veneer, Glossy Accents is a great product.  You can google it online to find resources.  It goes on clear, pools up nicely and dries to a clear, raised finish. I also have a fondness for Martha Stewart glitters.  I find mine at Michael's. 
First up I applied Glossy Accents to the wood snowflakes using the fine point tip.  You want to apply enough so that all the surfaces are covered and you see a slightly rounded liquid finish.  But not enough that it all spills over the edge. 
Next I sprinkled on some coarse glitter.  Glitter just makes every holiday project so sparkly and festive. I love it.  
Here's what the dried snowflakes look like.  The Glossy Accents dries clear with all the sprinkles embedded in the dry liquid.  If you wanted to leave off the glitter, the Glossy Accents would have dried to a nice wet looking finish.
Next up I got out my green Martha Stewart glitters and went to work on some wood veneer trees.
I used a slightly heavier coverage of the glitter for the trees but less glitter would have left some of the wood veneer showing through.  I'll use these on my Project December inserts + they'll be cute on holiday cards and packaging.
Lastly, I used some Martha Stewart acrylic craft paints that I found at Michael's.  I painted the wood veneer surfaces, applying 2-3 coats to get a good coverage of paint.
Next I added a nice layer of Glossy Accents and just a tiny sprinkling of glitter.  I like this wet, shiny look so that the paint colors shows through.
Now I have a nice little stash of glittery wood accents to add to my collection of holiday products.
Here's a little sampling of one of the glittery snowflakes on a card.  I used Crate Paper, old dictionary paper, October Afternoon Make it Merry, red & white baker's twine and a stitched notebook tag from my Stitched in Red Kits.  The stamped sentiments are from Ali Edwards' Daily December stamp.
I've been using tags on my cards a lot lately.  They make a great layering accent and they're perfect to add a strip of patterned paper or Washi tape then a few wraps of baker's twine to finish off the card.
Here's a sampling of a new project I've been working on for my Project December.  The printed grid vellum with red stitching is a handmade item from the Stitched in Red Kit.  I love using the vellum because as you can see below, any patterned paper that use can still be seen underneath.
Here's a shot of the Stitched in Red Kit.  There are vellum pieces, index cards, a label, a library card, coin envelope, cute stitched notebook paper tags, sacks, twine and a few clips to make some gift packaging.  
Thanks for stopping by today.  I'm off to get groceries for my growing girls.  These long basketball practices are making them soooo hungry lately.  Tis the season.  :)
Related Posts with Thumbnails