November 30, 2009

Trim the Tree Challenge

Back by popular demand, Nichole has issued the Papertrey Senior Design Team the challenge of creating homemade ornaments. Oh what fun it is!

Homemade ornaments are a great gift to make and give. You can package them up in pretty little boxes, tie them to gifts, or do what I've done and tie one to a pretty, decorated envelope. The envelope can hold a Christmas card or can be used for gift cards. And my favorite way to present a homemade ornament? I like to tuck the envelopes into the Christmas tree and let the recipient search for envelope with their name on it.

What I've created for my ornament is a button wreath with a pretty tied bow. Pretty enough by itself but even better tied to a beautifully stamped Kraft envelope. And oh so simple to make. Easy peasy.
For my button wreath, I used the ever so popular Vintage Buttons in Dark Chocolate. I chose medium sized buttons and arranged them to create the size of circle I wanted. My button wreath measures about 2" in diameter and I used 12 buttons. Using black craft wire, I then threaded my buttons onto the wire. Leave about a 2" tail at the beginning and ending of the wire ends. When all the buttons are threaded onto the wire, twist the wire ends like a bread wrapper about 5-6 times to secure the button wreath. Tie on a length of Rustic Twine to make the ornament hanger. Then for the finishing touch, tie on a length of ribbon. I used Luxe Satin ribbon in Fresh Snow. To tie the wreath to an envelope, wrap more Rustic Twine around the envelope, tying the strands around a part of the wreath.
For my decorated envelope, I used a square Kraft envelope stamped with images from Snowflake Serenade. Beautiful sentiments and intricate snowflakes were stamped in Dark Chocolate and Fresh Snow. As a finishing touch, I added some brown sequins and White Gold Martha Stewart glitter(available at Michael's or Walmart) to the envelope edges.
Simple but super duper cute! The kids would love this too.

Other ideas for button wreath ornaments: Tie around the neck of a bottle of wine....wrap twine around a fresh loaf of bread and tie on an ornament.......use tiny buttons to create a smaller button wreath to tie onto individual wine glasses........tie to a handle of a coffee mug....tie to a box full of stamping goodies (like a mishie mini kit)......pin to a lapel of a jacket.....hang from a holiday kitchen/bath towel.....use as the main accent of a card......place a magnet on the back for fridge magnets.....hang from your rear view mirror in the car.....tie to the handle of your favorite Longaberger basket lined with a coordinating napkin liner......use red and white buttons to create a peppermint button wreath and tied around a bundle of candy canes......

........what other ideas can you think of????

And be sure to get even more holiday inspiration from the other Papertrey Senior girls:

Nichole Heady
Becky Oehlers
Heather Nichols
Lisa Johnson
Betsy Veldman

Annabelle O'Malley (guest designer)

November 28, 2009

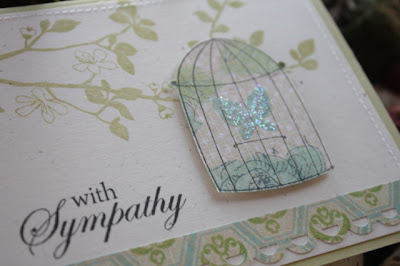
With Sympathy Bird Cage Card

This month ends my guest designer spot at My Cute Stamps. Thanks to Holly for having me, it's been a pleasure! Be sure to check out the site, it's been totally revamped and looks great! Fun blog too!!

I've been working in my stamp room, trying to fill a few empty spots in my card stash basket. I just love these serene images from the set called Ashley's Blossoms.
The branch with blossoms is so nicely illustrated. It makes the perfect backdrop for the bird cage. For the focal image, I stamped the bird cage onto some K & Company patterned paper. I then stamped the butterfly and glittered it. I adhere this to my card front using pop dots. The sympathy image was stamped in black ink. A little more patterned paper and machine stitching finish off the card.
Well, it's a busy day for me so I need to head out the door. Have a great day everyone, hope you get to relax this weekend. I've been working on lots and lots of projects just for me. Feels good!

November 27, 2009

Cream Cheese Potato Soup Recipe Card

Becky Higgins font can be found at her website. The link is on the right hand side: http://www.beckyhiggins.com/blog/

While finishing up this post Thanksgiving evening, I know that soup is about the last thing on our minds right now. But here goes! Hope you all had a wonderful Thanksgiving.

I haven't posted a recipe card forever, have I? I came across this recipe in a cookbook that I recently purchased at my scrapbooking retreat. The proceeds went to charity so I couldn't pass it up. I recalled my brother talking about a recipe that he raved over that had cream cheese and ham in it. I found the recipe in this cookbook so I had to try it. It's a keeper! We all loved the soup, especially now that the weather is getting colder outside. To create my 4" x 6" recipe card, I typed my recipe and printed it off onto cardstock. See left side bar for fonts, please, just scroll down. For my main *soups and stews* label, I used JustRite's Recipes Borders and Centers stamp set. I cut out the small circle using a Spellbinders Circle Nestabilities die template. I layered that onto a Spellbinders Pinking Circle Nestabilities die template in brown.

I then used patterns from October Afternoon to punch 1" squares of various papers. I adhered them to my recipe card then stitched around three sides of the card. I pinked the edges of the snippets of patterned paper that peek off the top of the recipe card.
To finish my recipe card, I used more October Afternoon paper and sticker strip of flowers. Machine stitching is along the sides and under the recipe title for some graphic line detailing.
I really love making these recipe cards. Hope you enjoy them too! Oh, and try the soup! If you want a cheesy taste, add a big chunk of Velveeta. At our house, it's real cheese. ;)
Edit: I forgot to paste in the recipe for you. Here ya go:
Cream Cheese Potato Soup
6 cups water
7 teaspoons chicken bouillon granules
2 pkgs (8ox) cream cheese, cubed
1 pkg (30 oz) cubed hash browns, thawed
1-1/2 cups cubed fully cooked ham
½ cup chopped onion
1 teaspoon dill weed
In a Dutch oven, combine water & bouillon. Add cream cheese; cook & stir til cheese is melted. Stir in remaining ingredients. Bring to a boil. Reduce heat; simmer, uncovered, for 18-20 minutes til veggies are tender. Nov 09
Big sale, check out this Just Rite announcement: It's a Black Friday 5 Day Sale...Take 20% off all JustRite Products (excluding November Releases). Sale starts November 26th- (Thanksgiving Day) and goes November 30th.

November 26, 2009

Come for Tea?

Happy Thanksgiving everyone! Blessings to you and safe travels if you're out and about this holiday.

How about a little lovin' for the tea drinkers out there? Today I have a super sweet card with all of you in mind. I used Karen Lockhart's Teapot stamp which features a fat little teapot and teacup, some lemons and a few sweet treats. I paper pieced the teapot and teacup using October Afternoon patterned paper. For the rest of the image, I used Copic Sketch markers. I added a little glitter to the background for some shimmer.
For the main card, I used more October Afternoon paper, Papertrey Vintage Cream Cardstock, Aqua Mist cardstock, Aqua Mist ribbon, a Vintage Button,Rustic Cream Twine and a sentiment from Time for Tea.

Hope the tea lovers enjoy! Have a great day.

November 25, 2009

Basketball Bookmarks

Before I start my post for today, be sure to stop by on December 2! JustRite will be sponsoring a blog hop featuring last minute gift ideas. It's sure to be a fun time!
Now for my post. I thought I would start out by showing you some of the scrapbook pages I worked on at the scrapbooking retreat I went to recently. I worked on the girls' albums and did mostly their sports pages. Sports are huge to our family. I am so thankful to have two, over the top talented little sports nuts for daughters too.
So needless to say, I take a ton of photo at the games, always trying to get that perfect shot.
Then when it comes time to scrapbook, I am in photo heaven......and photo overload too! :) Lots and lots of photos but we LOVE to look at the albums.
While I was still in sports mode, I wanted to create something for my girls. I decided to make them some book marks with their school colors and some basketball embellishments.
I found this great sentiment *Dream Big* by Just Rite that worked perfect for what I wanted to create. I used the new set called Just A Note Borders and Corners which fits into the new 2" Square Stamper. I also like the fun curly swirly border of the new 2" Frames set. I colored the little butterflies in with an orange Copic Sketch marker and then used Glossy Accents and some glitter to add a little bling.
I made my bookmark by cutting out a Classic Long Megabilities rectangle and Long Scalloped Megabilities rectangle using Spellbinders die templates. The longer shape is perfect for bookmarks. I finished off the bookmarks with Papertrey patterned paper and some basketball themed stickers.
For the back of the bookmarks, I added a white rectangle to match the size on the front. I wrote this note on the back to my girls: "Aim for the net but always keep reaching for the stars. You can do anything in life you want to do. Always keep reaching. Dream Big. Love Mom."

Before I go check out this Just Rite Announcement: It's a Black Friday 5 Day Sale...Take 20% off all JustRite Products (excluding November Releases). Sale starts November 26th- (Thanksgiving Day) and goes November 30th.

November 24, 2009

Christmas Goody Box

Today I'm using one of Karen Lockhart's new holiday stamps called Cookies for the Neighbors. It's a fun little image to color because it's full of Christmas cookies.....my favorites are frosted sugar cookies of the soft variety with fluffy frosting and sugar sprinkles. I colored the main image with Copic Sketch markers and then used a glitter pen to add shimmer to some of the cookies. To the main image, I added the Lockhart *celebrate the season* sentiment and a Papertrey sentiment from Peaceful Poinsettia. I stamped around the main image with Papertrey's Vintage Label in Pure Poppy. The image was cut with a Spellbinders Labels 1 die template. I love how the image is front and center on this card. So cute! On the inside of my card, I lined it with more Vintage Cream paper that I used for the main image. When my base card is a dark color, I sometimes like to line the inside with a lighter color so that writing shows up better. I stamped more Lockhart images on the inside and colored them with Copic Sketch markers. Using the green marker, I made some dots along the curly border. Shimmery pen was added for some holiday glitz.
Below are the Copic Sketch colors I used to color my image:
Hope you're ready for the holidays cuz here they come!! Have a great week everyone! Thanksgiving vacation starts tomorrow for us, woohoo!!

November 23, 2009

Coffee Notes

How about a little coffee break this Monday morning? I have to say that after having my DH(deer hunter/dear husband) home for five days I'm happy to have the house to myself this morning. I would drive him to his hunting spot, read his texts that he sent out of boredom, pick him up from his hunting spot......repeat, repeat, repeat. And still no deer, poor fella.


So now, I'm settling in with a nice cup of coffee and some stamping projects. Wouldn't you like to see this inviting basket when you show up at work or when you visit a friend? I put together this ensemble speedy quick thanks to some Just Rite stamps. I sewed these coffee themed fabric napkins (the blue material) this last summer and can't wait to have an actual visitor so I can use them for real. :) Along with the coffee ensemble, I thought it would be cute to tuck in a few coffee themed stamped goodies. I used Papertrey's lined recipe cards to make some super duper simple lists. Have you ever heard Paula Deen say *it's so easy it's almost stupid easy*? That is this project!
Using JustRite Stampers set called Just A Little Caffeine Borders and Centers, I stamped some fun sentiments onto patterned paper. I stamped the border sentiments right onto the lined notecards. I then punched out my center sentiments and adhered them to the inside of my circle sentiments. Notice how the circle on one card hangs off the edge...that just adds a little quirky-ness, I love it. A little office paperclip was added....because if you're like me, one list just doesn't cut it. I always seem to add another list, and another, and another.......
So if you've got some good friends at the office or maybe you're having a friend over for coffee....try out these little notecards. You could stamp oodles in a matter of minutes. Keep it stylish, keep it simple!!
If you like the fabric I used, it's from Studio E......at www.studioefabrics.com . The brown paper napkins were in my stash from some time ago.


Oh, and remember when I gave a clue that my next big Etsy kit has lots of brown? Well your guess of a chocolate theme were not correct. Any other guesses?

November 22, 2009

Snail Mail Gift Boxes

One of my favorite gifts to give to my mom, mother-in-law and Eric's grandma is a stash of homemade cards. They look forward to it each year too! Usually I package them up in a clear cello bag with a bow but this year I decided to make something different. Let me show you what I've created.

I started out by stamping some cute snails from My Cute Stamps set called Little Forest Friends. I colored the snail body and added a shadow using the Copic Sketch colors shown below. I then stamped the snail shell onto some new October Afternoon paper I scored at my local scrapbook store.

I cut out those images and adhered them to the colored snail images. I then punched out circles to make the snail images into tags.

I then took some office tags I had in my stash and stamped them with Papertrey's Polka Dot Basics II in Spring Moss and Background Basics: Text Style II in True Black.
I layered my tags onto scalloped punched circles in PTI's Spring Moss and Ripe Avocado cardstock. Images were adhered to tags with pop dots and then I added some clear sequins to the tags for a little bling.
Next up, I created the packaging. I used Papertrey's clear boxes and inserted a 4-1/4" x 5-3/4" piece of Everyday Blessings patterned paper. The box is tied with olive ribbon and the tag ties to the box with Papertrey Rustic Cream Twine.
I think it's always the packaging that makes the first impression of a great gift, don't you?
Here's a few ideas for you for the snail mail boxes:

Package up some cards from your stash....I know you have a stash.......and add in some postage stamps. Place them all in the box for a much appreciated gift. Tip: Create cards that are fairly flat (no puffy ribbons) and you'll fit more into the clear boxes.

Or add a few hand stamped tags of your own along with some small envelopes and twine for a small card crafting kit. This would be great for the kids!!
I'm definitely planning on keeping a few of these on hand at all times. Hope you are inspired! I made my list today of all the teacher gifts, etc that I want to stamp. It sure helps to have it all in list form when you start creating those goodies. I'm hoping to accomplish a lot over the Thanksgiving holiday!
Etsy update: I'm adding a few of these kits to my Etsy shop in just a bit.

November 21, 2009

Hello there...

Today I have some fun and fresh cards that I made using My Cute Stamps set called Hello Doodle. This is my last month as their guest designer and I'm having fun using their cute stamps. I stamped a flower image onto Basic Grey Nook and Pantry patterned paper and cut them out with fine tip scissors. I then added a tied button to each flower center. These became the main images for my cards. I made a whole stack of cutie pie cards, I just love having a few like this on hand for those *just because* moments when you want to send someone a card.
I love the little details on cards. That's what keeps me excited about paper crafting. The fun little accents that make a card so cute. I added green and yellow ribbon from Papertrey and used my messy stitches to adhere it. My messy stitches are three back and forth zig zags done with the sewing machine.

I also did something fun with the hello sentiment. I colored the letters with green and yellow Copic Sketch markers,blending the colors together by going back over both colors with the yellow marker. I then added Ranger Glossy Accents to the letters for a 3-D shine. Love that look!
For a final touch, I added a Papertrey sentiment from Dawn's Signature Greetings stamp set. It fits in perfectly with my hello sentiment.

Hope you enjoy! I'll be adding a few of these to the Etsy shop in a bit. :)

November 20, 2009

Masculine Get Well Slippers

I needed a masculine get well card for my Uncle Bob so I decided to make a few extra for my stash. It seems that male cards are always a challenge for us card makers, right? There's an abundance of pretty girly papers and floral stamps, but when it comes to the fellas our choices are a little more limited.

Karen Lockhart has a nice line of get well stamps that I like to pull out of my stash when making masculine cards. The slippers and the get comfy sentiment are some of my favorites. And the slippers are very versatile, they can be used for male or female cards. Below you can see my finished focal image pieces that will be attached to card fronts. I stamped the slippers onto Little Yellow Bicycle patterned paper and then paper pieced them, using fine tip scissors. I shaded the slippers using a Copic E43 marker and a colorless blender. I stamped my sentiment in black and stamped some leaf images from Papertrey's Turning A New Leaf set using Versamark ink. I added two snippets of Ripe Avocado and Terracotta Tile ribbon to the main image pieces using my messy stitches.....3 lines of back and forth stitching using my sewing machine.
For the card fronts, I used a leafy patterned paper from Little Yellow Bicycle(from a local scrapbook store). And here's a tip for you: If the paper is double sided, cut the paper to fit the card front and then trim 1" of the paper off. Turn it over and use that paper as a coordinating pattern. I like to use tiny strips of patterned paper to seal the two edges.
A nice little pile of cards....makes me a happy camper. :)
And I did it.....I made some masculine cards. Hope you are inspired!

And don't forget.....you can use ribbon on manly cards. I usually don't tie a bow but if you use the ribbon flat or sewn on like I did, it's totally man worthy!

November 19, 2009

Office Supply Kit Samples

Update on the hot cocoa recipe: I haven't made it yet. :) I'll be sure to keep you posted whenever I get around to making it though.

Hey there. If you ordered one of my office supply kits, you should have it by now. I thought I'd give you a little inspiration using some of the supplies from the kit. Below is a notepad using a Papertrey lined notepad, a giant clothespin to hold notes, and a libary card with slip in note. For the notepad and giant paperclip, these stamped images were included in your kit contents. Both are sentiments from my Papertrey Take Note set that Nichole and I worked on together. Don't you just love that little pencil? These sentiments look great paired up with grid patterned paper. I also used the alphabet paper from the Chocolate Remix patterned paper collection. Tied Sweet Blush Vintage Buttons sit on top of brown twill ribbon. To adhere the chipboard pieces to the giant paper clip, I like to use my hot glue gun or E6000 glue.
The pink floral fabric pieces were also included in the kit. Here's the library card paired up with a little file folder accent and some twill ribbon.

Hope you're having fun with your goodies! I have another kit in the works that I've been collecting supplies for. Lots of brown in this kit....any guesses to the theme?

November 18, 2009

Gingerbread Treat Sacks

One of my favorite things to do at Christmas time is to give out little gifts......just a little something that doesn't cost much but shows that I thought of someone. Homemade candies or paper crafted goodies usually do the trick.

Today I have some cute treat sacks to show you that would be perfect for the candy varieties. I used Papertrey sacks and Nichole's Holiday Button Bits to fancy up some goodies. The closure for the sacks is a 1" wide strip of Mary Engelbreit fabric from Moda, that is tied around the sack. I notched the ends with sharp scissors. I then stamped strips of cardstock with the *sweetest holiday wishes* sentiment from Holiday Button Bits. I tied this to my fabric strip using Martha Stewart striped twine. A red, glittery piece of holly leaf and a small jingle bell finish off the wrapping.
For the gingerbread image, I stamped him with Fresh Snow ink onto a Kraft punched scalloped square. Pure Poppy buttons finish him off. The squares attach to the sack with pop dots on both sides of the ribbon.
I went to work assembly line fashion and baked up lots of gingerbread images in the crafty kitchen.
And stamped lots of the sentiments onto Kraft cardstock.....notching the ends and punching holes with my Crop-A-Dile.
And used my rotary cutter and cutting board to make quick work of the red fabric strips.
I can't wait to package up some of my goodies in these bags. Do you have a favorite candy you give out this year? I haven't made that decision yet, too many goodies to choose from. :)

If you like my little treat sacks, I've made up some extras for my Etsy shop as kits of 3. Enjoy! I know sometimes, we all need a little help in getting all the packaging and wrapping done during the holidays. Have a great day!
Related Posts with Thumbnails