
For today I have more Project Life pages to show you.
Project Life...week of February 6th
First, please excuse the furry thing. I took my photos outside to get better lighting and Miss Libby would not go away. In my last Project Life post I talked about treating one week's worth of photos as a 2 page layout. Everything coordinates somewhat as far as colors and papers. This week I had additional papers and more photos that I wanted to add. To accommodate these extra items, I'm adding in more page protectors and am adding in papers and accents that still match my main, larger PL pages. I am going to try to keep these additional inserts at a smaller size too so that the main PL pages can be seen. So two big pages that make the main layout with smaller items tucked in between. Below I have added two 8.5 x 11 pages, one vertical and one horizontal.
 Below you can see what the spread looks like when opened. The smaller, additional pages are tucked right in but the main pages can still be seen too. The first additional 8.5 x 11 page is a letter that was sent to Eric that I wanted to keep. I attached one of E's current business cards too.
 I added a strip of patterned paper with some stitching, along with a long sticker. Simple but it added a few elements that help tie this page in with the others from this week.
 Here I flipped the page and now have two 8.5 x 11 pages. The left is the back of the letter page which holds a grocery list that I attached to an old advertisement page from some sort of magazine I got at an auction. The right is a horizontal page that I added that has a photo collage from a fun day of sledding.
 To my grocery list page, I added a stamped circle sticker and an embellished journaling card that I added typing to with my vintage typewriter.

 Below I turned the page again. You can see the back side of my horizontal 8.5 x 11 layout. These are additional photos of the girls building a snowman.
 Again, I wanted to include these photos but did not want the bulk of big layouts. I found a collage feature on the Walgreens photo developing site that works great. You select the size of photo collage you want, then select the photos and then it arranges them into a collage. You also have the ability to move around the photos. Simple for me since I'm not that good at the digital stuff. Yet. You can see more of the same type of scrappy elements that I added to the edge of my layout + a journaling card tucked under the photo collage.
 Here's the fur ball again. "Hello Miss Pink Nose and Pretty Green Eyes. Yes, I see you. Now please get off my Project Life album, I will pet you in a little bit. "
 Here's a shot of my two main PL pages with the insert pages removed. Am reallllly loving the concept of treating these two pages like a two page 12 x 12 spread. I tuck in my photos and journaling cards then add more scrappy accents and papers from my stash. This week my journaling cards that I tucked in the slots had a green theme....so it was fun to dig through my stash and find green themed accents.
 I am spending maybe 2-5 hours a week here and there on these two main pages. Fits into my schedule perfectly and I still feel like I'm doing the creative part of scrapbooking. Plus I'm keeping the focus on my photos + the journaling.
 Here's the left side of my layout.
 For the journaling cards, I like to leave some of them as is and then add other accents. This way the original design of the card stays true. On others I like to add my own twist of colors and patterned papers, etc. Here I added label sticker to the left journaling card + stamping, letter stickers and typewriter journaling to the right journaling card. I use machine stitching a lot.
 Here I embellished a blank journaling card with punched circles + machine stitching + a sticker.
 Below I added patterned paper + stickers + typewriter journaling + a trimmed down business card. If you round the corners, the business cards fit nicely onto the journaling cards.
 Here I tucked in a folded note from school + added a punched label. I stapled one side to my journaling insert so that the note could be tucked under and held in place nicely. And that wraps up this week of my PL album.

Stay tuned for the next week of my Project Life album coming this week. I used a collection of patterned papers and stickers that have a Valentine theme to dress up my pages. It's a fun way to use some of those collection type items we just have to have. Thanks for stopping by.
 Below you can see what the spread looks like when opened. The smaller, additional pages are tucked right in but the main pages can still be seen too. The first additional 8.5 x 11 page is a letter that was sent to Eric that I wanted to keep. I attached one of E's current business cards too.
 I added a strip of patterned paper with some stitching, along with a long sticker. Simple but it added a few elements that help tie this page in with the others from this week.
 Here I flipped the page and now have two 8.5 x 11 pages. The left is the back of the letter page which holds a grocery list that I attached to an old advertisement page from some sort of magazine I got at an auction. The right is a horizontal page that I added that has a photo collage from a fun day of sledding.
 To my grocery list page, I added a stamped circle sticker and an embellished journaling card that I added typing to with my vintage typewriter.
And here's some accents I added to the right page. I take lots of photos at events like sledding so it's always hard to figure out how to add so many photos to my albums without adding pages and pages of additional layouts. I like to keep my focus on photos + journaling so big layouts with lots of embellishments do not work for me most of the time. I have decided to turn the photos into collages like the one you see below. It's working great for me. I'm still able to have fun with the scrappy part as you can see with the patterned paper squares, scalloped edges and chipboard snowflakes.
 Below I turned the page again. You can see the back side of my horizontal 8.5 x 11 layout. These are additional photos of the girls building a snowman.
 Again, I wanted to include these photos but did not want the bulk of big layouts. I found a collage feature on the Walgreens photo developing site that works great. You select the size of photo collage you want, then select the photos and then it arranges them into a collage. You also have the ability to move around the photos. Simple for me since I'm not that good at the digital stuff. Yet. You can see more of the same type of scrappy elements that I added to the edge of my layout + a journaling card tucked under the photo collage.
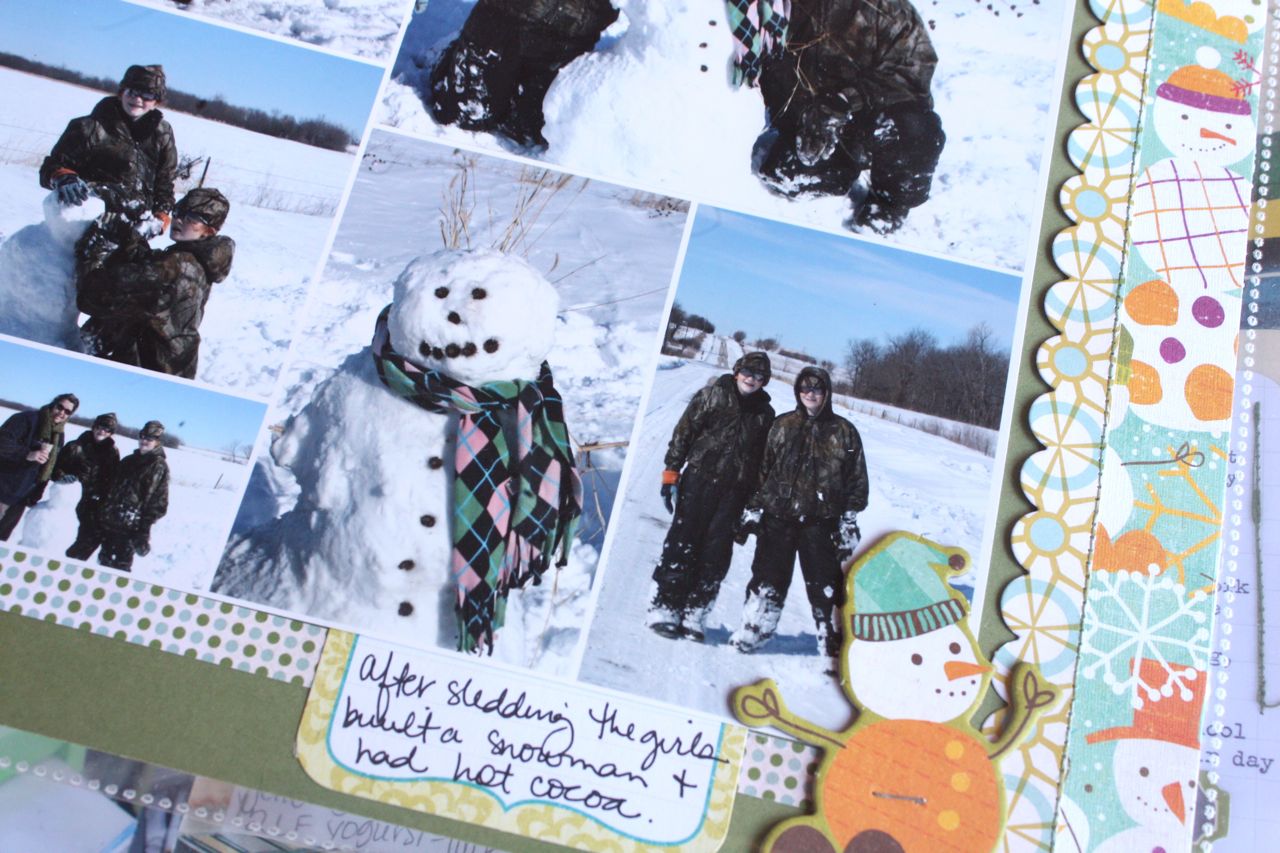 Here's the fur ball again. "Hello Miss Pink Nose and Pretty Green Eyes. Yes, I see you. Now please get off my Project Life album, I will pet you in a little bit. "
 Here's a shot of my two main PL pages with the insert pages removed. Am reallllly loving the concept of treating these two pages like a two page 12 x 12 spread. I tuck in my photos and journaling cards then add more scrappy accents and papers from my stash. This week my journaling cards that I tucked in the slots had a green theme....so it was fun to dig through my stash and find green themed accents.
 I am spending maybe 2-5 hours a week here and there on these two main pages. Fits into my schedule perfectly and I still feel like I'm doing the creative part of scrapbooking. Plus I'm keeping the focus on my photos + the journaling.
 Here's the left side of my layout.
 For the journaling cards, I like to leave some of them as is and then add other accents. This way the original design of the card stays true. On others I like to add my own twist of colors and patterned papers, etc. Here I added label sticker to the left journaling card + stamping, letter stickers and typewriter journaling to the right journaling card. I use machine stitching a lot.
 Here I embellished a blank journaling card with punched circles + machine stitching + a sticker.
 Below I added patterned paper + stickers + typewriter journaling + a trimmed down business card. If you round the corners, the business cards fit nicely onto the journaling cards.
 Here I tucked in a folded note from school + added a punched label. I stapled one side to my journaling insert so that the note could be tucked under and held in place nicely. And that wraps up this week of my PL album.


4 comments:
I screamed when I saw the sneak peek!:)
I knew you could do postage...and you would be perfect for it!
Though I'm still holding out hope for some WWII era one's at some point...love that time period if you couldn't guess.
And can't wait to find out more about these vintage labels...
love just the thought.
So excited!
I love all these wonderful pages...how you include the everyday things...letters from school...fav bar-b-que spot...
someday this will be worth more than gold...
and every moment it took to hold these moments in time.
awesome Michelle ..I am happy to report that I am doing much better than I thought keeping mine up it is so easy and great fun your concept is amazing
great job, I need to get caught up this week with my album and I love how you have included some of your own touches to the album.
I'm curious to know if you print your pictures at home or do you have them printed? Any suggestions or good tutorials on resizing them?
Michelle...thanks for sharing your PL! I loved all your bits and pieces that really made it so interesting to tell the week's story. I love where you live...Kansas looks like a peaceful place to raise those two beautiful daughters.
I'm waiting for some tags from Elle's Studio to add to my PL pages but I also added designer papers to my journal cards. The way you coordinated each 2 page spread is a great idea! I too look for the dominant color in my photos.
Looking forward to seeing more of your postage stamp sets from PTI...but waiting to order the whole kit and caboodle of your "buttons" from last month.
How is your OLW coming along?
Have a happy week!
Post a Comment