Showing posts with label Copic. Show all posts

June 19, 2014

Winnie & Walter Guest Blog Post....Floral Cards

I love a good floral stamp set, especially when I can create a vintage look with the images and have lots of options for adding color.  It's also great when the stamp set has a fun typewriter font that I love so much.  Winnie & Walter's The Big, the Bold and Extras has just the look I love.  
I used a journaling card as the building block for my images.  I stamped the images in brown ink, stamped the filler image then colored a few accents with Copic markers.  For the banner I did some two step stamping with a light pink ink.  My vintage typewriter came in handy for adding a birthday sentiment.  I popped the flowers and birthday sentiment up with pop dots.
A strip of washi tape placed diagonally is accented with a staple.  The journaling card has stitching to add a homespun look.  I used a pretty patterned paper from my stash for the background.
*Sigh*...beautiful floral images on a card just can't be beat.  Thank you so much to Winnie & Walter for having me as their guest this week.  Be sure to check out all their fun stamp sets & see their social media links on their blog sidebar.

September 28, 2012

Pinwheels...Halloween style with October Afternoon

TGIF everyone.  Today I'm sharing a post here and over at the October Afternoon blog.  I'm using these stamped patterned paper pieces from the Witch Hazel collection to create some trendy Halloween pinwheels.  Check out my mini tutorial on how to create the pinwheels at the October Afternoon blog.  
I created these two Halloween cards using my finished pinwheels.  
Lots of October Afternoon Witch Hazel product was added to my card fronts including Tin Pins, Buttons and Chip 'n Stick buttons.  The large backgrounds are from the Miscellany pack.  
 I'm also sharing an extra project here on my blog using one leftover pinwheel that I had.  I grabbed some Large Kraft Sacks, Dainty Doilies, Small Clothespins, my Hero Arts alphabet stamps and some Copic markers.
 I created two gift sacks that I will use for the girls' Halloween treat sacks.  I'll probably add flat items like packs of gum, and some iTunes cards.
 For the pinwheel embellishing, I cut one pinwheel in half and created a sack topper using a folded Dainty Doily.  I added tied chipboard buttons to the tops.  For some name tags, I used some round Tidbits and the Hero Arts alphabets.  For the small clothespins, I used my Copic markers to make some spooky stripes.
Woohoo, ahead of the game on the Halloween treats and cards.  How about you? Have you been creating any fun Halloween goodies?  

In other news:
Just did me a little shopping at 2Peas for the new Pink Paislee Portfolio items.  The clear stamps, Tiny Tabs, Ephemera pack and Embossed Chipboard Album are a few of my favorites.  

I've also been busy organizing my mealing planning venture and the Crockin' Girls recipes are big faves.  I've also been pinning a lot to my Pinterest boards in the Crock Pot Recipes and Freezer Meals sections.  

I've got new items in my shop also, including a brand new Mixed Greetings Card Kit, some vintage finds and lots of Fall and Halloween goodies.  

That about does it for me for the week.  I've got to do some shopping for Jordan's upcoming birthday, organize her sleepover with friends and get to decorating for Halloween.  Homecoming is tonight, should be a great night for a football game.  Have a great weekend everyone!

June 3, 2011

girly birthday cards

Hey friends. What a week it's been! I don't even want to know the amount of $$ I've spent on gas this week hauling the reds around. And we're off for a weekend ball tournament tonight. The fun never ends!

Jordy has a birthday party to go to next week and I've noticed that I never have any teenage/girly type cards in my stash. So my goal this summer is to add a few fun cards in here and there. When I want teenage girl type cards, I always reach for my Stamping Bella stamps. I love the whimsical images, especially the one I chose to work with today called presentahbella.

I stamped the images on solid cardstock and then again on some new My Mind's Eye patterned paper. Most of the papers and twine I used today are from the Lime Twist collection. I used my Copic markers to color in the girls on the solid cardstock and a few more to color in some spots on the paper pieced presents.
I adhered the presents to the main images and added a few quote bubbles that I cut out from this adorable paper. I stamped *happy birthday* sentiments onto the bubbles and popped them up with pop dots.
Next up it was time for a few embellishments. Using more of the Lime Twist paper I cut some strips and then notched the end to create little flags.
These were adhered to my card fronts and then buttons were added using some Lime Twist twine.
I also added some staples using my Tiny Tim stapler + some clear rhinestones that I colored with my Copics. Instant matching.
And here's my little stash-o of birthday cards for the girls to choose from.
I stitched around the focal image to add a little interest to the white + I added some glitter. Love all the mixy matchy colors in this one line as you can see on all my little notched strips of patterned paper.
Again, I love those little quote bubbles. Just too cute.
Hope you enjoy! Do you have some favorite stamps to use for teenage girl cards? I'd love to hear about your favorites.

Okay, we're off to see the Wizard. Well not really. We're really off to see Bud the softball coach. Catch ya later, peeps. Have a great weekend! Stay tuned because on Monday I'm teaming up with a crafty friend for an ongoing summer project. We'll be blogging our progress and I'll tell you all about it June 6th!

April 11, 2011

you've got mail..

Edit: Several of you asked about the size of my cards in my Mother's Day post. I've edited that post with the information and packaging tips here.

Hey everyone, you've got mail. :) Today I have a card to show you that I made using Friendship Jar + Friendship Jar Spring Fillers. I thought it would be fun to place the jar lying down so that all the mail goodies could spill out.
I love the look of paper piecing and I think it's even more cute when you stamp on patterned paper and then cut out the paper pieced image. Here I stamped the envelope images twice, one on Rustic White cardstock and then on my patterned paper. I colored the airmail stripes with the YR16 Copic marker. Then on the white cardstock I colored the bottom envelopes with the new E81 Ivory marker.
When the colored envelope gets placed on the white cardstock, the Ivory colored part becomes shadows.
I attached this to my jar image that was stamped with the polka dot filler with pop dots. I added a mini clothespin tied with twine for a fun accent.
The side of the card is fancied up with the little label image from the original Friendship Jar + a die cut and stamped label from Label Basics + a postage stamp from Postmarks. Machine stitching and a tiny staple hold everything in place. Patterned paper is from The Girls Paperie (from my local shop: Scrapbooks, Etc).
Hope you enjoy! Be sure to check out Nichole's blog for the latest sneaks of this month's Papertrey releases. She's got great projects featured today + links to the other stamp designers' blogs.

March 29, 2011

Easter wishes card

Hey friends. I've been reading in the Papertrey forums that you'd like to see some Easter inspiration + there was a question as to what the double line image from the Label Basics stamp set was to be used for. I've got both of those covered in today's post. :)

Easter seems to be late on the calendar this year, April 24th. That gives us more time to create a few springy/Easter projects, right? I'm starting off with this colorful card that uses Friendship Jar and Friendship Jar Spring Fillers. Remember that if you want to use the jar image, it does not come with any of the fillers sets.
I decided to use the cute chick in the egg image for my card today. So cute and chubby. I'm also using the tied twine image that is a new addition. I love this look. For perfect placement, stamp it right where the jar starts to curve.

Using my Copics, I stamped the chick image and colored it with my Copics. You can see the fully colored image on the right. I cut the colored image out carefully with scissors and attached pop dots to the back. Next I stamped the image a second time onto a stamped and die cut jar image. Using just 2 of my Copic markers I colored the image, just making sure the very outside parts of the image were colored.
I did this double coloring so that when I adhered my fully colored image, you can see some of the image and coloring beneath. Many times when you purchase a store bought sticker embellishment, you will see this double layering with pop dots in between. Love that dimensional look and so easy to achieve with our own stash of products.
Before I adhered the fully colored chick image, I stamped my jar with the polka dot filler from the original Friendship Jar right over the partially colored chick. I love the pastel background and it doesn't overpower the chick image. Using the Jar Toppers die, I die cut and stamped the coordinating image from the original Friendship Jar set. My completed jar embellishment was adhered to a Dainty Doily that was sewn to a piece of Sassafras patterned paper. The *from the heart* sentiment from the Spring Fillers set was stamped right onto the doily, near the stitching.
The bottom of my card features some Angled Label Basics dies that were stamped with the Label Basics stamps. These labels will be staples in my supplies, I can tell already. To address the question in the PTI forums about what to do with the double line stamp image from Label Basics.....the line image is to stamp over the labels to create divisions. You can stamp the image right in the middle or to the side....you can create journaling lines of sorts. On the larger images, you can stamp a line in the middle to create a postcard looking division. Lots of possibilities. I can't wait to try it with my Project Life album....the date on one side with some journaling on the other.

Today I stamped two of the angled labels first then die cut them with the coordinating die. Erin Lincoln shared that it's easiest to stamp the labels first then die cut. I totally agree. Next I stamped the double line image on both of my labels. On one section I stamped the Easter wishes greeting from the Spring Fillers stamp set. On the other sections, I sewed on buttons. Lots of possibilities with the labels. A very basic set of stamps but oh so many options.
A pretty little card to add to my stash. I'll probably keep this one on my desk for a little Easter decoration for a while though.
Hope you enjoy and thanks for stopping by! Maybe someday it will actually seem like Spring around here.

March 12, 2011

Postmarks

Welcome to Group Post day with the Papertrey Ink Design Team. Today the design team will be creating wonderful projects using the new Postmarks stamp set + I'll be showing the new Label Basics stamp set and dies as well. The Postmarks stamp set is actually a collaboration of ideas from Betsy and myself. We had both submitted concepts to Nichole for postage type stamp sets so Nichole combined our ideas into one set. At the same time I submitted concepts for a vintage label set reminiscent of the old Dennison labels, like I've shown below. I thought the postage theme and these classic labels would go hand in hand together.
So my first project showcases lots of stamps from the Postmarks set as well as labels from the Label Basics stamp set....in air mail theme with red and blue. I will be using a regular A2 Kraft envelope to create some mail art.
The idea behind mail art is that the packaging is embellished any way you like and slap some postage on it. It's amazing as to what you can mail through the postal service. I found a cool blog that has lots and lots of good inspiration but I have lost the link (will post it once I find it again). I think this type of project would be great for art students.

So here I have arranged stamp and dies on my envelope to get a feel for my art mail envelope layout. At this point, I snapped a photo to have as a visual reference.
I gathered up all my dies and placed them on my die cutting machine. I used White Adhesive Sheets for my labels so that they would stick nicely to my envelopes.
Next, I stamped red and blue labels, via airmail style.
Once I had all my labels stamped, I peeled off the back and stuck them to my Kraft envelope. In the upper right hand corner, I left a blank spot for a real postage stamp. I also left two labels blank so that I can address my envelope. For the rest of the front and back of the envelope, I added stamped images to fill in the blank spots. This is a great little exercise to just test out all the stamps.
Along with my art mail envelope I created a very simple notecard using the new Postmarks patterned paper designed by Heather Nichols. I simply cut an 5.5 x 8 rectangle and folded in half. A few leftover labels embellish the front.
I can't wait to send this off in the mail to an artsy friend. As long as you can slap a stamp on it, the sky's the limit. You might check with your local post office but I saw things like baseballs, 3-D items and all sorts of painted and sewn envelopes. It's all about stretching your creativity and having fun!
My next project uses the new Postmarks and Label Basics sets in a more traditional way. I've gathered up a few sheets of the Postmarks patterned paper, Kraft cardstock, cork, vintage book paper and a card sketch I did while waiting for my supply box to arrive this month. Again, I laid out the stamps and dies to get an idea of how my card would come together.
First, I die cut the Signature Series Butterfly die using patterned paper, cork and old book print. All of these layers will make for a ruffled up, dimensional butterfly.
I stitched down the center of all the layers, leaving the threads long to create butterfly antennas. Using the postmark stamp, circle stamp and small butterfly from Postmarks, I stamped the butterfly. What better way to send airmail than with a pretty, fluttery butterfly, right? You could also use bird stamps or the fun Up, Up and Away stamp if you want to keep with the air mail theme.
Next I use the well sought after postage stamp die that you've all been hoping for. I die cut the paper, stamped the outline edge, stamped the inside stamp (which has amazing detail) and then stamped the tiny little butterfly. All separate stamps so that you can design your own postage stamp any way you'd like. Very easy to add in different stamps from other sets.
Recently I acquired an entire box of old postmarked stamps from an auction. I thought it would be fun to add one to my finished card. So cool how my new stamps blends in nicely with my old stamp.
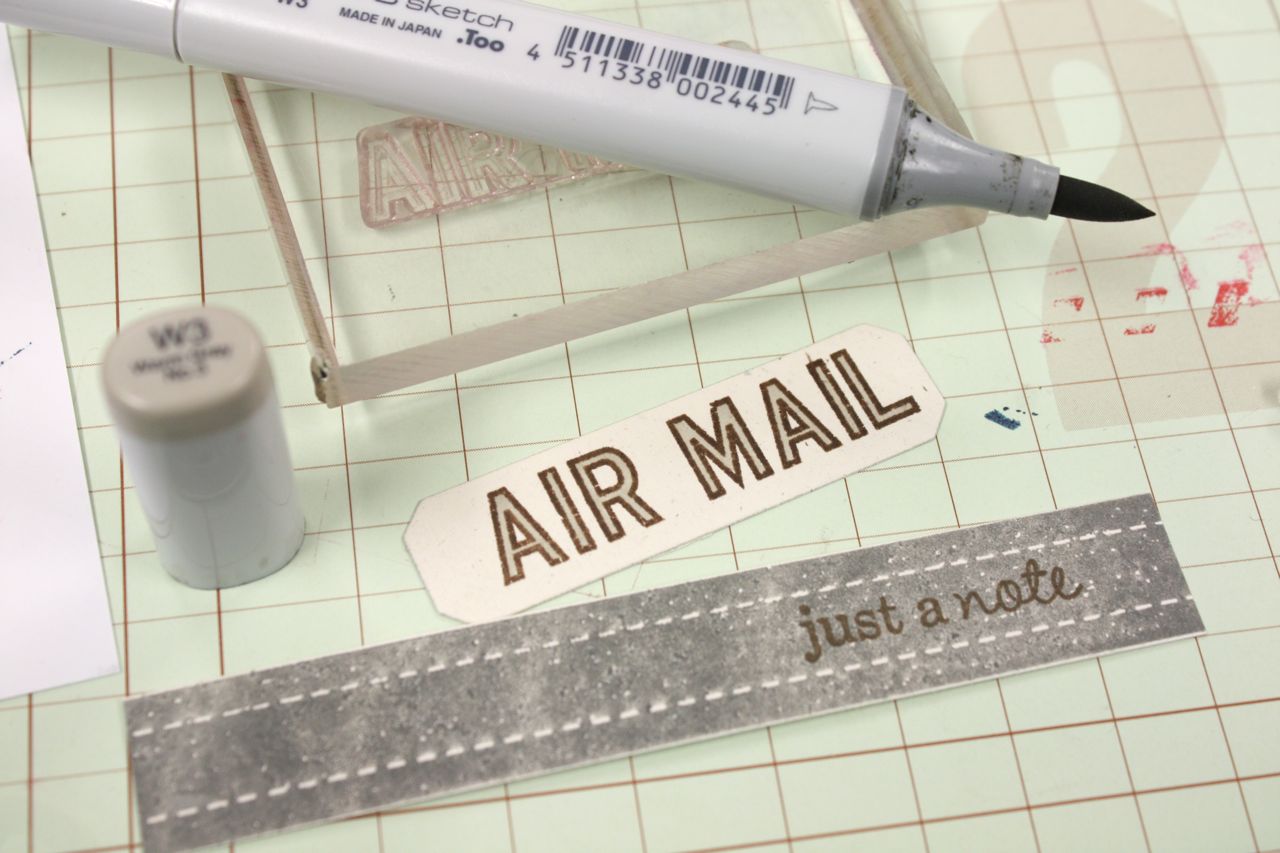
To create a vintage look to my card I used Dark Chocolate and Smokey Shadow colors that look so nice with the blue in the the Postmarks patterned paper. I first stamped the air mail sentiment onto a die cut cardstock label using Dark Chocolate ink. I then colored in the letters with a W3 Copic marker. I also stamped a strip of cardstock with Pine's new Ribbon Tails stamp using Smokey Shadow ink. Why not use a strip of actual ribbon, you ask? I love that I can add a strip of ribbon looking paper across my card fronts and not worry about the ribbon fraying.....plus I love that I can stamp a sentiment on the ribbon strip with the ink bleeding. Love.
And here's my finished card. Lot of nice details + I think this style of card would be great for manly card. Maybe switch out the butterfly or just leave it off the card altogether.
So many dimensional accents on this one, a fun card to create.
For my next project I'm going to brighten things up a bit with some colorful, spring flowers + a postcard. The stamps from Postmarks are perfect for designing your own postcards. I found that the Library Card Tag die is the perfect size for postcards.
First, I die cut the Library Card Tag shape using Rustic Cream cardstock. Don't worry about the hole, it will be totally covered up. Using Dark Chocolate ink I stamped the basic postcard elements. I also added in the 25 cent stamp from Button Boutique to create the divider line often seen on vintage postcards. I inked the edges with the Chamomile Tea Dye ink.
Next I die cut more of the White Adhesive sheets with the angled labels and stamped the coordinating label images using Aqua Mist ink.
To create an old stamp resembling the one on a vintage postcard find, I simply die cut the stamp shape, stamped on green the images with green ink and then touched the top with the Chamomile ink. Looks so real, doesn't it?
Next I wanted to create a pretty front for my postcard. I stamped the tulip image from Friendship Jar Spring Fillers with Dark Chocolate ink. Using the Copic colors shown below I colored my image in a somewhat watercolor looking fashion. Lots of white space + layering in colors.
To add some beautiful shimmer to my colored tulips, I painted over the Copic coloring with LuminArte Twinkling H2O's. These are pretty paints that add shimmer...I used a brush + some water to apply the yellow/orange paint.
I also added a few areas of purple paint. Purple is a complementary color to yellow and it really makes that yellow pop off the page.
I added a few patterned papers to my postcard front using my sewing machine. If you zoom in on the photo below you can really see the shimmery look of the Twinkling H20 paints.
And here are the back and front of my postcard. I used two separate layers just in case my paints and Copic markers bled through to the other side.
A beautiful, spring greeting or perhaps a nice Easter postcard for someone special.
On the back of the postcard, I can fill in the labels with a handwritten note. I'll probably slip this into a envelope if I decide to mail. I could have left off the postage die and added a real stamp if I wanted to mail this as an actual postcard. Can't wait to try more of these.
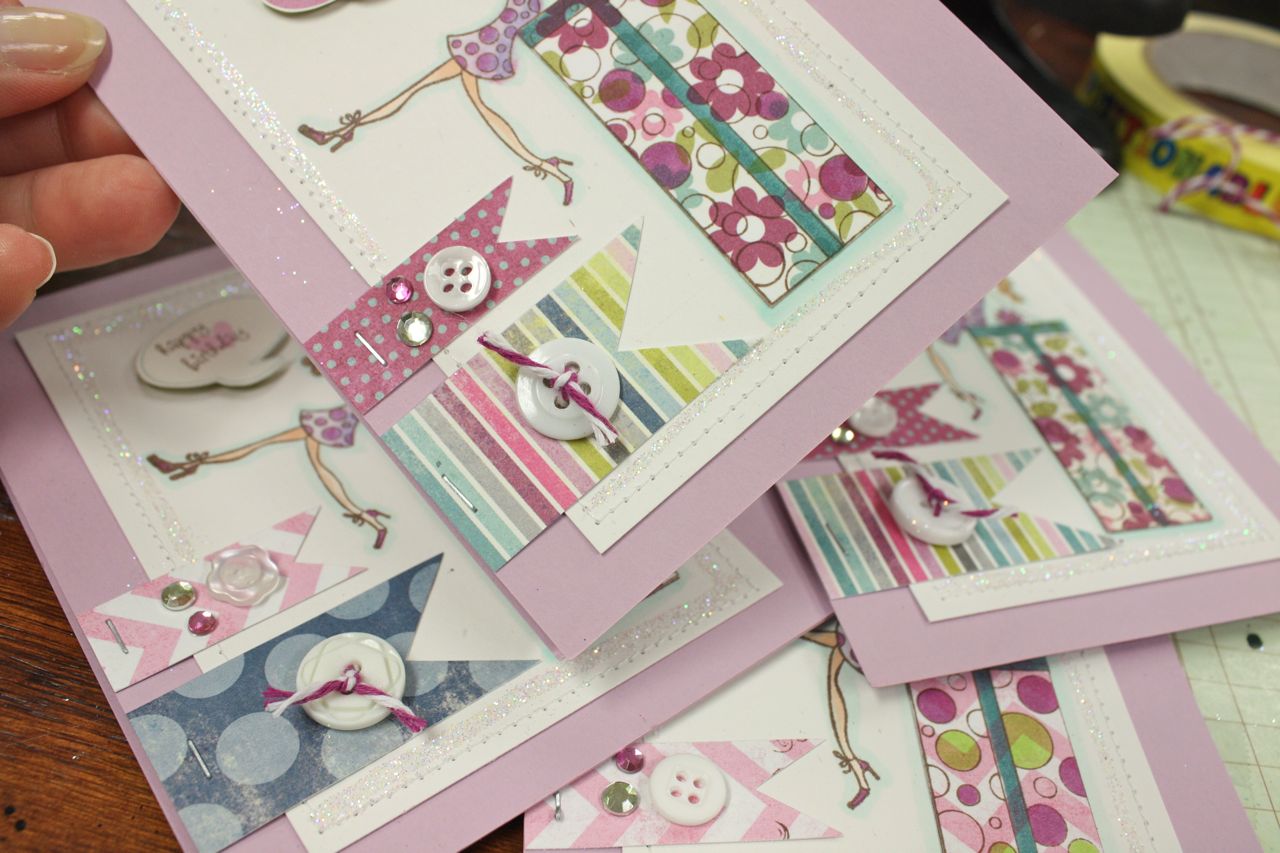
For my last project today I created two mini postcards that I intend to tuck into the girls' Easter baskets. I cut my mini postcard shapes from the Button Boutique button card die. Using colorful inks I stamped on lots of images from the Postmarks stamp set. A perfect way to use the Postmarks set if you're not into the vintage look. I love the Orange Zest and Aqua Mist airmail strip along the bottom. Part of the background was stamped with Pine's new Background Basics: Twinkle stamp set in green ink.
The eggs were made by using the Egg die cut shape, Green Boutique patterned paper, buttons + twine, a flower stamp from Melissa's new Tiny Tags, and a die cut from Flower Fusion #2. The notched ribbons were created by using Pine's new Ribbon Tails stamp set + the Double Ended Banner dies. So cute and colorful for spring or Easter projects. Use them as is or add to a card or gift sack. The *handle with care* and *fragile* sentiments are perfect to use with an egg theme or maybe even a baby theme.
Whew, that's it for today's projects. I hope you enjoy! Be sure to visit Nichole's + the other Design Team members' blogs for their fun projects using Postmarks.

Related Posts with Thumbnails