Showing posts with label Easter/Spring. Show all posts

March 20, 2014

Front door Spring decor...vintage umbrella floral arrangement

Happy Spring everyone!  I so look forward to this time of year.  Charlie and I were just out in the flower beds, digging to see if we could find new little plant sightings.  Sure enough there are lots of new, green sprouts peeking out.  

With Spring comes a time of renewal, a change to change things up and start fresh.  Ever since I saw this umbrella floral arrangement on the cover of a Midwest Living magazine I've wanted to find an old umbrella and do the same.  I believe this is the cover photo but I'm not exactly sure...pretty close if not.  This photo is pinned on my March Inspiration Board: Going Green

One day while out junking I found a vintage umbrella with a beautiful ivory looking handle.  I knew it had to come home with me and I knew exactly what I wanted to make with it.  A trip to Michael's for some fake florals and I was good to go.  The girls helped me select these flowers.  I love that they selected colors that just happen to coordinate with my color kit that I've recently been using for my Color Studio class assignments.  Large peonies are always a favorite flower of mine and these look pretty realistic. 
Here's my finished umbrella on my front door.  Pretty simple in nature and I added in my old chippy chair, suitcase and watering tins for a fun photo shoot.  
Such pretty colors and a fun welcome to our guests.
I just tucked in the florals, using a few grocery sacks for stuffing here and there.
My tried and true favorites, my watering cans are like old friends to me.  The suitcase?  I jokingly tell friends that I keep it packed with a few of Eric's things....just in case.
I'll be filling these up soon to water those first pretty flowers of the season.
Bright and sunny and so welcoming.  Bring on Spring...I'm so ready for you.  
Now.....I must go dig in my flower beds a bit more.  The girls made their first big outing in their new truck today with a friend.  They ventured into town for some Orange Leaf yogurt.  I worry.  Like all mamas do.  I worry more now.  I know they'll be okay.  But I worry....

March 12, 2013

Spring Packaging...

The 17" of snow has all melted and hopefully Spring is on it's way.  I like to have some fun packaging on hand for Easter and little small gifts so here's what I came up with today.  A fun Spring sack featuring a confetti sack, pretty patterned paper from Amy Tan, a die cut border, stamped tag, button and string.  To soften the sacks, I misted them using a mask and white spray.  
My favorite way to package up a few cards for the school secretaries or our moms.  
Also great for little Easter goodies and fairly flat items.
I've got 2 different kits up in the shop today.  You get all the supplies you need to complete a sack with just a little bit of assembly.  Each kit comes with extra confetti so you can use it on other projects.  This kit is the Multi Stripe Spring Kit.
This kit is the Pink Spring Packaging Kit.
I get lots of nice notes with orders and emails letting me know that you love to have these little packaging kits so that you can keep a few ready made sacks on hand.  Many of you also just like to purchase the packaging products separately too so you can have a stash of supplies on hand.  If you like today's packaging and want to purchase the items separately, I used Large Kraft Sacks, Pastel Confetti, and Dainty Doilies.  The Simple Sack Gift Packaging Kits would also be a good staple to have on hand for gift giving.  The glittery clothespins in the shop would be cute to top the sacks off too.  

Thanks so much for dropping in. Coming soon I'll have some more Gossamer Blue projects created from the March kit, Project Life updates and some fun new artsy finds. 

March 7, 2013

Confetti Easter cards...

Hey there, I'm back today to share some Easter cards with you using some new shop products.  My product picks from my shop today are these fun bags of Pastel Confetti Fluff.....
.....and the Small Yellow Glitter Clothespins.
I got a jump start on some Easter cards and packaging and here's what I created.  Some fun cards using confetti bags as a focal points and some simple packaging.  I used about a teaspoon of the confetti fluff in each clear bag...the bag you get comes with about 3 heaping tablespoons so there is lots to work with for cards. 
For my cards I used some new My Mind's Eye papers and stamps.  I stamped the whimsical flower onto Small White Parcel Tags.  For packaging up a fun springy gift, I used Large White Glassine Sacks and Dainty Doilies.
 For cute little clips, I used a Small Yellow Glitter Clothespin and a Glittery Gold Clothespin. I just added some paper flowers to top them off. If  you want to create your own colored, glittery clips I also have plain clothespins in the shop.
Cute and springy cards for my stash.  I'm thinking some fun sugar cookies with lots of pastel sprinkles might be a fun treat for the sacks.
For another treat idea, have you seen my Peep Show Cookie Jars?  This post has been pinned a bunch on Pinterest lately so I thought maybe it was worth sharing again.  The actual blog post is here with the recipe.  I think I'll make up some of these for the little kiddos this year.
Here's hoping Spring will be here soon.  Enjoy!

April 19, 2011

Make + Save: Peep Show Cookie Jar

Please note: The Make + Save link is not available just yet over at Papertrey Ink. I have listed the recipe ingredients and will walk you through the assembly process in my post here today. The information for this Make + Save will available soon at Papertrey Ink. If you have any questions on supplies, etc please leave a comment and I will edit my post with answers. :)

Welcome to another Papertrey Make + Save post, where you'll find nifty handmade gift ideas that you make from your own supplies. Today I'm featuring a Peep Show Cookie Jar just in time for Spring and Easter. Full instructions for how to assemble the jar ingredients and how to embellish the jar are at the Make + Save section of the Papertrey Ink website.

First up I'm going to show you how to make assemble the cookie ingredients in the jar. I've included the recipe for the Peep Show Cookies below so you can see what ingredients we're working with for jar assembly. Be sure to include the recipe with the jar when giving as a gift.

Note: A wide mouth canning jar + lid and ring work best for this project.

Peep Show Cookies
1 sleeve graham crackers, crushed
8 Peeps marshmallows
1-1/2 cups plain pastel M & M’s
1/3 cup brown sugar
½ cup butter, melted
1 teaspoon vanilla
1 quart canning jar

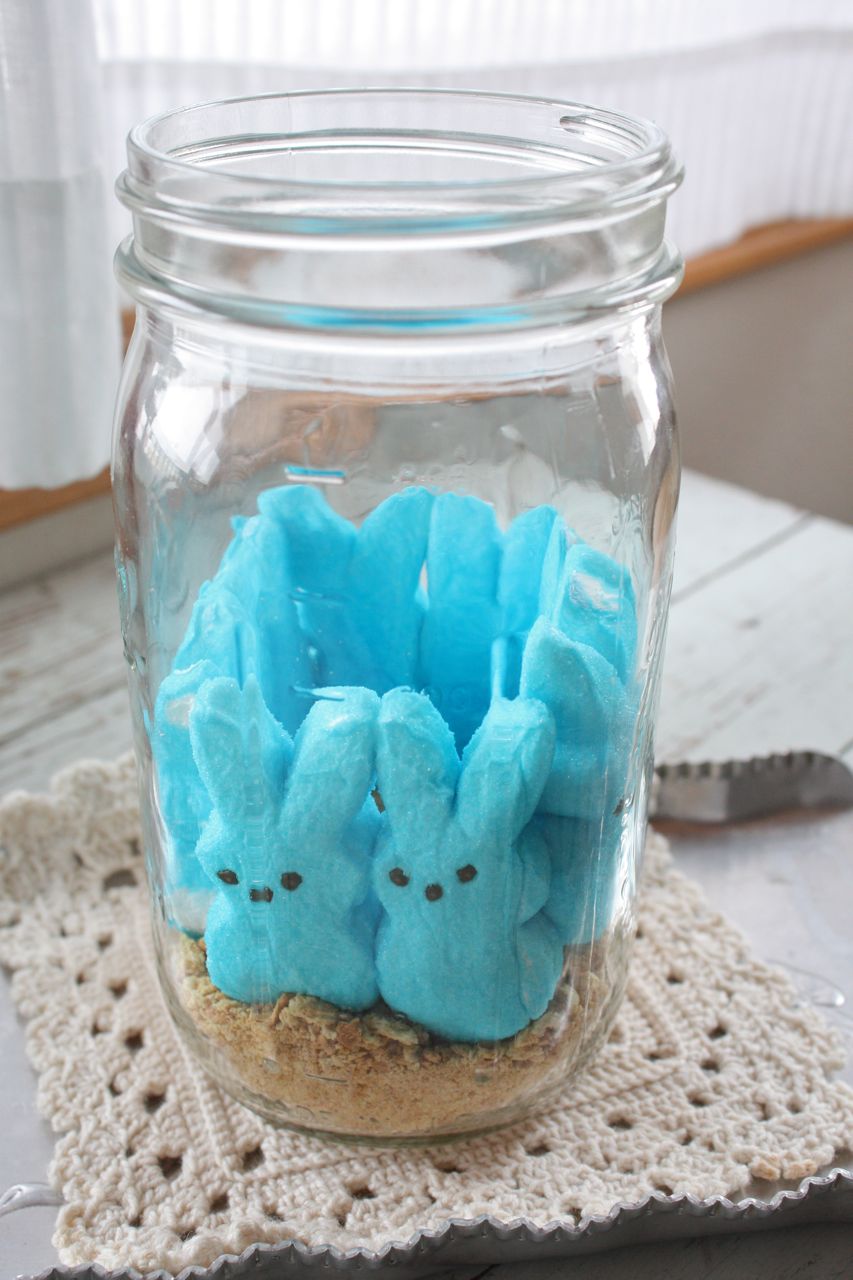
To assemble jar: Layer 2/3 cup graham cracker crumbs in jar. Arrange 8 Peeps on top of crumbs, around inside of jar. Spoon remaining crumbs in to support the Peeps. Pour M & M’s on top. Pack in brown sugar.
To make cookies: Dump jar ingredients into bowl. Snip Peeps into bits. Mix all ingredients with melted butter and vanilla. Pat into 9” baking dish. Bake at 350 degrees for about 15 minutes. Cut into bars. Enjoy!

Here's a photo of the ingredients you'll need to assemble the jar: Peeps Marshmallows, brown sugar, graham crackers and pastel, plain M & M's.
Using a clean, wide mouth canning jar layer 2/3 cup crushed graham crackers into bottom of jar. Arrange 8 Peeps marshmallows around the inside of the jar.
You will then spoon in the rest of the crushed graham crackers to support the Peeps. Pour in the M & M's. Then pack in the brown sugar. I used this unknown wooden tool that I got in a box of stuff at an auction. If you don't own an unknown wooden tool, just use a large spoon to pack the brown sugar. Place the lid on the jar and screw on the ring. Set jar aside while we make the jar embellishments.
Here's a photo of the supplies needed to embellish the jar. Again, the complete supply list and instructions are listed at the Make + Save section at Papertrey Ink. I'll be using Friendship Jar + Friendship Jar Spring Fillers plus lots of other fun products.
Start off by die cutting and stamping the jar + lid + topper + label images as shown below. The bunny in the jar is from Friendship Jar Spring Fillers.
Color the bunny image with Copic markers. Using the fine tip end of pastel Copics, make small polka dots on the jar.
Assemble the die cut jar pieces as shown below. I used pop dots to adhere the jar lid and the label. A portion of the label will be snipped off. Set embellishment aside.
Cut a 5" circle of fabric using pinking shears. The fabric I used is from Amy Butler (sorry, I don't know the exact name). Center the fabric circle over the jar lid then screw the ring over the fabric. Set aside.
Using spray mists (you could also use Copic re-inkers and an old toothbrush), splatter the ribbon with droplets of ink. I did not spray the ink but instead used the spray nozzle as a eye dropper of sorts. This gives the ribbon a great speckled egg look.
Tie the ribbon around the jar ring, using small glue dots to secure in place if needed. Wrap a piece of twine around the jar lid of the embellishment and tie around tied bow on jar.
And here is my completed Peep Show Cookie Jar. I'm using mine as a cute center piece decoration for now. So cute and colorful.
Place a few little chicks from the craft stop on top for even more adorable-ness.
So cute with the pastel M & M's showing through. All kids young and old LOVE these jars. Include a copy of the recipe so that the recipient knows how to prepare the cookies. So easy and fun. Hope you enjoy!

March 29, 2011

Easter wishes card

Hey friends. I've been reading in the Papertrey forums that you'd like to see some Easter inspiration + there was a question as to what the double line image from the Label Basics stamp set was to be used for. I've got both of those covered in today's post. :)

Easter seems to be late on the calendar this year, April 24th. That gives us more time to create a few springy/Easter projects, right? I'm starting off with this colorful card that uses Friendship Jar and Friendship Jar Spring Fillers. Remember that if you want to use the jar image, it does not come with any of the fillers sets.
I decided to use the cute chick in the egg image for my card today. So cute and chubby. I'm also using the tied twine image that is a new addition. I love this look. For perfect placement, stamp it right where the jar starts to curve.

Using my Copics, I stamped the chick image and colored it with my Copics. You can see the fully colored image on the right. I cut the colored image out carefully with scissors and attached pop dots to the back. Next I stamped the image a second time onto a stamped and die cut jar image. Using just 2 of my Copic markers I colored the image, just making sure the very outside parts of the image were colored.
I did this double coloring so that when I adhered my fully colored image, you can see some of the image and coloring beneath. Many times when you purchase a store bought sticker embellishment, you will see this double layering with pop dots in between. Love that dimensional look and so easy to achieve with our own stash of products.
Before I adhered the fully colored chick image, I stamped my jar with the polka dot filler from the original Friendship Jar right over the partially colored chick. I love the pastel background and it doesn't overpower the chick image. Using the Jar Toppers die, I die cut and stamped the coordinating image from the original Friendship Jar set. My completed jar embellishment was adhered to a Dainty Doily that was sewn to a piece of Sassafras patterned paper. The *from the heart* sentiment from the Spring Fillers set was stamped right onto the doily, near the stitching.
The bottom of my card features some Angled Label Basics dies that were stamped with the Label Basics stamps. These labels will be staples in my supplies, I can tell already. To address the question in the PTI forums about what to do with the double line stamp image from Label Basics.....the line image is to stamp over the labels to create divisions. You can stamp the image right in the middle or to the side....you can create journaling lines of sorts. On the larger images, you can stamp a line in the middle to create a postcard looking division. Lots of possibilities. I can't wait to try it with my Project Life album....the date on one side with some journaling on the other.

Today I stamped two of the angled labels first then die cut them with the coordinating die. Erin Lincoln shared that it's easiest to stamp the labels first then die cut. I totally agree. Next I stamped the double line image on both of my labels. On one section I stamped the Easter wishes greeting from the Spring Fillers stamp set. On the other sections, I sewed on buttons. Lots of possibilities with the labels. A very basic set of stamps but oh so many options.
A pretty little card to add to my stash. I'll probably keep this one on my desk for a little Easter decoration for a while though.
Hope you enjoy and thanks for stopping by! Maybe someday it will actually seem like Spring around here.

April 4, 2010

Vintage Easter Postcards

Happy Easter Peeps! I hope you are spending time with your family and having a blessed day. My dad gave me these old postcards that were written on by his grandmother Cora.
I thought these Easter ones were especially pretty.
I love the old time images, so soft and serene. It seems there were always little chicks on lots of them.
And the beautiful handwriting is exquisite. So flowing and loopy and pretty.
Thank you all for blessing my life. You're the reason my blogging has so much meaning. Have a happy day. It's beautiful here in Kansas today. Storms are to pass through tonight so we're going to enjoy the time outdoors. Maybe hide some eggs.

March 31, 2010

Impress, To Die For Tips & Tricks!

Hi everyone and Happy April Fool's Day!! It's time once again for the Papertrey Senior Challenge. This month, it's all about Papertrey's new dies and Impression Plates. I've been working on some fun Easter goodies so I thought I'd share what I've been up to.

Crepe paper embellishments are very popular right now and it's very easy to create your own. Here, I used 3-4 lays of pink crepe paper and stitched down one side, through all the layers. Then I cut my crepe paper layers with a Scalloped Border Die. The die easily cuts through all the crepe paper layers.
I ruffled up the scallops and added my crepe paper ruffle to an Easter treat sack. I packaged a Reese's Egg (my personal fave) in a medium glassine sack and used some ribbon and an Easter egg doodad from my stash to finish off the embellishments.
I nestled my treat sack into a little egg container box with some Easter grass. Such a pretty little gift but so easy to mass produce if needed.
Next up, I needed to make some tags for my girls' Easter baskets. I used the Egg Die, the Small Scalloped Border Die and the Fillable Frames #1 Die. I die cut eggs from some pretty Karen Foster paper and cut the scallop borders from Kraft cardstock.
I cut two Fillable Frames #1 dies for each tag so that I could stamp *happy Easter* from Pine's Egg Hunt stamp set on the inside.
The finished tags are tied to the girls' Easter baskets using some of my Wrinkle Ribbon. I keep the tags from year to year in the bottom of the girls' baskets. It's fun to see what I made from the previous years. Pine keeps her tags to use in her girls' scrapbooks. Great idea!
And here's the girls' Easter baskets with their cute tags tied on. The Easter Bunny has a few more goodies to deliver on Easter morning. :)
And here's my *oh so simple* die storage. I keep my Cuttlebug and dies on an old serving tray that I can wheel around my art studio. I picked it up at a garage sale a few years ago.
I store my Papertrey dies in an old wooden box. The small dies are in a little tin jello mold and my long dies are in an old tin drinking cup. The Impression Plates just stand up in the box along with extra cutting plates and mats. Nothing fancy at all but it works for me. I really like to keep my tools out where I can see them....yet I want them to have some sort of organization. As my collection grows I'll probably create some filing tabs for my box so that I can sort through them quicker.
Hope you enjoy today's post! No tricks, just treats! And speaking of treats, check out what the other girls have created today:

Related Posts with Thumbnails