Showing posts with label Cork. Show all posts

June 5, 2012

My Pieces of Me Kit...

This Summer I've decided to cut down a bit on my work schedule while the girls are home from school.  I plan to do two things in particular....spend quality time with the girls and spend more time working on some "just for fun" projects for me.  

One of the projects that I'm particularly excited about is Maggie Holmes' Pieces of Me workshop that's currently offered at 2Peas.  It's theme is centered around creating a mini album that is all about YOU.  Little bits and pieces about who you are and what you love.  I sat down this morning and wrote two full pages of things I want to include in my album. There is a kit that 2Peas is offering to go along with the workshop but I opted to design my own using items from my shop.    I offered some of my kits up in the shop (sold out now) and you can see the details and fun inspiration photos in this post.  Here's what my main kit looks like:  
My album will be 4 x 8 and I'll be using lots of Instagrams  and typed lists.  As you can see in the main kit photo above, I chose a color scheme of soft robin's egg blue, a peachy orange, olive green, cream/white and Kraft + grey.  I decided to add to my main kit with a few other products I chose after I shopped my own stash of goodies.  I'm placing all my supplies in this wicker tray and will keep it out on table #2 in my work room.  My plan is to dabble with the album and work on it here and there.
Here's some of the supplies I've added to my main kit.  Spray mists from October Afternoon and Studio Calico.  I want to experiment with my supplies and see what fun techniques I can try.  Big splatters and masking is on the list.  
While shopping my stash, I reached for some of my favorite items.  Vintage button cards are high on the list.  I'll use baker's twine to tie individual buttons that are from the main kit.
Washi tape is a new obsession.  3 whole stacks that have colors that coordinate with my kit colors.  Love this stuff..
Small tags and die cuts to use for journaling or to layer small embellishments.  Love these from Banana Fish Studio.
Sacks of all kinds from my shop + little coin envelopes, etc.  These are perfect for tucking in receipts, journaling tags, extra photos, etc.
Little buttons and baubles that I hand picked from my stash.  I selected a few favorites that I've been hoarding.  Wood buttons are becoming a new favorite embellishments.  I see a trend developing with lots of wood items.  Or maybe I'm behind and just now noticing.  ;)
Tags and more tags for journaling.  I want to experiment with more layering and stitching on tags.  My sewing machine should get a work out for sure.  I'll also be using lots of my Grid Labels that I'll run through my vintage typewriter.  My handwriting is large so the typed journaling helps save space.
Vintage trims of all kinds, including laces, ric racs, pieces of old doilies, circles cut from cutter quilts, velvet trim, seam binding and more.  Definitely pieces of me.
Embossing powders.  These always get stuck in the corner just like Baby but I'm hoping to experiment with some fun techniques.  I thought these colors were just perfect for my album.
And last minute I realized that I'll need some more page inserts.  I reached for lots of neutrals + a few new My Mind's Eye Indie papers that I just picked up at Archivers last weekend.  I just shuffled them all together and will select papers randomly.  Lots of the patterns will be covered by the Instagrams and embellishments so I'm not worried about patterns being too bold.
And that's a wrap.  I tucked everything in my basket and it's ready to go.  I took some time last night and watched all of Maggie's videos and looked all the albums from the class contributors.  Way to represent, girls!  Awesome class and I highly suggest it if you're looking to do a little something for "just you".  

Note:  I've several emails for requests to re-stock my Summer Cottage Kit.  I'm sorry but I just don't have the albums, etc to recreate full kits.  But if you look at the top photo of today's post or go to my original post about my kit, you'll see that there are tons of items from my shop that are available as individual items.  You could easily stock up on tags, etc and make up your own kit in no time.  
I'm hoping to report my progress if it's something you'll be interested in.  Just let me know by leaving a comment....let me know if you're taking on this project, how you planned your album, what you plan to include.  I'd love to hear from you.  

In shop news:
Thank you for the Washi love, I'm ordering new rolls with every batch but if there's some in particular that you'd like a repeat of just let me know.  Also, look for a brand new batch of sacks coming soon.  I am fresh out of everything and have had lots of requests.  You got it!

Have a great day everyone!

May 30, 2012

Summer Cottage Mini Journal Kits

SOLD OUT KITS: The kits are now sold out in the shop. I've been asked if I can make anymore. I'm sorry to say that I don't have enough of the supplies on hand to do so. Most of the tags that I used are available in my shop + look for a few extras of the stamps to go up in the shop later today. Perhaps you could piece together a kit of your own making. Thanks so much to everyone who ordered a kit, enjoy!

I have something to share that's just been waiting for Summer to arrive. Each Summer when the girls are out of school I dream of a lazy days with lots of relaxing and doing lots of whatever I want. In reality my summers are not like that at all. They're full of work, ballgames, practices and lots of crazy girls running around our home. While I love all that, a girl can dream of that beautiful Summer cottage, tucked away in a far away spot. And so came about the idea for my Summer Cottage Mini Journal Kits.

Please note: I have taken time to provide the Pinterest links for each of the photos I used in my collages below. If you would like to pin a photo, please pin from the photo links provided below each collage (and not the actual collage) so that the proper credit is given to the original poster. :)

If I could have my own Summer cottage it would be reminiscent of the photos below. A place to hide away and call my own. Lots of little nooks to relax in, fresh picked bouquets everywhere and maybe a stack of books that I've been wanting to read........

Perhaps I'd write some letters or even a book, plan a little party out in the meadow, or have a little picnic for two.....

I'd be surrounded by beautiful things I love. Perhaps I'd ride my old bike into a quaint little town. Or maybe fire up my favorite old truck for a day of junkin'.

What would be your idea of a favorite Summer cottage? Whatever it may be it's fun to dream, right? Or maybe you do have a Summer cottage that you call your own. My Summer Cottage Mini Journal Kits are designed to hold all those picture perfect photos and mementos in one little spot. Use the journal to jot down your thoughts, add those little Instagrams.....photos from your garden or favorite spot on the porch....whatever your heart desires.
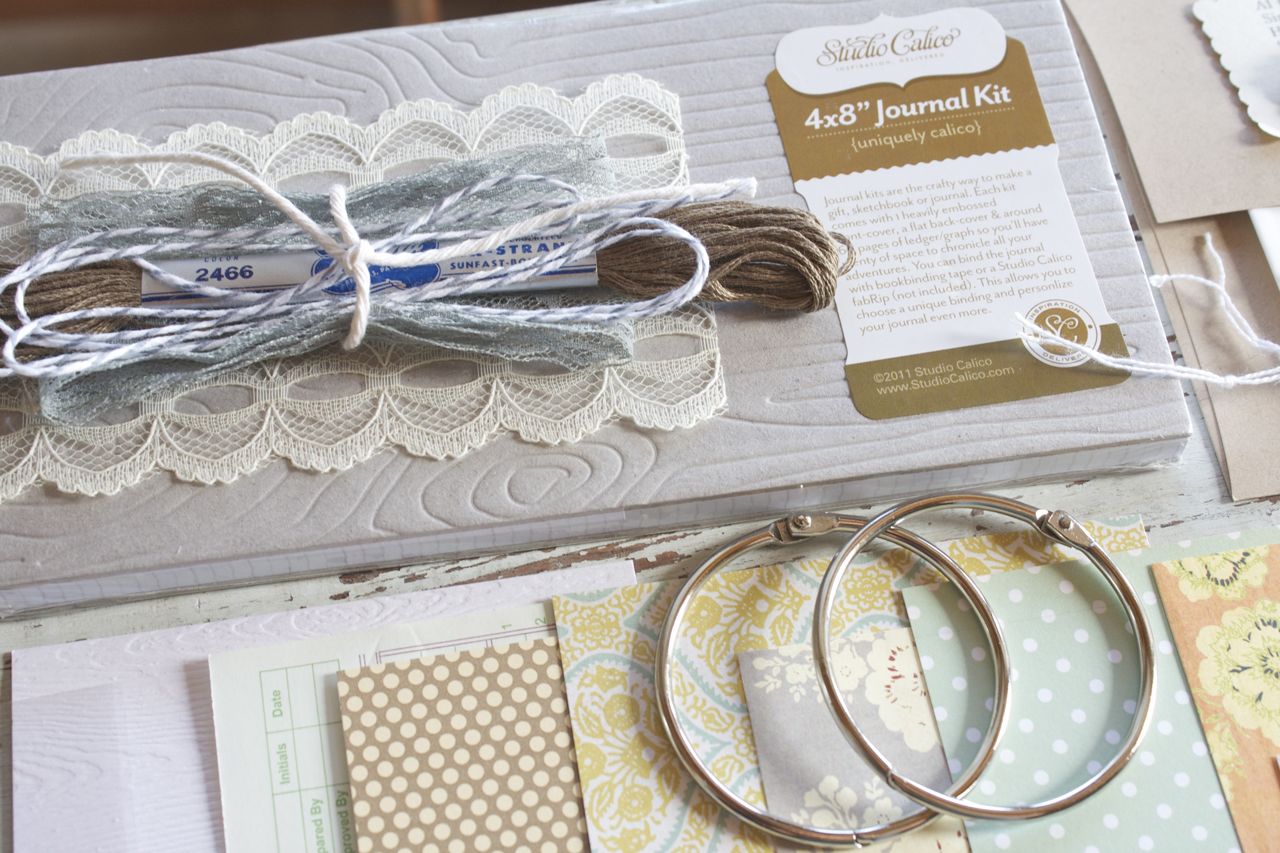
I've selected my favorite Summer colors for this kit and there are oodles of papers and embellishments tucked inside. Lots of tags, punched woodgrain pieces and a full roll of Washi tape from Freckled Fawn.
My favorite colors of mossy green, light aqua, sherbet orange and grey all come together. You'll have lots of fun using the 2 stamps from Banana Fish Studio. I'll show you how to use them in an informational post coming soon.
Use all the tags, lined cards, Grid Labels and more for journaling or to create your own accents. The Grid Labels are fun to run through a vintage typewriter...or stamp on them.
I've included a few stamped pieces too along with a Library Card, index tab punches, buttons and more.
I pulled out my stash of vintage sequins and buttons and plan on showing you soon how to make a beautiful layered butterfly to adorn the cover of your journal, perhaps. You must zoom in on the woodgrain pattern, it's so detailed.
You'll receive a 4 x 8 woodgrain, chipboard journal. It's full of copy weight grid paper inside, perfect for creating a journal or diary of sorts. I've also included a bundle of vintage lace, a full skein of embroidery floss, and baker's twine to add a homespun feel to your pages. There are 2 giant 2" binder rings so that your journal can grow and grow this Summer. None of the pieces are punched but if you have a Crop-a-dile or regular hole punch, that will do the trick.
The kits are in the shop now and are in very limited quantities. They're going quickly already. I'll be back for lots of fun posts using this kit so stay tuned. I'm planning on using my personal kit for Maggie Holme's Pieces of Me class which is being offered at 2Peas. Kits will start shipping on Thursday in case you need one quickly. :) I'll be gathering up a few more items from my own stash to add to my kit and will be sharing those photos soon too. Lots of fun to come!
Thanks so much for stopping by and Happy Summer to you.

Note: Shipping boxes Internationally always involves a certain amount of guess work. If you order and your shipping is way high, I will be happy to refund a portion of the cost back to your PayPal account.

December 13, 2011

Christmas Tag Trio...

Time to get busy making some gift tags for teacher and neighbor gifts. I like to have a stash on hand that can be added to simple brown bag type packaging. Lisa Truesdell's trio of misted tags were the perfect inspiration I needed. I gathered up a few of my holiday supplies and went to work.
Here's my creation of three colorful tags that will perfect for any gift. I used a Large Manila Tag, a Medium Manila Tag and a Small Manila Tag from my shop as the bases.
I splattered my tags with Studio Calico Mister Huey spray mist in green. Each tag also has a punched piece of cork as an accent piece with layers of October Afternoon Holiday Style Flour Sack embellishments on top.
I added buttons and vintage twine to the stars on the two larger tags.
Each tag base also has a few strips of October Afternoon Holiday Style patterned paper plus some Washi tape here and there.
I finished off each tag with a candy cane clothespin that I had in my shop earlier this holiday season.
For the back of the tags, I made simple to/from labels by typing on store bought striped labels that I found at Target. I just slipped the entire sheet of labels into my vintage typewriter and typed the words. A fun little trio of tags that took very little time to make. Into my stash basket of holiday tags they go. :)
If you'd like to try your hand at a few handmade tags of your own, I put together a handful of Tag & /Cork Sampler Kits in the shop. There's a sample of the 3 sizes of manila tags I carry plus some cork embellishments and a few clothespins. The tags and clothespins can also be purchased separately if you need bigger quantities. Have fun!
Tomorrow is my big shopping day in the city. We're definitely not going overboard this year so it should be easy to stick to the list....get in and get out of the stores.....then back home to my little place in the country. Just how I like it. So how's your holiday going? Are you frizzled, frazzled? Do you need a cup of margarita nog yet? ;)

March 12, 2011

Postmarks

Welcome to Group Post day with the Papertrey Ink Design Team. Today the design team will be creating wonderful projects using the new Postmarks stamp set + I'll be showing the new Label Basics stamp set and dies as well. The Postmarks stamp set is actually a collaboration of ideas from Betsy and myself. We had both submitted concepts to Nichole for postage type stamp sets so Nichole combined our ideas into one set. At the same time I submitted concepts for a vintage label set reminiscent of the old Dennison labels, like I've shown below. I thought the postage theme and these classic labels would go hand in hand together.
So my first project showcases lots of stamps from the Postmarks set as well as labels from the Label Basics stamp set....in air mail theme with red and blue. I will be using a regular A2 Kraft envelope to create some mail art.
The idea behind mail art is that the packaging is embellished any way you like and slap some postage on it. It's amazing as to what you can mail through the postal service. I found a cool blog that has lots and lots of good inspiration but I have lost the link (will post it once I find it again). I think this type of project would be great for art students.

So here I have arranged stamp and dies on my envelope to get a feel for my art mail envelope layout. At this point, I snapped a photo to have as a visual reference.
I gathered up all my dies and placed them on my die cutting machine. I used White Adhesive Sheets for my labels so that they would stick nicely to my envelopes.
Next, I stamped red and blue labels, via airmail style.
Once I had all my labels stamped, I peeled off the back and stuck them to my Kraft envelope. In the upper right hand corner, I left a blank spot for a real postage stamp. I also left two labels blank so that I can address my envelope. For the rest of the front and back of the envelope, I added stamped images to fill in the blank spots. This is a great little exercise to just test out all the stamps.
Along with my art mail envelope I created a very simple notecard using the new Postmarks patterned paper designed by Heather Nichols. I simply cut an 5.5 x 8 rectangle and folded in half. A few leftover labels embellish the front.
I can't wait to send this off in the mail to an artsy friend. As long as you can slap a stamp on it, the sky's the limit. You might check with your local post office but I saw things like baseballs, 3-D items and all sorts of painted and sewn envelopes. It's all about stretching your creativity and having fun!
My next project uses the new Postmarks and Label Basics sets in a more traditional way. I've gathered up a few sheets of the Postmarks patterned paper, Kraft cardstock, cork, vintage book paper and a card sketch I did while waiting for my supply box to arrive this month. Again, I laid out the stamps and dies to get an idea of how my card would come together.
First, I die cut the Signature Series Butterfly die using patterned paper, cork and old book print. All of these layers will make for a ruffled up, dimensional butterfly.
I stitched down the center of all the layers, leaving the threads long to create butterfly antennas. Using the postmark stamp, circle stamp and small butterfly from Postmarks, I stamped the butterfly. What better way to send airmail than with a pretty, fluttery butterfly, right? You could also use bird stamps or the fun Up, Up and Away stamp if you want to keep with the air mail theme.
Next I use the well sought after postage stamp die that you've all been hoping for. I die cut the paper, stamped the outline edge, stamped the inside stamp (which has amazing detail) and then stamped the tiny little butterfly. All separate stamps so that you can design your own postage stamp any way you'd like. Very easy to add in different stamps from other sets.
Recently I acquired an entire box of old postmarked stamps from an auction. I thought it would be fun to add one to my finished card. So cool how my new stamps blends in nicely with my old stamp.
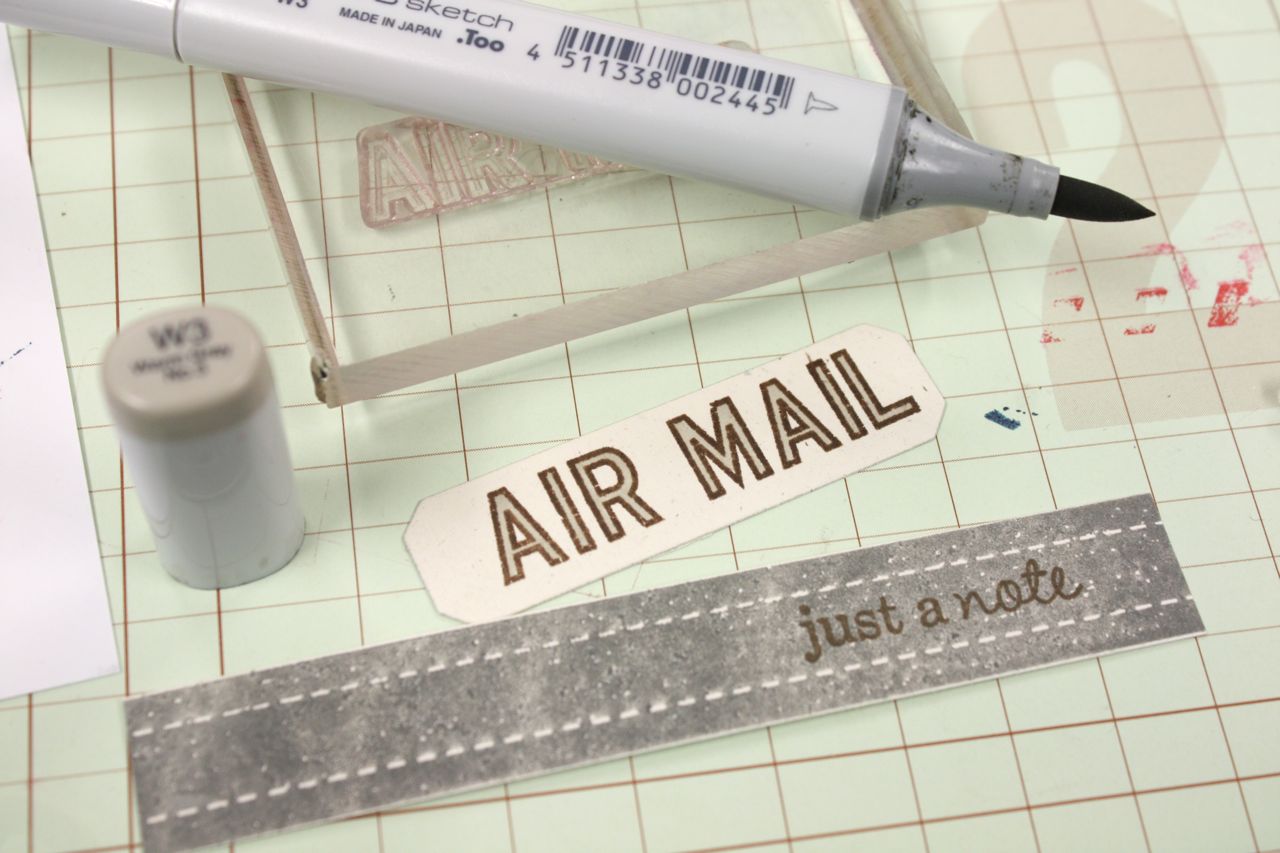
To create a vintage look to my card I used Dark Chocolate and Smokey Shadow colors that look so nice with the blue in the the Postmarks patterned paper. I first stamped the air mail sentiment onto a die cut cardstock label using Dark Chocolate ink. I then colored in the letters with a W3 Copic marker. I also stamped a strip of cardstock with Pine's new Ribbon Tails stamp using Smokey Shadow ink. Why not use a strip of actual ribbon, you ask? I love that I can add a strip of ribbon looking paper across my card fronts and not worry about the ribbon fraying.....plus I love that I can stamp a sentiment on the ribbon strip with the ink bleeding. Love.
And here's my finished card. Lot of nice details + I think this style of card would be great for manly card. Maybe switch out the butterfly or just leave it off the card altogether.
So many dimensional accents on this one, a fun card to create.
For my next project I'm going to brighten things up a bit with some colorful, spring flowers + a postcard. The stamps from Postmarks are perfect for designing your own postcards. I found that the Library Card Tag die is the perfect size for postcards.
First, I die cut the Library Card Tag shape using Rustic Cream cardstock. Don't worry about the hole, it will be totally covered up. Using Dark Chocolate ink I stamped the basic postcard elements. I also added in the 25 cent stamp from Button Boutique to create the divider line often seen on vintage postcards. I inked the edges with the Chamomile Tea Dye ink.
Next I die cut more of the White Adhesive sheets with the angled labels and stamped the coordinating label images using Aqua Mist ink.
To create an old stamp resembling the one on a vintage postcard find, I simply die cut the stamp shape, stamped on green the images with green ink and then touched the top with the Chamomile ink. Looks so real, doesn't it?
Next I wanted to create a pretty front for my postcard. I stamped the tulip image from Friendship Jar Spring Fillers with Dark Chocolate ink. Using the Copic colors shown below I colored my image in a somewhat watercolor looking fashion. Lots of white space + layering in colors.
To add some beautiful shimmer to my colored tulips, I painted over the Copic coloring with LuminArte Twinkling H2O's. These are pretty paints that add shimmer...I used a brush + some water to apply the yellow/orange paint.
I also added a few areas of purple paint. Purple is a complementary color to yellow and it really makes that yellow pop off the page.
I added a few patterned papers to my postcard front using my sewing machine. If you zoom in on the photo below you can really see the shimmery look of the Twinkling H20 paints.
And here are the back and front of my postcard. I used two separate layers just in case my paints and Copic markers bled through to the other side.
A beautiful, spring greeting or perhaps a nice Easter postcard for someone special.
On the back of the postcard, I can fill in the labels with a handwritten note. I'll probably slip this into a envelope if I decide to mail. I could have left off the postage die and added a real stamp if I wanted to mail this as an actual postcard. Can't wait to try more of these.
For my last project today I created two mini postcards that I intend to tuck into the girls' Easter baskets. I cut my mini postcard shapes from the Button Boutique button card die. Using colorful inks I stamped on lots of images from the Postmarks stamp set. A perfect way to use the Postmarks set if you're not into the vintage look. I love the Orange Zest and Aqua Mist airmail strip along the bottom. Part of the background was stamped with Pine's new Background Basics: Twinkle stamp set in green ink.
The eggs were made by using the Egg die cut shape, Green Boutique patterned paper, buttons + twine, a flower stamp from Melissa's new Tiny Tags, and a die cut from Flower Fusion #2. The notched ribbons were created by using Pine's new Ribbon Tails stamp set + the Double Ended Banner dies. So cute and colorful for spring or Easter projects. Use them as is or add to a card or gift sack. The *handle with care* and *fragile* sentiments are perfect to use with an egg theme or maybe even a baby theme.
Whew, that's it for today's projects. I hope you enjoy! Be sure to visit Nichole's + the other Design Team members' blogs for their fun projects using Postmarks.

Related Posts with Thumbnails