Showing posts with label Friendship Jar. Show all posts

March 6, 2013

Friendship Jar cards...using Gossamer Blue kit items

Hello everyone, it' going to be a glorious day.  I slept so well last night, the sun is shining & the snow is melting....it's a chilly 19 degrees this morning but I can feel that Spring will be amongst us soon. And to me that means flowers.  So it's flowers for today's project.  

I compiled this collection of products from the Gossamer Blue March kits.  The colors and patterns here are some of my favorite from the March lineup.  What I really love about Gossamer Blue's kit club is that it offers something for everyone.  It's all about crafting and whatever that encompasses for you.  
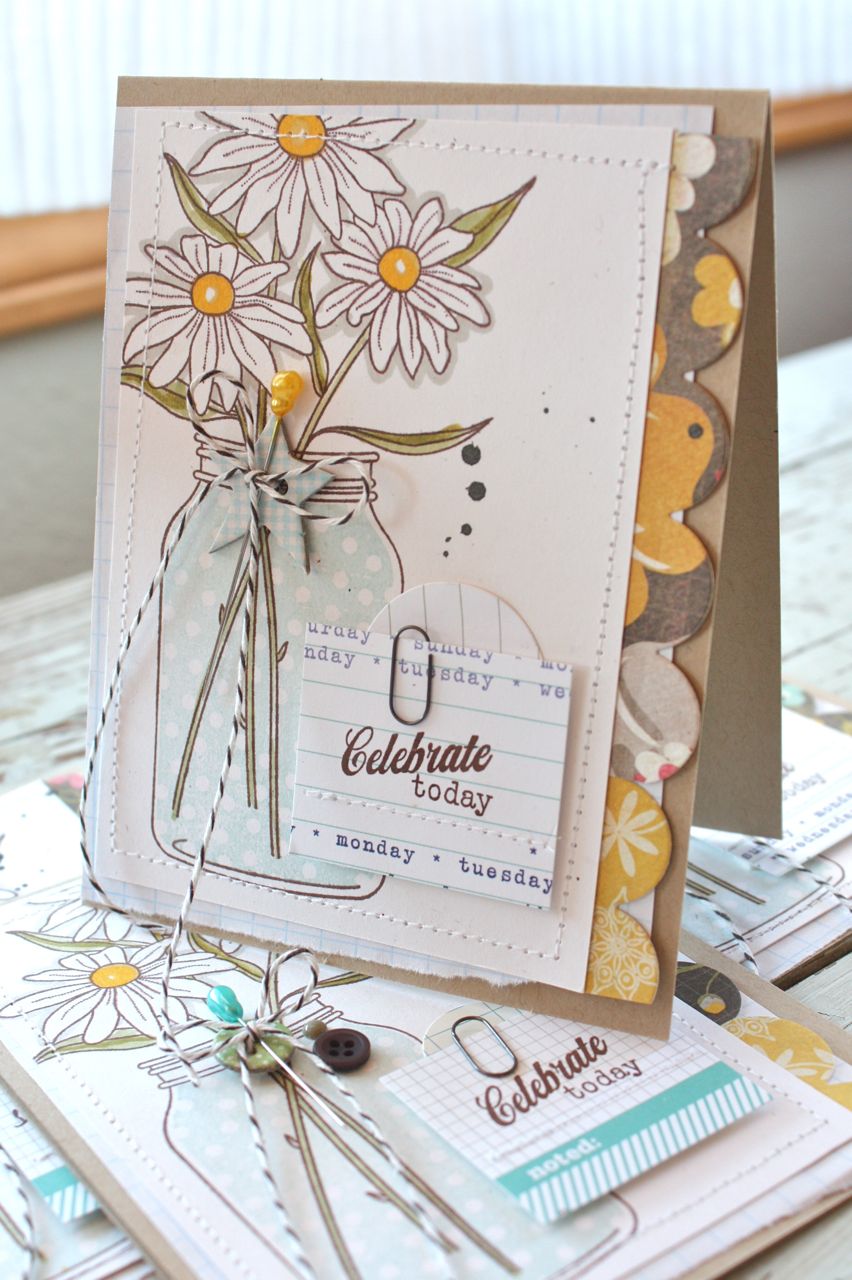
Today I'm sharing how I used the kit items with some stamps from my stash.  If you are a stamper I know you have dozens, maybe hundreds of stamps in your crafty arsenal.  The Gossamer Blue kits are perfect to use with your stamps.  It's fun to set up a monthly supply station like I did here and see what you can create.  I selected the supplies you see above and a favorite stamp set of mine, Friendship Jar.  If you are new to my blog, I designed Friendship Jar and and a series of coordinating stamps for Papertrey Ink.  Nichole Heady brought them to life with her wonderful illustrating.  They are stamps that are near and dear to me and it's like reacquainting with an old friend each time I pull them out again.  You can see the entire lineup of Friendship Jar stamps and coordinating dies over at Papertrey Ink here.  

Today I wanted to get a little bit artsy but since I wanted to mass produce the cards I didn't want anything too time consuming.  I stamped my jar and daisy images and then stamped the jars with the polka dot filler pattern.  Then I scribbled some Copic colors in buttery yellows to find just the right colors and then colored my flowers.  I used a grey marker to outline the flowers to make them pop off the page.  
Next I used some of the journaling tags from Elle's Studio that were included in the March Bits & Pieces Kit.  I stamped a sentiment on each tag, trimmed them down and stitched them with my sewing machine. I also created scalloped border strips using the pretty floral paper from the March Add-on Kit #2 + one of the buttery yellow papers.  
Then I decided on a simple card design and went into mass production mode when it came time to assemble my cards. 
I absolutely love the white space and the soft & pretty colors.  Each card is a little different but the basic design is the same.  And except for the base papers, some grid paper, small paperclips and twine, the rest of my embellishments are from Gossamer Blue.  It's such a creative boost to take your kits and challenge yourself to use those items.  No hoarding, the idea is to use up as much of the kits as possible in one month.....knowing there will be new items coming in the next month's kit.  
I also challenged myself to use the Black Color Shine from Heidi Swapp in the March Color Kit.  I love how the tiny sprinkling of ink fills in the white spaces just a bit on my cards.  To get a very controlled area of color, I rip scraps of paper into small pieces and mask off very small areas on my cards.  That way the main image doesn't have blobs of color.  If you want teeny tiny specks, unscrew the spray nozzle from the Color Shine and flick off most of the color onto a scrap piece of paper ( I keep mine in a box to color the overspray)...when there is very little color left then I flick the ink onto my cards.  
For each card, I popped up the sentiment piece with pop dots.  I used a small Elle's Studio tag from the kits underneath + added a small Tim Holtz paper clip for interest.
On each of my cards I also added a tied embellishment to the jars.  I created these using the Mixed Buttons from Fancy Pants and the Chipboard pieces from My Mind's Eye in the March Add-on Kit #2. I absolutely love the stick pins from My Mind's Eye in the March Main Add-on kit.  These are something I probably never would have purchased while shopping online but they were such a fun addition to my cards.  Tiny buttons and enamel dots from other kits were added here and there too.
Oodles of little embellishments and papers that coordinated so well for this batch of cards.  I do hope you give the Gossamer Blue kits a try.
Note:  Most of the the March kits from Gossamer Blue have sold out but quantities will be increasing as Gossamer Blue grows it's number of subscribers.  Thanks for stopping by and I hope you make today a GREAT day!  To all my old Papertrey friends, I do hope you stop in to say hello.  :)

October 20, 2011

Holiday Planners & More...

'Tis the season for my much anticipated Holiday Planners. When the holiday season rolls around, all of my friends and family look forward to their Holiday Planner so that they can begin jotting down gift ideas, recipes, long to do lists and more. I like to hand out the Holiday Planners at least by November 1st and this year I'm adding in a few other items to make a perfect "re-gift". Here's a little shot of the merry little mess I created down in the Craft Department.

Every year I love to use a simple red and white color scheme for the holidays. Sometimes I leave it at that....and other times like this year, I'm adding in some aquas and greens to the mix. I'm also going with a candy cane stripe as you can see in the patterned papers and twine in my photo below.
Here's the whole gift ensemble. My idea is that in addition to my usual Holiday Planner, I'm also going to include 2 cards with envelopes and 2 gift tags with enclosure sacks. Many times the recipient will say "It's too cute to use"...or...."I want to keep all of it for myself". Well this year they can keep all of it. Or they can keep the Holiday Planner and give the rest away. Or they can keep the Holiday Planner + 1 card + 1 tag and give the rest away. You get the idea? I think I'm going to type up a little note enclosure that says this is the perfect *re-gift* and how this is the gift that keeps on giving. :)

The time is critical here for handing these out. I plan to give mine out by November 1st. This way the recipient can start using their Holiday Planner & other items. It's also a nice way to give a little gift to someone you don't buy something big or expensive for. And it's great to get together with the recipient early in the season before all the hustle and bustle starts.

Okay, here's what I did for my ensemble of goodies. Each piece has some similar items:

*Kraft cardstock base with white splatters (I used Studio Calico white Mister Huey)
*1 vertical, wide strip of aqua colored candy cane patterned paper from Candy Cane Prints
*1 vertical, narrow strip of red colored candy cane patterned paper (see above link)
*1 horizontal strip of Rustic White cardstock with sentiment (except tags)
*1 tiny pint jar embellishment with snowflake embellishment
For the Holiday Planner I used 2 White Notepads so that the notebook will be thicker and last a little longer through the holiday season.
All jar embellishments use the smaller friendship jar from the Friendship Jar Summer Fillers stamp set. The Pint Jar die is sold separately and makes mass producing these projects a breeze. I created 5 total jar embellishments and then started the projects from there. I colored each jar with a Copic marker, just around the edges. The pinked paper is from Crate Paper's Peppermint line. The snowflake die is from the Peace Be Still Collection. Snowflake stamp is from In the Meadow. Pure Poppy Vintage Buttons and Red Baker's Twine are from the PTI store.

For the sentiments, I used Take Note. It's still a favorite set of mine that Nichole designed from my concept sketches. Paper is from Crate Paper's Peppermint Collection. Vintage ribbon is from my stash.
Here's what the inside of the Holiday Planners look like. I use Scor-Tape to adhere the notebooks to the cardstock cover. Note: I do not have measurements for the cutting and scoring for the notebooks. I mark where I want to cut & score with my fingernail. The measurements are so small that they never turn out right when I go by a set number. I just make sure to add a little extra to the cardstock cover so that it fully covers the notebooks. For the notebook enclosure, I used a brown paper sack from my shop that I trimmed down and stitched around.
Here are the pair of cards. Same concept for the jar embellishment and patterned papers. For the sentiment strip, I used my Scor-Pal to create 2 raised lines on the top and bottom of the strip. That just adds a little dimension without the addition of more papers, inks, etc. These cards could easily be used as Christmas cards, thank you cards or well into the winter months of next January, February, etc. The *just a note * and hand are from Take Note. The *Winter wishes* is from Friendship Jar Holiday Fillers.
Here are a duo of tags that are made with the new Tag Sale #5 die. It's a new favorite of mine too. The sentiment is from Friendship Jar Holiday Fillers. Red chevron sacks are from my shop.
And there ya have it, a fun little ensemble that will surely put the recipient in the holiday spirit. The perfect re-gift! Hope you enjoy!

Note: You can click on the *Notebooks* label at the end of this post to see all my previous blog posts featuring my notebook creations.

July 12, 2011

Half & Half + Friendship Jar Summer + Little Labels

Hi there and welcome to today's Papertrey Group Post featuring Nichole's new Half & Half stamp set and coordinating dies. The concept behind this set of products is a set of dies that let you create different lengths to use for accents on projects. There are mixy match y combinations of dies and stamps that make for endless possibilities. Today I'll be using the dies on some scrapbook pages of the reds, one layout featuring a horizontal accent and one layout featuring a vertical accent. I'll also be pairing my Half & Half projects up with the new Little Labels stamp set coming out this month. This little set features fun new labels to use on the new Friendship Jar Summer Fillers + all the other Friendship Jar sets....or any project you like.

To kick things off, here's a shot of the vertical and horizontal Half & Half accents on my pages. They make very easy work of layering on the Little Labels + stamped sentiments + buttons, etc.
This first layout features an 8.5 x 11 horizontal layout of my oldest red, Josey. Photo size is 5 x 7 so it takes up a good portion of the page. My pages came together rather quickly since the base patterned paper are the starter pages from Sassafras. Along the right edge of my page I used the largest of the scalloped border dies + the Background Basics: Chevron Stripes stamp on linen vellum, using Summer Sunrise ink. A Little Label die cut and stamped piece was stapled to the bottom right hand corner, using a sentiment from the Little Labels stamp set.
Here I've used the Half & Half die cut from the linen vellum which was stamped with more of the chevron stripes. The little swirly stamp at the bottom edge of the die cut vellum is a stamp from Half & Half. Lots of fun images to add to the die cut edge. Three labels from Little Labels adorn my Half & Half strip, which were then stitched and embellished with tied Vintage Buttons. The sentiment stamped in Orange Zest is from the Half & Half stamp set. The outline flowers on the left side were colored in with Copic markers + some ink splattering was added using my Studio Calico Mister Huey spray mists.
On the bottom right of the page you can see some information I added using Heather's new Tag-It's outline circle + a few stamped stars from the same set + a date stamp + Josey's stamped name using Hero Arts mini letter stamps. All in Smokey Shadow ink.
And here's Jordan's 8.5 x 11 layout. I used another Sassafras starter page, a 5 x 7 photo + lots of smaller photos which fill up most of the layout.
Here you can see my Half & Half accent using more Little Labels + stitching + layered, Vintage Buttons tied with Rustic Cream twine.
In the bottom right corner, I used more stamps from Piney's Tag-It's stamp set + an additional polka dot circle from Borders and Corners: Circles. Some patterned paper from Road Trip + a little Washi tape + a tied Vintage Button add some accents.
Today I'm also featuring the newest and final addition to the Friendship Jar collection called Friendship Jar Summer Fillers. Recently my sister gifted me with the cutest strawberry canisters made in Italy so I wanted to make her a little thank you gift. I opted for some stamped notecards tucked into some berry baskets.....4 notecards + 4 berry baskets that she can use for little gift givings of her own. I made a special tag for the outside that she can keep for herself.
The Large Manila Tag was layered with a die cut, stamped and embellished mini jar from Friendship Jar Summer Fillers. The squatty little size is so dang cute! If want to use the liquid like fillers like I did, simply mask off the stamped jar and then stamp on the inside filler stamp. I added a fun striped straw and some hand cut strawberries that were colored with Copic markers. The Little Labels oval was die cut and stamped with an oval outline image + a cute sentiment from the Friendship Jar set. I tied the tag up with thick cotton twine and clipped it to my gift set with a Small Clothespin.
My four cards were tucked into medium glassine sacks and tied up with Pure Poppy ribbon.
Here's the four little cards all standing in a row. My cards measure 3.5" x 11, then folded in half...this size fits nicely into the medium glassine sacks.
The background paper is some vintage paper from my stash. Here's the little cutie pie jars, embellished with some patterned paper from Cosmo Cricket + Little Labels + more hand cut and colored strawberry images. The jars were outlined with a Copic marker to resemble the old, blue jars I love so much. A tiny clothespin is clipped to the top of each jar. These little die cut jars are just so tiny and cute....they'll be the perfect addition to your jar collection and will look great with any jams or jellies that you might be making this summer.
My last card is on the whimsical side. As you may have read in an earlier post, we are now the parents of a teenage driver. Josey got her learner's permit the day after her 14th birthday and she's been driving everywhere we go now. If you've been in this boat, then you know that lots of other parents and friends like to poke fun at the new driver. It's fun to watch kids jump onto the sidewalks when they see Josey is at the wheel. It's all in good fun! So I thought a card for the new driver is in order which you'll see in my gallery this month......but how about something for the new driver's parents?? This card takes a fun spin on that concept with the addition of some fun word stamps from Nichole's new Congrats All Ways stamp set + a few green, chipboard letters stitched on. I also used Maile's new Leafy Vine Border die + some more Mister Huey mists for splatters.
The cute margarita jar complete with straw, lime and fun label dripping with juice let the parents know that a drink might just be in order after all that driving around with the new, inexperienced driver. It's all in good fun and I know my fellow parents of new drivers will get a kick of a card like this.
Hope you enjoyed my little sneaks today. All of the products will be available at Papertrey Ink on the 15th of this month! For even more inspiration on these fun, new products please visit Nicole's + the other PTI designers' blogs:

April 19, 2011

Make + Save: Peep Show Cookie Jar

Please note: The Make + Save link is not available just yet over at Papertrey Ink. I have listed the recipe ingredients and will walk you through the assembly process in my post here today. The information for this Make + Save will available soon at Papertrey Ink. If you have any questions on supplies, etc please leave a comment and I will edit my post with answers. :)

Welcome to another Papertrey Make + Save post, where you'll find nifty handmade gift ideas that you make from your own supplies. Today I'm featuring a Peep Show Cookie Jar just in time for Spring and Easter. Full instructions for how to assemble the jar ingredients and how to embellish the jar are at the Make + Save section of the Papertrey Ink website.

First up I'm going to show you how to make assemble the cookie ingredients in the jar. I've included the recipe for the Peep Show Cookies below so you can see what ingredients we're working with for jar assembly. Be sure to include the recipe with the jar when giving as a gift.

Note: A wide mouth canning jar + lid and ring work best for this project.

Peep Show Cookies
1 sleeve graham crackers, crushed
8 Peeps marshmallows
1-1/2 cups plain pastel M & M’s
1/3 cup brown sugar
½ cup butter, melted
1 teaspoon vanilla
1 quart canning jar

To assemble jar: Layer 2/3 cup graham cracker crumbs in jar. Arrange 8 Peeps on top of crumbs, around inside of jar. Spoon remaining crumbs in to support the Peeps. Pour M & M’s on top. Pack in brown sugar.
To make cookies: Dump jar ingredients into bowl. Snip Peeps into bits. Mix all ingredients with melted butter and vanilla. Pat into 9” baking dish. Bake at 350 degrees for about 15 minutes. Cut into bars. Enjoy!

Here's a photo of the ingredients you'll need to assemble the jar: Peeps Marshmallows, brown sugar, graham crackers and pastel, plain M & M's.
Using a clean, wide mouth canning jar layer 2/3 cup crushed graham crackers into bottom of jar. Arrange 8 Peeps marshmallows around the inside of the jar.
You will then spoon in the rest of the crushed graham crackers to support the Peeps. Pour in the M & M's. Then pack in the brown sugar. I used this unknown wooden tool that I got in a box of stuff at an auction. If you don't own an unknown wooden tool, just use a large spoon to pack the brown sugar. Place the lid on the jar and screw on the ring. Set jar aside while we make the jar embellishments.
Here's a photo of the supplies needed to embellish the jar. Again, the complete supply list and instructions are listed at the Make + Save section at Papertrey Ink. I'll be using Friendship Jar + Friendship Jar Spring Fillers plus lots of other fun products.
Start off by die cutting and stamping the jar + lid + topper + label images as shown below. The bunny in the jar is from Friendship Jar Spring Fillers.
Color the bunny image with Copic markers. Using the fine tip end of pastel Copics, make small polka dots on the jar.
Assemble the die cut jar pieces as shown below. I used pop dots to adhere the jar lid and the label. A portion of the label will be snipped off. Set embellishment aside.
Cut a 5" circle of fabric using pinking shears. The fabric I used is from Amy Butler (sorry, I don't know the exact name). Center the fabric circle over the jar lid then screw the ring over the fabric. Set aside.
Using spray mists (you could also use Copic re-inkers and an old toothbrush), splatter the ribbon with droplets of ink. I did not spray the ink but instead used the spray nozzle as a eye dropper of sorts. This gives the ribbon a great speckled egg look.
Tie the ribbon around the jar ring, using small glue dots to secure in place if needed. Wrap a piece of twine around the jar lid of the embellishment and tie around tied bow on jar.
And here is my completed Peep Show Cookie Jar. I'm using mine as a cute center piece decoration for now. So cute and colorful.
Place a few little chicks from the craft stop on top for even more adorable-ness.
So cute with the pastel M & M's showing through. All kids young and old LOVE these jars. Include a copy of the recipe so that the recipient knows how to prepare the cookies. So easy and fun. Hope you enjoy!

April 11, 2011

you've got mail..

Edit: Several of you asked about the size of my cards in my Mother's Day post. I've edited that post with the information and packaging tips here.

Hey everyone, you've got mail. :) Today I have a card to show you that I made using Friendship Jar + Friendship Jar Spring Fillers. I thought it would be fun to place the jar lying down so that all the mail goodies could spill out.
I love the look of paper piecing and I think it's even more cute when you stamp on patterned paper and then cut out the paper pieced image. Here I stamped the envelope images twice, one on Rustic White cardstock and then on my patterned paper. I colored the airmail stripes with the YR16 Copic marker. Then on the white cardstock I colored the bottom envelopes with the new E81 Ivory marker.
When the colored envelope gets placed on the white cardstock, the Ivory colored part becomes shadows.
I attached this to my jar image that was stamped with the polka dot filler with pop dots. I added a mini clothespin tied with twine for a fun accent.
The side of the card is fancied up with the little label image from the original Friendship Jar + a die cut and stamped label from Label Basics + a postage stamp from Postmarks. Machine stitching and a tiny staple hold everything in place. Patterned paper is from The Girls Paperie (from my local shop: Scrapbooks, Etc).
Hope you enjoy! Be sure to check out Nichole's blog for the latest sneaks of this month's Papertrey releases. She's got great projects featured today + links to the other stamp designers' blogs.
Related Posts with Thumbnails