
Photo taking for the week:
The idea behind Project Life for me is to capture a week's worth of everyday moments and not much more. I have been using my iPhone for the majority of my PL photos because my phone is handy most of the time. I am not looking to take 20 photos a day and then sort through them. Usually I take a couple of photos a day and then weed them out (unless it's a special event, ballgame, birthday, something really cool happened, etc). Having completed almost 3 full years of Project Life albums I can look back now and know that the single photos turn into weeks which turn into months...which turn into years. I just want to capture the general everyday highlights...not every single moment.
Getting the photos into the Project Life album:
1. I set my PL album up with a stack of blank page protectors, all Design A to begin with. Using sticky notes (which I love so much), I write the weekly dates down for about a month's worth of pages. My first week of 2012 was a little different because I used January 1-January 8th so that my next full week would start on a Monday. I place the dated sticky note in the upper left hand corner of each page protector. This helps me know what dates to refer to on my calendar, in my notes I took and if I ever get behind a little.
2. When a week has passed, I'm ready to print photos. I started printing at home using an Epson Artisan 730 and I love it! I started using Marcy Penner's awesome PL printables to create a plan of what photos I want where. Having an Interior Design degree, making little floor plans of my pages is so natural. To start printing I usually sit my album right next to my printing desk. Referring to my calendar and notes I print the full size photos for the 4 x 6 slots first. These may be full 4 x 6 photos or Instagram photos. I then fill in with any smaller photos that fill the 4 x 6 and/or journaling slots. I've definitely been adding more than just 7 photos for the week lately. For the extras, I just print them smaller and add them into the journaling slots. For this week I think I used 14 photos which captures even more stories. My goal is to not have a ton of insert pages so I really try to fit in all that I can into these two pages + still have room for journaling. For 2011 I ended up with 2 albums packed really full and my goal is to keep 2012 at 2 albums also.
Putting it all together:
Now is where the visuals come in. Once I have my photos in my page protectors, it's time to move my album into my work room. If you are using Project Life in it's simplest form, you don't need any other supplies than journaling cards and a pen. I have chosen to get scrappy with my Project Life because I love to scrapbook and I love to purchase new supplies & get all crafty. Project Life works so well for me because I can complete a weekly spread in about 2 hours and I totally get my scrapbooking fix. Sometimes that 2 hours is at one sitting but most of the time it's 15 minutes here or 30 minutes there that I get to work on my pages. I don't do many traditional layouts simply due to time constraints. Would love to but I know it just isn't gonna happen. I'll have an occasional insert that is more traditional style here and there though.
First up I reach for my journaling cards and main dated 4 x 6 pieces. I'm using a mix of ALL of the core kits. I just love the variety and mixy matchy style. I just shuffle through them and pick out ones that coordinate with my photos, usually color being a main element I look for. I'll also use some of my own handmade journaling cards that I make using the grid journaling cards + I've started printing some digital journaling cards that I purchase online...like Marcy's great lines.
 Once I have the journaling cards picked out I lay all my photos and cards out on top of my page protector for the week. I work right with my album on my table....there's no losing items, it's all organized,etc. If you don't have the space for this you could certainly remove the page protectors from the album and just work with those.
 Next I reach for the goodies...the embellishments, Washi tapes, stickers, chipboard letters, patterned papers, etc. I really try to pull out only a handful of items each week. I just want to embellish my pages, not create a shrine to scrapbooking supplies on each weekly layout. For me, photos + the stories come first. The embellishments are just icing on the cake. They are just filling in little leftover spaces, and that's it. Plus, the idea is for me to get the pages done in a timely manner. I don't want a huge mess of products to clean up afterwards.
 Then I just start filling in. I embellish the photos and journaling card with all kinds of accents. I find that I'm loving little file folder/address labels for journaling. I run the full sheet through my vintage typewriter and then just peel off however many I typed on and stick them to photos or journaling cards.
 After I've added all my embellishments, labels, etc I usually add some stitching to my weekly inserts. I gather up the whole stack and head to my sewing machine. Man I love sewing on my paper projects. Love. Lastly, I tuck all the photos and journaling pieces into the appropriate slots. My favorite part, having a weekly spread all done.
 But wait. Then there's that little creative mess I've made. It's not overwhelming but do I have clean it up?
 Yes. Almost every time I clean up after each weekly spread I do. It's so, SO nice to start with a clean work space. Don't even ask me to see what's under my table though....that's a different story and entirely different organizational "issue". Another day, perhaps.
 And here's Week 1 of 2012. Complete, yay! Red and blue were kind of my color themes I worked with this week.
 Here's the left page spread. New Year's Day, got the flu this week, preparing for big shop update, Pinterest and Josey grew.
 Here's the right page. Awesome weather to hang out clothes, 7 loads of laundry, Josey driving to school for the first time by herself, basketball games, hanging out with the family, movie nights and taking down the Christmas decor.
 A few close-ups. Here's my main, dated insert. Stitched on chipboard letters, the date stamps, typed labels and 2 photos. I usually don't include photos on this insert but I had a few extra days in this week. Did you eat black eyed peas on New Year's Day? A family tradition that I continue with my family....they hate it, hate the peas and only eat one. Just one. To make Mom happy.
 Here I have a photo of our chalkboard + a PL journaling card. I added small sticker letters and half a sticker label that I typed on.
 Another PL card with a ruler sticker + a plain journaling card that I added a photo to along with a sticker with the date, typed labels and some patterned paper.
 Here I used a folded journaling card to add the story about how nice it was this day + doing SEVEN loads of Josey's laundry. Good grief is right! I really love the Studio Calico chipboard cloud that I stapled on and added the word "pull" to. This is a reminder that there's an insert here for other viewers of my album. On the right I used a screen shot of a text message Josey sent me after making it to school okay. I love that I'm capturing real conversations via texting. These take me right back to that particular moment in time.
 Here I used a PL journaling card with typed labels and a small photos. On the right Jordan saved me a Skittles box from her 8th grade movie night. She was supposed to snap me a photo with her phone but I'm pretty sure she forgot. The candy box worked for me!
 I embellished a 4 x 6 photo with some stickers + chipboard letters + a typed label. Josey finally grew 1/4" after more than a year. She was running around like a chicken with its head cut off. I'm glad I captured the wall with our pencil marks. You never know when a fresh coat of paint might cover it up.
 Here I added a portion of a Fed Ex sticker that was stuck on my front door to a photo of some new shop kit items. I typed on a grid label I created and stuck/stapled that to my photo.
 I love my clothesline photos. Don't know why but I just love to see clothes out on the line, whipping back and forth. Looking at this photo I can almost smell the freshness. I added a stamped label and stitched on a chipboard number. I love adding numbers to my layouts. They're such a cool design element and I think the eye is drawn to numbers.
 Here I used an Instagram photo that I divided using the Diptic app. I typed on a Medium Manila Parcel Tag then added an Amy Tangerine key sticker. Tags are one of those universal supplies that I use on everything. You can find more at my Made by Mish shop and my Etsy shop. I'll be getting more fun sizes too. You can slip them right through a typewriter or use removable adhesive to adhere them to a piece of copy paper & then run through your typewriter. You can also run them through your printer in the same manner. I find that my handwriting is so loopy and big that I run out of space for journaling sometimes. My typewriter journaling is just perfect for longer stories.
 Another number stitched to a photo + a typed label. Look for corners of photos that have no real content to add little embellishments to.
 And lastly, my last 4 x 6 insert for the week featuring 2 small, square photos with typed journaling labels above. I used 2 arrow stickers from a PL core kit to point to each photo from the journaling label. Arrows are a great design element to use on your PL pages as they really draw the eye to a photo or accent.
 Another fun week of our lives in the album. So happy. So excited to start a brand new year. How did your first week go? Just dive in if you haven't started.....start by printing those photos and everything else will fall into place. If it's too overwhelming just stick with photos + journaling card these first few weeks. Good luck and please ask questions or leave your great tips in the comments section.
 Once I have the journaling cards picked out I lay all my photos and cards out on top of my page protector for the week. I work right with my album on my table....there's no losing items, it's all organized,etc. If you don't have the space for this you could certainly remove the page protectors from the album and just work with those.
 Next I reach for the goodies...the embellishments, Washi tapes, stickers, chipboard letters, patterned papers, etc. I really try to pull out only a handful of items each week. I just want to embellish my pages, not create a shrine to scrapbooking supplies on each weekly layout. For me, photos + the stories come first. The embellishments are just icing on the cake. They are just filling in little leftover spaces, and that's it. Plus, the idea is for me to get the pages done in a timely manner. I don't want a huge mess of products to clean up afterwards.
 Then I just start filling in. I embellish the photos and journaling card with all kinds of accents. I find that I'm loving little file folder/address labels for journaling. I run the full sheet through my vintage typewriter and then just peel off however many I typed on and stick them to photos or journaling cards.
 After I've added all my embellishments, labels, etc I usually add some stitching to my weekly inserts. I gather up the whole stack and head to my sewing machine. Man I love sewing on my paper projects. Love. Lastly, I tuck all the photos and journaling pieces into the appropriate slots. My favorite part, having a weekly spread all done.
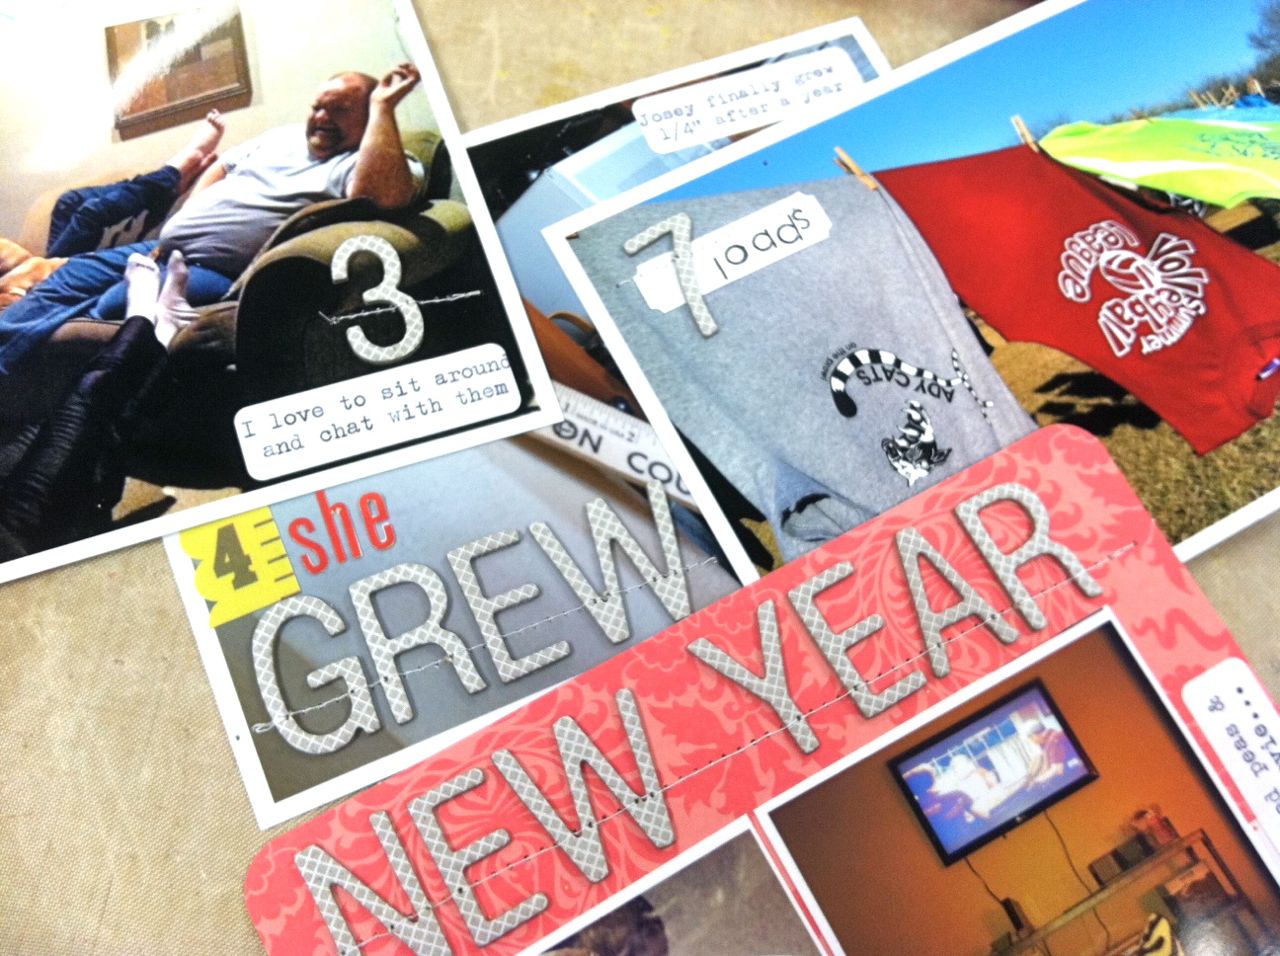 But wait. Then there's that little creative mess I've made. It's not overwhelming but do I have clean it up?Yes. Almost every time I clean up after each weekly spread I do. It's so, SO nice to start with a clean work space. Don't even ask me to see what's under my table though....that's a different story and entirely different organizational "issue". Another day, perhaps.
 And here's Week 1 of 2012. Complete, yay! Red and blue were kind of my color themes I worked with this week.
 Here's the left page spread. New Year's Day, got the flu this week, preparing for big shop update, Pinterest and Josey grew.
 Here's the right page. Awesome weather to hang out clothes, 7 loads of laundry, Josey driving to school for the first time by herself, basketball games, hanging out with the family, movie nights and taking down the Christmas decor.
 A few close-ups. Here's my main, dated insert. Stitched on chipboard letters, the date stamps, typed labels and 2 photos. I usually don't include photos on this insert but I had a few extra days in this week. Did you eat black eyed peas on New Year's Day? A family tradition that I continue with my family....they hate it, hate the peas and only eat one. Just one. To make Mom happy.
 Here I have a photo of our chalkboard + a PL journaling card. I added small sticker letters and half a sticker label that I typed on.
 Another PL card with a ruler sticker + a plain journaling card that I added a photo to along with a sticker with the date, typed labels and some patterned paper.
 Here I used a folded journaling card to add the story about how nice it was this day + doing SEVEN loads of Josey's laundry. Good grief is right! I really love the Studio Calico chipboard cloud that I stapled on and added the word "pull" to. This is a reminder that there's an insert here for other viewers of my album. On the right I used a screen shot of a text message Josey sent me after making it to school okay. I love that I'm capturing real conversations via texting. These take me right back to that particular moment in time.
 Here I used a PL journaling card with typed labels and a small photos. On the right Jordan saved me a Skittles box from her 8th grade movie night. She was supposed to snap me a photo with her phone but I'm pretty sure she forgot. The candy box worked for me!
 I embellished a 4 x 6 photo with some stickers + chipboard letters + a typed label. Josey finally grew 1/4" after more than a year. She was running around like a chicken with its head cut off. I'm glad I captured the wall with our pencil marks. You never know when a fresh coat of paint might cover it up.
 Here I added a portion of a Fed Ex sticker that was stuck on my front door to a photo of some new shop kit items. I typed on a grid label I created and stuck/stapled that to my photo.
 I love my clothesline photos. Don't know why but I just love to see clothes out on the line, whipping back and forth. Looking at this photo I can almost smell the freshness. I added a stamped label and stitched on a chipboard number. I love adding numbers to my layouts. They're such a cool design element and I think the eye is drawn to numbers.
 Here I used an Instagram photo that I divided using the Diptic app. I typed on a Medium Manila Parcel Tag then added an Amy Tangerine key sticker. Tags are one of those universal supplies that I use on everything. You can find more at my Made by Mish shop and my Etsy shop. I'll be getting more fun sizes too. You can slip them right through a typewriter or use removable adhesive to adhere them to a piece of copy paper & then run through your typewriter. You can also run them through your printer in the same manner. I find that my handwriting is so loopy and big that I run out of space for journaling sometimes. My typewriter journaling is just perfect for longer stories.
 Another number stitched to a photo + a typed label. Look for corners of photos that have no real content to add little embellishments to.
 And lastly, my last 4 x 6 insert for the week featuring 2 small, square photos with typed journaling labels above. I used 2 arrow stickers from a PL core kit to point to each photo from the journaling label. Arrows are a great design element to use on your PL pages as they really draw the eye to a photo or accent.
 Another fun week of our lives in the album. So happy. So excited to start a brand new year. How did your first week go? Just dive in if you haven't started.....start by printing those photos and everything else will fall into place. If it's too overwhelming just stick with photos + journaling card these first few weeks. Good luck and please ask questions or leave your great tips in the comments section.
Today:
The girls are out of school today. My little Jordy is sick so she'll be taking a trip to the doctor to have her lungs checked out. We always worry about her so much with her asthma. It seems to just make everything worse. I'll also be printing my Week 2 Project Life photos.
Basketball updates:
Jordan had her league tournament last week and they got 1st place! Yay, Lady Cats!! Josey's team won 1st in league standings and has their tournament this week. We'll be on the go once again.
Shop update:
I'll be putting more sacks in the shop this week + I'll have some fun kits to use for your Project Life soon using some Elle's Studio products.


23 comments:
nice! love your style of PL layouts, Mish!
Good Morning -
I keep seeing these beautiful layouts and the words "Project Life" keep popping up on Pinterest and had to find out what this is all about. Your stuff is amazing! I would certainly be one of those people that would be overwhelmed. I'm still working on a December mini album......sad. In the meantime, I'm a new follower and hope I can be inspired enough to start a project and finish it too. Did I tell you your stuff is great?
Thanks for sharing! I love yor pages and take on project life! I am wondering how you are getting the screen shots of the weather and your text messages. Can you share that process? Thanks so much!
Appreciate so much the sharing and detail of your process. Certainly makes this project appear to be very *doable'* and exciting.
Cheers~
Mish thank you. I sat down to do my first week and after 20mins I packed it all up totaly overwhelmed. I then took my iPad to bed and studied some of your pages. The next day I tried again and oh what fun I had. Once I started, the rest came easily so THANK YOU.
ha! that's great!
I've just started this project this year. In fact without those amazing embellishments but it's fun for me :)
hugs!
Thanks Mish for posting this. It's appreicated!! I am doing some of the same things this year,taking a more scrappy approch to PL. I always look forward to your pages!!
Thank you for this very helpful post.
Thank you for such a detailed post! It must have taken you forever to put together, and I really appreciate it :) 2012 is my first year doing PL, and so far, I've been very good about keeping my pictures organized and writing things down in my calendar (per your earlier suggestion a while back). Only problem is that I don't have the page protectors yet since they've been out of stock for what seems like forever, so I feel really behind b/c I want to "get scrappy" with my pages, too!
I'm new to PL & am having a hard time dealing with each space. Do you plan how it might look as a whole or just go with it. How long do you spend on each week? I think I may be overthinking this!
do you put stickers, labels, letters, etc directly on the photo? or just on the page protector?
I love seeing your PL process and your album pages are always so full of ideas and inspiration. Thanks for sharing with us!
Christine
Michelle...this is just so awesome. My PL supplies arrived today and I do have my photos printed and ready to go. Thanks for all of the inspiration and entertaining tutorial on how to get you PL album started.
yet another great post! i saved it until this evening so i could really digest it. :)
I love what you do with your Project Life album, I really love the sewing on your stuff. I took inspiration from you and tried some sewing on one of my layouts tonight, love the look of it. Just have to ask, my sewing machine was not too happy about sewing the chip board, how do you do it?
love seeing your PL pages! Starting my second year of PL and just finishing up touches on last year. (wow actually caught up on a year, amazing!)
A few of your tips that I am using this year. Post it notes! I messed up on a few of my weeks last year so this will help immensely.
Bic Markits. I went and bought some after reading how much you love them, and I am so glad I did. So fun to write with and a pop of color in my journaling.
Love your blog and love seeing what you do with your PL! So much great inspiration!!!!
Thank you SO much for taking the time to share so much about your Project Life. It is so much fun to learn what other people's processes are!
Hi Michelle
I am so excited to find you via Becky Higgins :)
Love your work!
Thanks so much for your great explanations. So helpful.
Will be back often i suspect!
Alison, Australia
If we don't get it PL with this great post we never will! Thanks so much for taking the time to spell it out for us. Your pages are just awesome!
Thanks for sharing your week 1 Project Life. I love your style. I've been following you since Papertrey (maybe a couple years now?) and I was soo thrilled to see that you were doing project life last year. I thought it was about time that I left you a message on your blog :) Thank you for constantly inspiring!!
Thanks so much for sharing! I love your blog and am always inspired. In fact I started PL because of you. I have been having a blast with it! Thanks so much for the constant inspiration!!
Hi Michelle
love reading you PL updates. I'm sure you have mentioned this before but what brands are your chipboard letters and where do you get them from?
Post a Comment