
Welcome to another Papertrey Make + Save post, where you'll find nifty handmade gift ideas that you make from your own supplies. Today I'm featuring a Peep Show Cookie Jar just in time for Spring and Easter. Full instructions for how to assemble the jar ingredients and how to embellish the jar are at the Make + Save section of the Papertrey Ink website.
First up I'm going to show you how to make assemble the cookie ingredients in the jar. I've included the recipe for the Peep Show Cookies below so you can see what ingredients we're working with for jar assembly. Be sure to include the recipe with the jar when giving as a gift.
Note: A wide mouth canning jar + lid and ring work best for this project.
Peep Show Cookies
1 sleeve graham crackers, crushed
8 Peeps marshmallows
1-1/2 cups plain pastel M & M’s
1/3 cup brown sugar
½ cup butter, melted
1 teaspoon vanilla
1 quart canning jar
To assemble jar: Layer 2/3 cup graham cracker crumbs in jar. Arrange 8 Peeps on top of crumbs, around inside of jar. Spoon remaining crumbs in to support the Peeps. Pour M & M’s on top. Pack in brown sugar.
To make cookies: Dump jar ingredients into bowl. Snip Peeps into bits. Mix all ingredients with melted butter and vanilla. Pat into 9” baking dish. Bake at 350 degrees for about 15 minutes. Cut into bars. Enjoy!
Here's a photo of the ingredients you'll need to assemble the jar: Peeps Marshmallows, brown sugar, graham crackers and pastel, plain M & M's.
 Using a clean, wide mouth canning jar layer 2/3 cup crushed graham crackers into bottom of jar. Arrange 8 Peeps marshmallows around the inside of the jar.
 You will then spoon in the rest of the crushed graham crackers to support the Peeps. Pour in the M & M's. Then pack in the brown sugar. I used this unknown wooden tool that I got in a box of stuff at an auction. If you don't own an unknown wooden tool, just use a large spoon to pack the brown sugar. Place the lid on the jar and screw on the ring. Set jar aside while we make the jar embellishments.
 Here's a photo of the supplies needed to embellish the jar. Again, the complete supply list and instructions are listed at the Make + Save section at Papertrey Ink. I'll be using Friendship Jar + Friendship Jar Spring Fillers plus lots of other fun products.
 Start off by die cutting and stamping the jar + lid + topper + label images as shown below. The bunny in the jar is from Friendship Jar Spring Fillers.
 Color the bunny image with Copic markers. Using the fine tip end of pastel Copics, make small polka dots on the jar.
 Assemble the die cut jar pieces as shown below. I used pop dots to adhere the jar lid and the label. A portion of the label will be snipped off. Set embellishment aside.
 Cut a 5" circle of fabric using pinking shears. The fabric I used is from Amy Butler (sorry, I don't know the exact name). Center the fabric circle over the jar lid then screw the ring over the fabric. Set aside.
 Using spray mists (you could also use Copic re-inkers and an old toothbrush), splatter the ribbon with droplets of ink. I did not spray the ink but instead used the spray nozzle as a eye dropper of sorts. This gives the ribbon a great speckled egg look.
 Tie the ribbon around the jar ring, using small glue dots to secure in place if needed. Wrap a piece of twine around the jar lid of the embellishment and tie around tied bow on jar.
 And here is my completed Peep Show Cookie Jar. I'm using mine as a cute center piece decoration for now. So cute and colorful.
 Place a few little chicks from the craft stop on top for even more adorable-ness.
 So cute with the pastel M & M's showing through. All kids young and old LOVE these jars. Include a copy of the recipe so that the recipient knows how to prepare the cookies. So easy and fun. Hope you enjoy!

 Using a clean, wide mouth canning jar layer 2/3 cup crushed graham crackers into bottom of jar. Arrange 8 Peeps marshmallows around the inside of the jar.
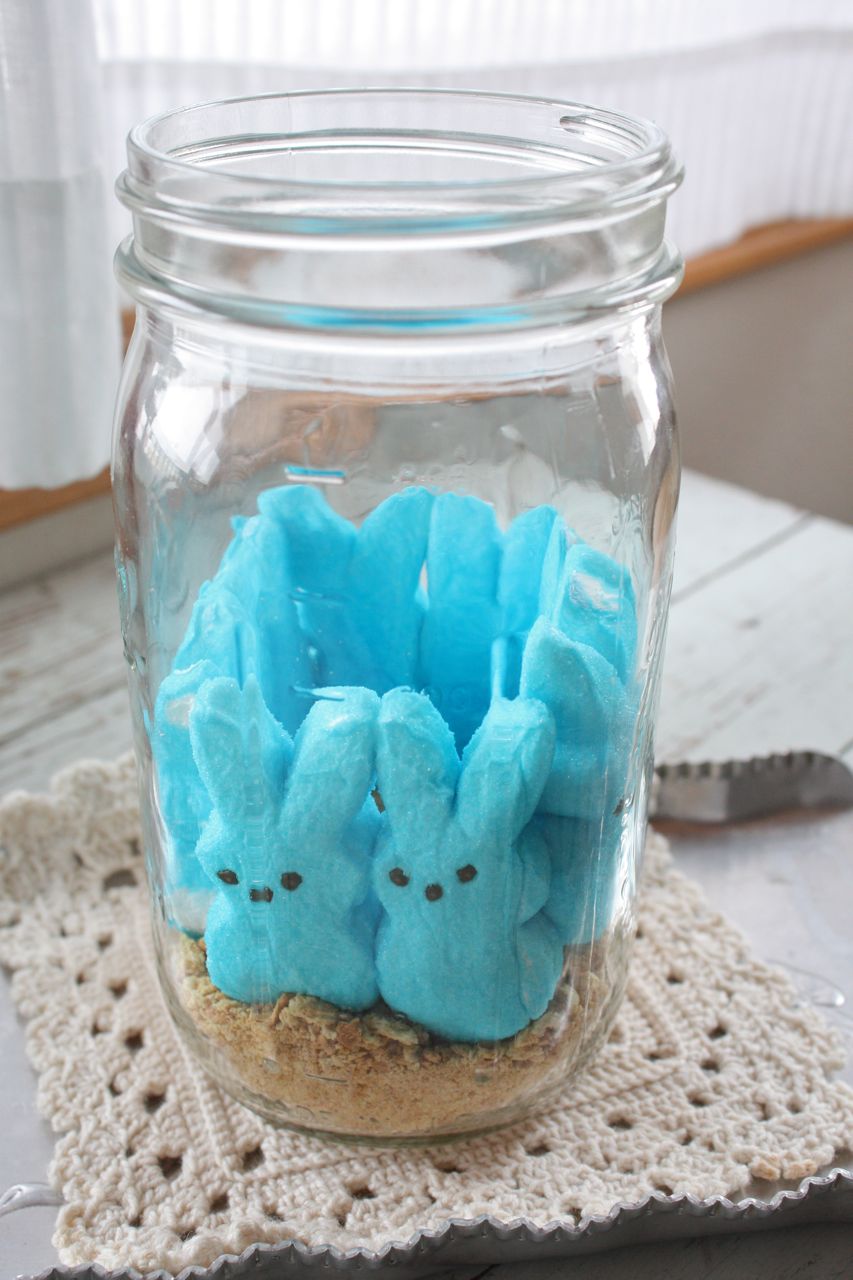 You will then spoon in the rest of the crushed graham crackers to support the Peeps. Pour in the M & M's. Then pack in the brown sugar. I used this unknown wooden tool that I got in a box of stuff at an auction. If you don't own an unknown wooden tool, just use a large spoon to pack the brown sugar. Place the lid on the jar and screw on the ring. Set jar aside while we make the jar embellishments.
 Here's a photo of the supplies needed to embellish the jar. Again, the complete supply list and instructions are listed at the Make + Save section at Papertrey Ink. I'll be using Friendship Jar + Friendship Jar Spring Fillers plus lots of other fun products.
 Start off by die cutting and stamping the jar + lid + topper + label images as shown below. The bunny in the jar is from Friendship Jar Spring Fillers.
 Color the bunny image with Copic markers. Using the fine tip end of pastel Copics, make small polka dots on the jar.
 Assemble the die cut jar pieces as shown below. I used pop dots to adhere the jar lid and the label. A portion of the label will be snipped off. Set embellishment aside.
 Cut a 5" circle of fabric using pinking shears. The fabric I used is from Amy Butler (sorry, I don't know the exact name). Center the fabric circle over the jar lid then screw the ring over the fabric. Set aside.
 Using spray mists (you could also use Copic re-inkers and an old toothbrush), splatter the ribbon with droplets of ink. I did not spray the ink but instead used the spray nozzle as a eye dropper of sorts. This gives the ribbon a great speckled egg look.
 Tie the ribbon around the jar ring, using small glue dots to secure in place if needed. Wrap a piece of twine around the jar lid of the embellishment and tie around tied bow on jar.
 And here is my completed Peep Show Cookie Jar. I'm using mine as a cute center piece decoration for now. So cute and colorful.
 Place a few little chicks from the craft stop on top for even more adorable-ness.
 So cute with the pastel M & M's showing through. All kids young and old LOVE these jars. Include a copy of the recipe so that the recipient knows how to prepare the cookies. So easy and fun. Hope you enjoy!


27 comments:
SO cute and adorable! What a delightful idea, gorgeous colors and as creative as always.Thanks.
What a darling little project & yes it is perfect for Easter as a gift or just a decoration! I'm making this for my BFF as I recently purchased the friendship jar set. Thank you for sharing your wonderful creations.....you're a sweetheart!
p.s.- the speckled ribbon...just adorable & soooo creative!
Adorable, Mish! Those cookie bars sound yummy, and the presentation couldn't possibly be cuter! BTW, you had me chuckling out loud with your Unknown Wooden Tool. Now I'm going to have to be on the lookout for UWTs at my local flea market. ;)
Hi Michelle,
The pastel colours look lovely together. Like how you made the jar sentiment to go along with the real jar. The final touches of adding the 2 lil' chicks on the jar cover is brilliant. Absolute cuteness.
Mish, I am SO excited about this post... awhile back I purchased some peeps knowing I wanted to do *something* with them... and yesterday they were staring at me, asking what, exactly, did I have in mind? And I really didn't know. But you've saved me, and I am so excited to make these to put on my easter table as gifts to our guests. THANK YOU!
Incredible Idea! Wish I had time to do this, this year... but next year...watch out!!!
These have got to be the cutest things I've seen in along time! Thank you for sharing. Dawn
hello, most adorable thing ever! :)
omg...peeps in a jar! love it, so creative.
so cute!
Thanks for the great project. It's so cute! I love your cute tag too. I love your stamps sets and use them often but I love to see what you do with them. Thanks for sharing!
Oh my gosh, this is just too cute! I think I would just put it in a jar and use it as a decoration too! What I great idea. And of course love how you used the tag. You are just too good.
This is sooo cute!! Love the marshmellows, we would never find them here in the Netherlands, but they are sooo cute!! Love the spots on the ribbon! Fun project!!
Hugs, Wendy
Oh my goodness Michelle, this is absolutely adorable. What a wonderful Easter gift!!! Thanks for the inspiration.
Oh my gosh! So cute! Love the ideas you share with all of us! You are much appreciated!
Adorable! thanks for sharing!!!
So Sweet! Thanks for sharing.....
Truly the cutest thing I have ever seen Mishie....love, love, love it!
Melis
Have never heard of these before! SO CUTE! Will definitely have to try them and make some for gifts! Thanks for sharing.
This is such a great idea!!! Really says HAPPY SPRING!
Catching up on all my favorite blogs this evening and this is Adorable! I love the idea and will have to get some of those Peeps before they disappear for this project. Thank you for the recipe. Have a wonderful Easter.
This is the cutest spring jar ever! It is too cute to disassemble for cookies. I have an odd question. I saw on your blog a "You Might Also Like" photo of Folgers coffee single and mini creamer. Looked intersting but when I went back it was a new photo. Now I can't find the post. Do you know when it was posted? My curiosity is bubbling! Looks like a sweet idea.
Beyond adoreable!! Love it. I could not find theese peeps but the old style peeps. Not as cute!! Going to look again today and get mine finished up!! Thansk for sharing!! Happy Easter to you and your family!!
Yummy - and pretty project!
The UWT is an early version of a meat tenderizer...great for pounding away your stress! My mom has a slightly newer version - wooden handle with steel block "toothy" head. I keep telling her not to give away her valuable antiques when she's done with them :)
Ooooh, I am so doing this next Easter for my fam! Love it!!!
This is perfect! You have the most wonderful ideas. Thank you for sharing them with us!
Post a Comment