
If it wasn't for project life I wouldn't have done any memory keeping for the past 3 years. I love everything about the concept. I have been able to keep up with it due to its simplicity.... even with 4 kids that were 5 and under. I am so thankful for the memories that I have documented and can't wait to continue!
August 15, 2012
Project Life Winner!

August 13, 2012
Project Life Week 24, 2012...Summer in full swing
Hey there. Welcome to another week of my 2012 Project Life. I'm sharing week 24 which is a week from June. Here's the 2 page spread.
 Here's the left page.....
 Here's the right page...
 I'm going to let the photos speak for themselves today while we have a little chat about our progress. :)
 Here's the left page.....
 Here's the right page...
 I'm going to let the photos speak for themselves today while we have a little chat about our progress. :)
As I've gotten a little behind this Summer (which seems to be the usual with my Project Life albums), I realize that I've really been missing working on my pages. I miss the photos, telling the stories, and paging through my albums. I miss the entire process. So I'm happy to be back at it now that we have a little more free time. School will be back in session in one week and my goal is to get mostly caught up by then. I've got 2 weeks in the works and about 5 more to complete. I can totally do this!
 I know some of you may be in the same boat. You're behind and feel you can't catch up. You've all but dropped Project Life altogether. Or you want to start Project Life but feel that it's an odd time to start half way through the year. My reply to all of those statements is that you can pick up Project Life any time. Whether you're catching up, starting over or starting new. Your album can start right where you want it to.
 You can be as simple as you want or as detailed as you like. The important thing is that you're sticking with it. I have chosen to embellish all my inserts like I would a traditional scrapbook page. I loved going to crops and making double 12 x 12 layouts. But that just doesn't work for me anymore. Time doesn't allow for me to make a separate layout for each one of my photos.
 That's what I have discovered I love most about Project Life. I have been treating each little insert like a teeny tiny scrapbook layout of its own. Each little section tells a story. A story that I can capture in a 3 x 4 space...or a 4 x 6 space....and that is awesome! I can capture what I want to say in a small paragraph and with one photo. As much as I love the big 12 x 12 layouts, I'm capturing the same thing with my little inserts.
 And those inserts come together to make a great 2 page spread of a week in my family's life. I'm capturing so many more memories by doing Project Life.
 I don't know how many single photos I had in my photo boxes over the years. Photos that I loved but didn't feel they deserved a full 12 x 12 layout. And now I don't have to worry about it. Those single photos are right at home in my Project Life albums.
 The other great thing about deciding to embellish my pages is that I'm feeding my desire to be creative. I can still shop for and hoard all the wonderful scrapbooking and stamping supplies out there without ever doing full page layouts.
 I do have lots of sticky notes on pages where I want to go back and add insert pages. I was hoping to find time to do some traditional scrapbooking with those. That may or may not happen. My goal is to go back and at least get the photos printed. I'm thinking with all the new Project Life page protector sizes that I might just add the inserts and embellish just like my regular page inserts. I'm particularly loving the idea of printing the best photo of the week at a larger scale (like a 5 x7) and perhaps just inserting that with a little journaling. I like the idea of the main pages and my inserts still coordinating.
 And those are my thoughts. If you've followed along with my thoughts, please feel free to scroll back to the top and check out the photos. I can't wait to check out the other Project Life Creative Team Members' blogs. Zooming in on photos to check out the details, the stories and the embellishments is so inspiring.
 I know some of you may be in the same boat. You're behind and feel you can't catch up. You've all but dropped Project Life altogether. Or you want to start Project Life but feel that it's an odd time to start half way through the year. My reply to all of those statements is that you can pick up Project Life any time. Whether you're catching up, starting over or starting new. Your album can start right where you want it to.
  You can be as simple as you want or as detailed as you like. The important thing is that you're sticking with it. I have chosen to embellish all my inserts like I would a traditional scrapbook page. I loved going to crops and making double 12 x 12 layouts. But that just doesn't work for me anymore. Time doesn't allow for me to make a separate layout for each one of my photos.
  That's what I have discovered I love most about Project Life. I have been treating each little insert like a teeny tiny scrapbook layout of its own. Each little section tells a story. A story that I can capture in a 3 x 4 space...or a 4 x 6 space....and that is awesome! I can capture what I want to say in a small paragraph and with one photo. As much as I love the big 12 x 12 layouts, I'm capturing the same thing with my little inserts.
  And those inserts come together to make a great 2 page spread of a week in my family's life. I'm capturing so many more memories by doing Project Life.
  I don't know how many single photos I had in my photo boxes over the years. Photos that I loved but didn't feel they deserved a full 12 x 12 layout. And now I don't have to worry about it. Those single photos are right at home in my Project Life albums.
  The other great thing about deciding to embellish my pages is that I'm feeding my desire to be creative. I can still shop for and hoard all the wonderful scrapbooking and stamping supplies out there without ever doing full page layouts.
  I do have lots of sticky notes on pages where I want to go back and add insert pages. I was hoping to find time to do some traditional scrapbooking with those. That may or may not happen. My goal is to go back and at least get the photos printed. I'm thinking with all the new Project Life page protector sizes that I might just add the inserts and embellish just like my regular page inserts. I'm particularly loving the idea of printing the best photo of the week at a larger scale (like a 5 x7) and perhaps just inserting that with a little journaling. I like the idea of the main pages and my inserts still coordinating.
  And those are my thoughts. If you've followed along with my thoughts, please feel free to scroll back to the top and check out the photos. I can't wait to check out the other Project Life Creative Team Members' blogs. Zooming in on photos to check out the details, the stories and the embellishments is so inspiring.
 So whether you're caught up, way behind or just starting.....keep with it. Keep going. I'm so happy for each week that I add to my albums. Feel free to leave me a comment with your progress, your questions, etc. I love hearing your feedback.
Okay, off to finish what I hope to be TWO weeks of Project Life today. The girls have started 2-a-day volleyball practices and I'm devoting that time to work on my albums. For my next Project Life post, I think I'll share how easy it's been for me to pick up right where I left off last.....organization is the key. :)
August 10, 2012
Stamps for Sale....
TGIF everyone. I hope you have a great weekend!
In case you missed my Twitter and Facebook announcements, I have some stamps for sale at the page at the left. You can find the direct link right HERE. Or you can click on the Papertrey Sale Page at the left. <-------
I'll be back with a Project Life update over the weekend. I just received a big box of the new page protectors so I'm hoping to find some time to do some catching up also. :)
August 7, 2012
Back to my stamping roots.....a shoebox card kit
The Hey There Card Kits are now sold out. Thanks so much for your orders. All of the card kits and stamp sets that have been sold will be shipped out by tomorrow morning. If you missed my stamp sale, the link is here....or click on the page link at the left. <-----
Edit: YES, I do ship everywhere. :)
Hey there. While I've been on a little break from being on any stamping design teams, it's given me a lot of time to think about what direction I want to take with my blog and my shop. I thought way back to the days of my stamping beginnings and it took me back to the times I was a Stampin' Up! demonstrator.
I lived in a bigger city at the time and did lots of workshops & had lots of customers. By request, my workshops progressed into large gatherings where stampers would come and make cards that I designed. It was a win-win situation because the customers got to take home cards without investing in a lot of supplies + they loved my card designs. I got to design cards and put together what I called "shoe box kits" in the mass production style I love so much. I also loved the interaction and teaching crafty people.
I often times run into some of my old customers. They tell me how they miss my classes and sure wish they had some of my handmade cards. And I kind of miss those days too. So that brought me to my newest venture for the shop. I'm bringing back my shoe box card kits....but this time in an online fashion.
Here's how it works:
For each new card kit offered in the shop, I'll have a brand new card design. My first card kit is called Hey There. The cards will be easy to assemble and will allow you to add your own stamps of choice. Or if you prefer, I will stamp your pieces & parts with the stamps I feature for each kit.
 With each card kit, you'll get pre-cut supplies to assemble 5 cards with coordinating envelopes. As a bonus I'm including some unique packaging to go along with the cards. Each new card kit will feature a new card design and packaging. I think the cards are pretty easy to assemble by referring back to my photos but if you have questions or need instructions, feel free to email me.
 Assembly tip: For each card and coordinating gift sack, cut a Dainty Doily in half. Use one half for the card and the other half for the gift sack.
 Here's a photo of what will come in my first shoebox card kit called Hey There. A nice little bundle of supplies delivered right to your door. I'll be using some of my patterned papers and lots of supplies from my shop, including tags & bags, doilies, labels and more. So even if you don't purchase a kit, I'll link up the goodies I use from my shop if you'd like to purchase them separately and create your own card sets.
 Here's a photo of what will come in my first shoebox card kit called Hey There. A nice little bundle of supplies delivered right to your door. I'll be using some of my patterned papers and lots of supplies from my shop, including tags & bags, doilies, labels and more. So even if you don't purchase a kit, I'll link up the goodies I use from my shop if you'd like to purchase them separately and create your own card sets.
 I'll be searching lots of online shops for unique items to add to my kits also. If you have some ideas, please shoot me an email or leave me a comment with links. I've also spent a great deal of time searching for cardstock and envelopes to use in my kits. I found a great selection that I'm very happy with....100 lb cardstock with coordinating envelopes. It definitely meets my expectations.
 Here's a closer look at what your cards and packaging will look like when all assembled. You'll love being able to add 5 new cards with coordinating packaging to your stash in lickety split time. How many times have you wished that you had a card and gift wrap ready to go? I can recall that the favorite part of my shoe box card camps was watching the ladies ooh and ahh over their finished cards. Many of them made lists for how many cards they needed for upcoming events and made cards accordingly. I know that I'm happy to have this little stash just for me too. I'll probably use a few to add to my stash of cards that I give to my mom and mother-in-law for Christmas presents too.
 As a little add-on to the shop, I'll have a limited number of embellishment kits. These include just a few extra items that you can use to fancy up your cards from the kit if you wish. I've also included a few extra tags, doilies and clothespins in case you want to try my card design with some of your own cardstock and patterned papers.
 Here's an example of a card and gift sack that has been embellished with items from the little add-on kit. For each new card kit, I'll show a sample of how to bling it up a notch for those that like to layer on more embellishments. Here I added items from the above add-on kit including the butterfly embellishments, the metal clip and a little bit of Washi tape from my own stash.
 I have had so much fun shopping for the supplies for my upcoming shoebox card kits. I hope you love them too and will enjoy adding some cards to your stash. The quantity of the kits will be limited....as much as I love to mass produce, I'm still a one woman show and time is limited. I'm not sure how often I'll be adding more shoebox card kits to the shop. I guess I'll see how the response is and go from there. :)
 Here's a closer look at what your cards and packaging will look like when all assembled. You'll love being able to add 5 new cards with coordinating packaging to your stash in lickety split time. How many times have you wished that you had a card and gift wrap ready to go? I can recall that the favorite part of my shoe box card camps was watching the ladies ooh and ahh over their finished cards. Many of them made lists for how many cards they needed for upcoming events and made cards accordingly. I know that I'm happy to have this little stash just for me too. I'll probably use a few to add to my stash of cards that I give to my mom and mother-in-law for Christmas presents too.
 As a little add-on to the shop, I'll have a limited number of embellishment kits. These include just a few extra items that you can use to fancy up your cards from the kit if you wish. I've also included a few extra tags, doilies and clothespins in case you want to try my card design with some of your own cardstock and patterned papers.
 Here's an example of a card and gift sack that has been embellished with items from the little add-on kit. For each new card kit, I'll show a sample of how to bling it up a notch for those that like to layer on more embellishments. Here I added items from the above add-on kit including the butterfly embellishments, the metal clip and a little bit of Washi tape from my own stash.
 I have had so much fun shopping for the supplies for my upcoming shoebox card kits. I hope you love them too and will enjoy adding some cards to your stash. The quantity of the kits will be limited....as much as I love to mass produce, I'm still a one woman show and time is limited. I'm not sure how often I'll be adding more shoebox card kits to the shop. I guess I'll see how the response is and go from there. :)
Hey There Card Kits can be purchased here.
Add-on Embellishment Kits can be purchased here.
5 yards extra brown/white baker's twine can be purchased here.
Happy Stamper add-on can be purchased here. (This is if you want me to stamp your pieces from the kit using the same stamps I did.)
In case you don't purchase a kit but would like to make some similar cards of your own, I'll be adding a supply list of items I used for the Hey There kit.
Supply List:
stamp set is Big & Bold Wishes from Papertrey using Dark Chocolate ink
Other popular shop items:
The 2 Squared School Kit is still available, just in time for back to school themed cards.
My Waxed Paper Sacks are best sellers right now. Perfect for packaging food treats plus they look so cute with cards or notepads.
The Notebook Paper Labels, Grid Paper Labels and my new Starburst Grid Paper Labels are great for Project Life journaling and I plan on using them quite a bit with little back to school teacher gifts. I also like to use them for envelope seals with a stamped image.
August 6, 2012
Is Project Life for you?
I was behind by about 3 months, but I've made progress.. I only have 3 weeks to do and I'll be all caught up!! And those cards are super cute!
Hey everyone. Happy Monday! We're winding down our last few weeks before school starts. I have lots going on this week so check back often.
First up, let's talk about Project Life. We're mid-way through the year and I know it gets tough to keep up, especially during the Summer months. I'm looking forward to doing a little catch up myself once the girls start back to school. If you're brand new to Project Life and are wondering if it's for you, this little video will give you a glimpse as to what it's all about. I say YES! Project Life provides a super simple solution to getting our photos into albums. It can be as basic as you want it to be.....or you can fancy up your pages with your own scrapbooking supplies.
Please check Becky's new video here to see what Project Life is all about.
I am also doing a Project Life giveaway today. If your name is selected from my comments section, you'll receive these brand new items from the Project Life lineup:
 To enter the contest, please leave a comment on this post telling me how Project Life has changed your way of scrapbooking....or if you're brand new to Project Life, tell me how you think you'll use it. Comments will be closed tomorrow, (Tuesday) August 6th at 9pm Central Time. Good luck!
This week:
Lot to juggle this week but I'm hoping to be back with some fun blog posts. Look for a Project Life update, some new cards, some provoking thoughts, a new kit, some vintage finds and lots of Papertrey stamps and patterned papers for sale. I need some time to organize it all but I'm going to try to fit it all in. Stay tuned & be sure to check my Facebook and Twitter updates for upcoming sales. :)
August 3, 2012
Last of the 2 Squared School Kit projects...
Hi there. Back today with the last of my projects made from my 2 Squared School Kit. I have had the most fun with this kit. I just set all the items on a tray and spent the good part of a weekend just being crafty with it. Such a fun way to spark a little creativity....limiting yourself to just a few items so you don't get overwhelmed...having a list of what you want to make....giving yourself a time frame to work within. The kit uses Studio Calico Elementary papers and stickers + there are tons of fun items from my shop. Be sure to scroll down to previous posts where I have lots of other school themed projects using this kit.
First up from today's projects are some embellished Project Life journaling cards. I set out the items below to use.
 And here are my finished journaling cards. I used the Project Life blank grid journaling cards as my bases. What I love about these cards are that they don't scream teacher/apple/school. There are subtle school themed items that aren't overwhelming for my high schoolers.
 I'll be reaching for these very soon when school starts back up again. Some of the photos I like to capture are of course the 1st day of school photos....but also shots of those first homework assignments, school books and papers, book bags, little snippets of homework papers. These little journaling cards will blend in so easily with my other pieces of Project Life.
 Next up on my list was a notebook. If you've followed my blog long then you knew I couldn't stay away from my beloved notebooks. Here's what I set out to use. That wonderful packet of flair buttons are from my sweet friend Leena Loh. You can find her shop, Finding Nana, right here. It's packed full of the sweetest little goodies ever. And if you love Project Life inspiration be sure to check out Leena's blog. Her pages are total eye candy and filled with lots of details.
 So here's my notebook. I used 2 Papertrey notebooks that were specifically designed to coordinate with my Papertrey Take Note set. The perfect size for a work bag, purse or to tuck in a drawer.
 I used a Medium Manila Parcel Tag from the kit + one of the pieces of my punched tab garland that I made earlier on the top of the notebook. A few strips of Washi tape were added too.
 I stitched over pieces of the Studio Calico Elementary paper after a few of the Kraft star stickers were added in a grid pattern. One of Leena's flair buttons was a perfect finishing touch to the circles on this fun patterned paper.
 Notebooks are always a great teacher gift and very much anticipated from everyone who knows their on my gift list. For gift packaging I used one of the large glassine sacks from the kit. You could also use my Large Kraft Sacks or my new Waxed Paper Sacks for packaging too. I tucked in the notebook and then folded the sack around to the back, securing with some Washi tape. I used a Small Parcel Tag from the kit + some leftover patterned paper that I trimmed down to make some notched tags. I tied on some baker's twine and then secured the tags down with strips of Washi tape. Love these notebooks and may have to make some more.
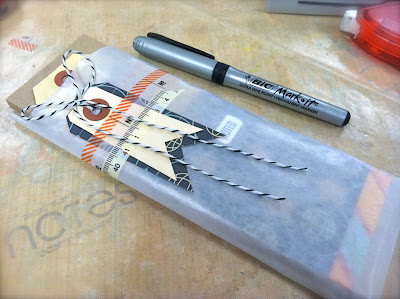 And here's the last of the scraps from the 2 Squared School Kit. I had just a few pieces leftover. If you click on the link to the kit you'll see that I used almost every single piece of it. Man, that was fun!
 Oh but wait. There's one more little project to show you that I almost forgot about. In the kit you'll receive a large clothespin. I used some Washi tape and wrapped it around the ends of the clothespin. Perfect width. I then added another one of Leena's flair buttons. That took all of about 1 minute to create. Perfect to go along with the notebook gift to keep papers nice and tidy. The flair buttons are perfect for this size of clothespin.
 So now that I've conquered the kit I thought I would show you all the goodies I made. Card sets, notebooks, bookmarks, gift sacks, journaling cards and more! I hope you enjoyed my projects and are inspired to create a few teacher gifts of your own. We can't forget the teachers. They spend a tremendous amount of time with our kids and are a huge influence. A little gift or card to let them know you appreciate their time is worth gold to them. I hope you take a little time to remember them this coming school year. :) I've got some of the 2 Squared School Kits left in the shop....perfect if you're looking to assemble some projects quickly.
 So what's next for me in the crafty department? I have this beeee-U-TeE-FuLL lineup of My Mind's Eye The Sweetest Thing papers, stamps and accessories just waiting for me. Seriously folks, this stuff is total eye candy. So pretty and soft and muted. With a little touch of vintage. I want to hoard all of it. I want to order doubles so that I can hoard all of it. But I won't. I'm going to dig in the next chance I get!
 Just look at the fun accessories. The stamp set has adorable little flowers as well as the colorful brads. And the Washi tape.
 The Washi tape deserves it's own photo. I couldn't make a decision so it ALL went into my cart at 2Peas. It's got a very smooth finish too and coordinates with the papers so wonderfully. Did ya get some? Here's your enabling alert!

Well, I better scoot on our of here. The girls will be home from weights soon and then we're heading to the big city for some back to school shopping. The girls have grown so much, they need new everything! I may have to trade Washi tape for new jeans. I'm praying for great deals & patience in the dressing rooms. Wish me luck! And here are my finished journaling cards. I used the Project Life blank grid journaling cards as my bases. What I love about these cards are that they don't scream teacher/apple/school. There are subtle school themed items that aren't overwhelming for my high schoolers.
 I'll be reaching for these very soon when school starts back up again. Some of the photos I like to capture are of course the 1st day of school photos....but also shots of those first homework assignments, school books and papers, book bags, little snippets of homework papers. These little journaling cards will blend in so easily with my other pieces of Project Life.
 Next up on my list was a notebook. If you've followed my blog long then you knew I couldn't stay away from my beloved notebooks. Here's what I set out to use. That wonderful packet of flair buttons are from my sweet friend Leena Loh. You can find her shop, Finding Nana, right here. It's packed full of the sweetest little goodies ever. And if you love Project Life inspiration be sure to check out Leena's blog. Her pages are total eye candy and filled with lots of details.
 So here's my notebook. I used 2 Papertrey notebooks that were specifically designed to coordinate with my Papertrey Take Note set. The perfect size for a work bag, purse or to tuck in a drawer.
 I used a Medium Manila Parcel Tag from the kit + one of the pieces of my punched tab garland that I made earlier on the top of the notebook. A few strips of Washi tape were added too.
 I stitched over pieces of the Studio Calico Elementary paper after a few of the Kraft star stickers were added in a grid pattern. One of Leena's flair buttons was a perfect finishing touch to the circles on this fun patterned paper.
 Notebooks are always a great teacher gift and very much anticipated from everyone who knows their on my gift list. For gift packaging I used one of the large glassine sacks from the kit. You could also use my Large Kraft Sacks or my new Waxed Paper Sacks for packaging too. I tucked in the notebook and then folded the sack around to the back, securing with some Washi tape. I used a Small Parcel Tag from the kit + some leftover patterned paper that I trimmed down to make some notched tags. I tied on some baker's twine and then secured the tags down with strips of Washi tape. Love these notebooks and may have to make some more.
 And here's the last of the scraps from the 2 Squared School Kit. I had just a few pieces leftover. If you click on the link to the kit you'll see that I used almost every single piece of it. Man, that was fun!
 Oh but wait. There's one more little project to show you that I almost forgot about. In the kit you'll receive a large clothespin. I used some Washi tape and wrapped it around the ends of the clothespin. Perfect width. I then added another one of Leena's flair buttons. That took all of about 1 minute to create. Perfect to go along with the notebook gift to keep papers nice and tidy. The flair buttons are perfect for this size of clothespin.
 So now that I've conquered the kit I thought I would show you all the goodies I made. Card sets, notebooks, bookmarks, gift sacks, journaling cards and more! I hope you enjoyed my projects and are inspired to create a few teacher gifts of your own. We can't forget the teachers. They spend a tremendous amount of time with our kids and are a huge influence. A little gift or card to let them know you appreciate their time is worth gold to them. I hope you take a little time to remember them this coming school year. :) I've got some of the 2 Squared School Kits left in the shop....perfect if you're looking to assemble some projects quickly.
 So what's next for me in the crafty department? I have this beeee-U-TeE-FuLL lineup of My Mind's Eye The Sweetest Thing papers, stamps and accessories just waiting for me. Seriously folks, this stuff is total eye candy. So pretty and soft and muted. With a little touch of vintage. I want to hoard all of it. I want to order doubles so that I can hoard all of it. But I won't. I'm going to dig in the next chance I get!
 Just look at the fun accessories. The stamp set has adorable little flowers as well as the colorful brads. And the Washi tape.
 The Washi tape deserves it's own photo. I couldn't make a decision so it ALL went into my cart at 2Peas. It's got a very smooth finish too and coordinates with the papers so wonderfully. Did ya get some? Here's your enabling alert!
Speaking of prayers, my family received a wonderful blessing on Monday. My dad went in for his 4 month post-op appointment. Blood work was good and his scans showed no signs of cancer. I can't tell you how wonderful it was to give my dad a hug and see the signs of relief on his face.
I'll leave you with that. Have a wonderful, crafty day my friends.
July 31, 2012
Simple Circle Notecards
Back once again with some more creations from my 2 Squared School Kit. I told you I was up for the challenge of conquering this kit. Getting closer. :) Here's another peek at all of the kit contents. There's a LOT of goodies in this kit, especially when you sort it all out and begin creating. As the kit suggests with the "2 squared" title, there are lots of 4 x 4 papers to start your projects. This is a great way to get a creative lift if you're in a little crafty slump.
 Each time I sat down to create with this kit, I picked a few items and then just went to work. Here I have some notecards with envelopes and stamped pieces. The large stamped bulls eye image is Studio Calico's Plano Stamp. The small circles were stamped with Studio Calico's Take Note.
 And here's my set of 3 finished notecards. These came together very quickly so they'd make great teacher gifts because they're easy to mass produce.
 On the tops of my cards I adhered some stamped Grid Paper Labels. I'm loving these labels lately for sentiments. They take ink well and if you want several of the same sentiments you can just stamp them all down the row while the labels are still on the backing sheet. I've also got Notebook Paper Labels. I layered 2 strips of Washi tape over the label.
 On the bottom of the cards I popped my focal pieces right in the centers of the stamped circles. Realllly love the graphic feel of this. And perfect for the fellas too.
 On my Kraft envelopes I used more Washi tape + more stamped Grid Paper Labels. Any of my labels work great on envelopes because they are very flat and stick well.
 For packaging I used a Waxed Paper Sack from the kit. I know I will be keeping a big personal stash of these sacks for teacher treats and packaging up small sets of cards. They have a gusset so you can easily fit in a set of cards with envelopes.
 I used yet another Grid Paper Label with some of the Kraft stars from the kit adhered. I sealed up my sack with more Washi tape then added a Metal Rim Tag from the kit with a big loop of black/white baker's twine. Eeek, I just love having a stash of teacher goodies ready to go.
 Okay, I have ONE more post this week with the last of my teacher themed projects made from the kit. Come back and visit. :)
 Each time I sat down to create with this kit, I picked a few items and then just went to work. Here I have some notecards with envelopes and stamped pieces. The large stamped bulls eye image is Studio Calico's Plano Stamp. The small circles were stamped with Studio Calico's Take Note.
 And here's my set of 3 finished notecards. These came together very quickly so they'd make great teacher gifts because they're easy to mass produce.
  On the tops of my cards I adhered some stamped Grid Paper Labels. I'm loving these labels lately for sentiments. They take ink well and if you want several of the same sentiments you can just stamp them all down the row while the labels are still on the backing sheet. I've also got Notebook Paper Labels. I layered 2 strips of Washi tape over the label.
  On the bottom of the cards I popped my focal pieces right in the centers of the stamped circles. Realllly love the graphic feel of this. And perfect for the fellas too.
  On my Kraft envelopes I used more Washi tape + more stamped Grid Paper Labels. Any of my labels work great on envelopes because they are very flat and stick well.
  For packaging I used a Waxed Paper Sack from the kit. I know I will be keeping a big personal stash of these sacks for teacher treats and packaging up small sets of cards. They have a gusset so you can easily fit in a set of cards with envelopes.
  I used yet another Grid Paper Label with some of the Kraft stars from the kit adhered. I sealed up my sack with more Washi tape then added a Metal Rim Tag from the kit with a big loop of black/white baker's twine. Eeek, I just love having a stash of teacher goodies ready to go.
  Okay, I have ONE more post this week with the last of my teacher themed projects made from the kit. Come back and visit. :)
July 30, 2012
2 Squared School Kit.....set of 3 cards with envies
Hello everyone. I'm starting off this week with more creations using my 2 Squared School Kit. I worked all weekend on projects and I finally conquered the kit! I'll be sharing my other projects throughout the week. I'm excited to have a stash of cards and gift packaging for the teachers.
So here's what I chose to work with today from the kit. I also created a fun punched file tab garland using the Jenni Bowlin punch and grey cardstock. Let's see what I come up with.
 I decided to do a set of 3 cards with coordinating envelopes + packaging for today. I used the 4 x 4 Studio Calico Elementary patterned papers at their true size. I layered on tags, strips of the old book paper and 3 pieces of the file tab garland. I wanted to add stitching that didn't show through on the insides of the cards so I did all the assembly on the 4 x 4 piece of patterned paper, then did my stitching.
 For each card I reached for some extra Medium White Tags. Here I used one with the strings stapled to the top of the tag. Stamps are from Studio Calico.
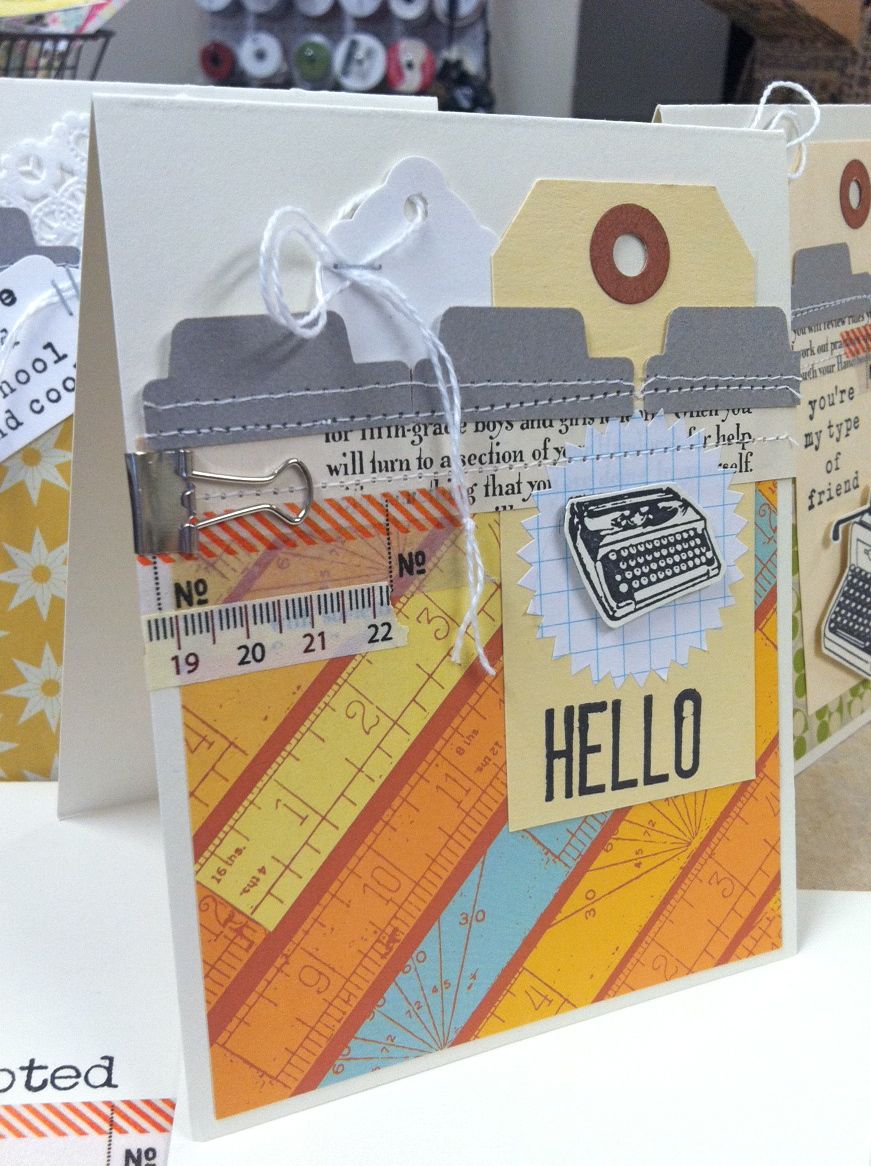 Here's one I did using the same assembly method as the card above. I used the small index card from the kit and rounded the corners then added one of my small Instagram prints. I also added a piece of a Dainty Doily under the stitched layer. For the Medium White Tag, I used it as the main card sentiment(Hero Arts) with stapling.
  For my third card I used this fun Retro Typewriter stamp and My Type sentiment from Hero Arts. I stamped the image and cut it out carefully with fine tipped scissors.
 The Large Manila Tag from the kit is the base for the popped up image. You can see in the photo below how I did the assembly and stitching on the 4 x 4 piece of patterned paper before applying to the cardstock. Speaking of cardstock, I found a great selection with coordinating envelopes to use in my kits. Stay tuned for more information on these kits coming this Fall to my shop.
 Here's the finished card with the popped up Hero Arts typewriter.
 For each of my 3 cards I used 2 strips of Washi tape with a metal clip attached to the side of the card. To make those clips more flat when mailing, I used my big honkin' hammer and tapped them flat. There's just enough space to nudge them onto the side of the card. Love this little tip as it takes a lot of bulk off of the card.
 Next up I created 3 coordinating envelopes that I dressed up with strips of Washi tape and the "noted" stamp. For each envelope I used Starburst Grid Paper Labels that I stamped with a Hero Arts image. I plan to use these on the backs of the envelopes as seals. So cute!
Here's the whole set of 3 cards with coordinating envelopes.


And that's it for today's projects using the 2 Squared School Kit. I must now clean up my area and switch gears to Project Life. I'm SEVEN weeks behind and that's making me a little twitchy. My game plan is to just start picking out my handmade journaling cards and work quickly. I have all the photos with notes in order so I just need to do a little planning. The family has some fair events they want to attend this week so I'm dedicating that time to solely work on my PL album. I'm not really into demolition derbys and rodeos. Plus it's still like 200 degrees and doesn't cool down so the air conditioning is my friend these days.
Okay everyone, have a great week!
Subscribe to:
Posts (Atom)


 Posts
Posts


