March 7, 2013

Confetti Easter cards...

Hey there, I'm back today to share some Easter cards with you using some new shop products.  My product picks from my shop today are these fun bags of Pastel Confetti Fluff.....
.....and the Small Yellow Glitter Clothespins.
I got a jump start on some Easter cards and packaging and here's what I created.  Some fun cards using confetti bags as a focal points and some simple packaging.  I used about a teaspoon of the confetti fluff in each clear bag...the bag you get comes with about 3 heaping tablespoons so there is lots to work with for cards. 
For my cards I used some new My Mind's Eye papers and stamps.  I stamped the whimsical flower onto Small White Parcel Tags.  For packaging up a fun springy gift, I used Large White Glassine Sacks and Dainty Doilies.
 For cute little clips, I used a Small Yellow Glitter Clothespin and a Glittery Gold Clothespin. I just added some paper flowers to top them off. If  you want to create your own colored, glittery clips I also have plain clothespins in the shop.
Cute and springy cards for my stash.  I'm thinking some fun sugar cookies with lots of pastel sprinkles might be a fun treat for the sacks.
For another treat idea, have you seen my Peep Show Cookie Jars?  This post has been pinned a bunch on Pinterest lately so I thought maybe it was worth sharing again.  The actual blog post is here with the recipe.  I think I'll make up some of these for the little kiddos this year.
Here's hoping Spring will be here soon.  Enjoy!

March 6, 2013

Friendship Jar cards...using Gossamer Blue kit items

Hello everyone, it' going to be a glorious day.  I slept so well last night, the sun is shining & the snow is melting....it's a chilly 19 degrees this morning but I can feel that Spring will be amongst us soon. And to me that means flowers.  So it's flowers for today's project.  

I compiled this collection of products from the Gossamer Blue March kits.  The colors and patterns here are some of my favorite from the March lineup.  What I really love about Gossamer Blue's kit club is that it offers something for everyone.  It's all about crafting and whatever that encompasses for you.  
Today I'm sharing how I used the kit items with some stamps from my stash.  If you are a stamper I know you have dozens, maybe hundreds of stamps in your crafty arsenal.  The Gossamer Blue kits are perfect to use with your stamps.  It's fun to set up a monthly supply station like I did here and see what you can create.  I selected the supplies you see above and a favorite stamp set of mine, Friendship Jar.  If you are new to my blog, I designed Friendship Jar and and a series of coordinating stamps for Papertrey Ink.  Nichole Heady brought them to life with her wonderful illustrating.  They are stamps that are near and dear to me and it's like reacquainting with an old friend each time I pull them out again.  You can see the entire lineup of Friendship Jar stamps and coordinating dies over at Papertrey Ink here.  

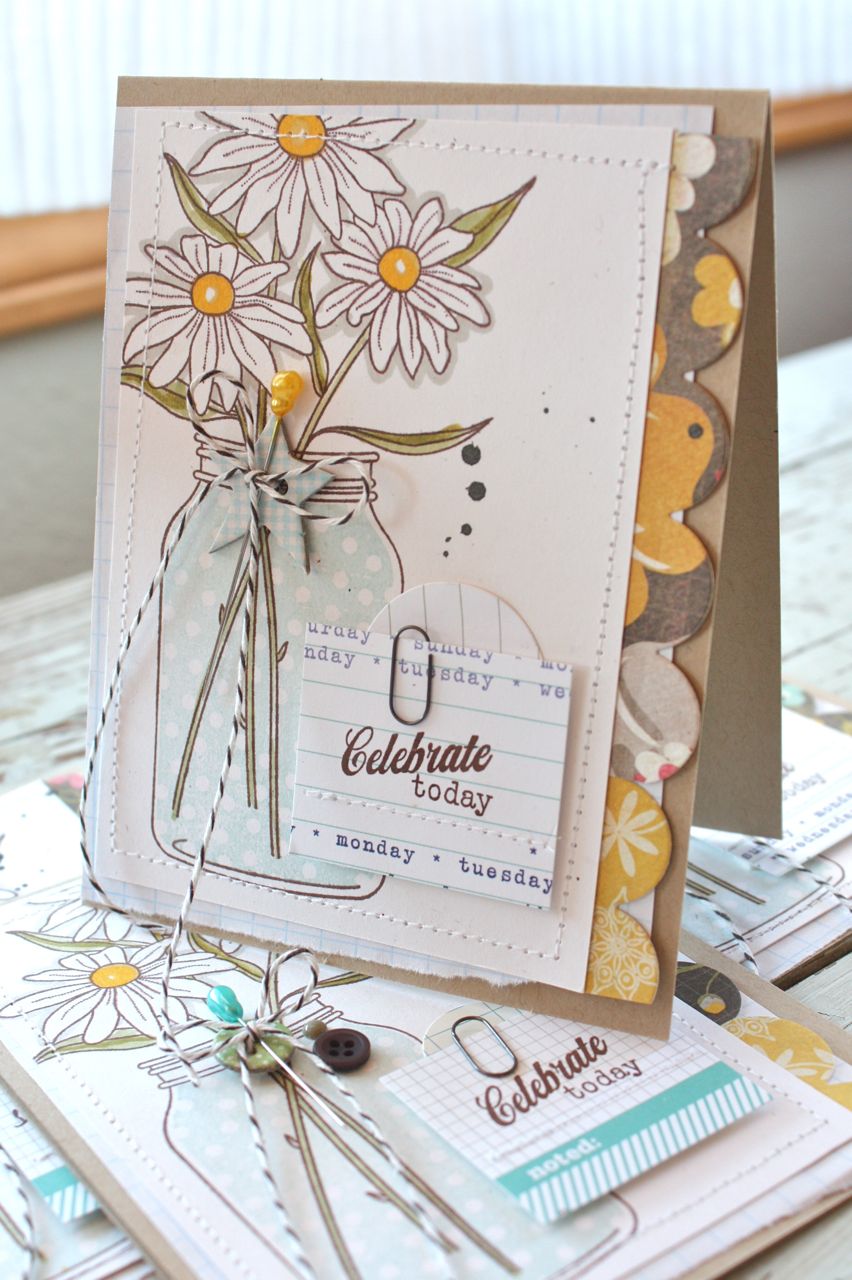
Today I wanted to get a little bit artsy but since I wanted to mass produce the cards I didn't want anything too time consuming.  I stamped my jar and daisy images and then stamped the jars with the polka dot filler pattern.  Then I scribbled some Copic colors in buttery yellows to find just the right colors and then colored my flowers.  I used a grey marker to outline the flowers to make them pop off the page.  
Next I used some of the journaling tags from Elle's Studio that were included in the March Bits & Pieces Kit.  I stamped a sentiment on each tag, trimmed them down and stitched them with my sewing machine. I also created scalloped border strips using the pretty floral paper from the March Add-on Kit #2 + one of the buttery yellow papers.  
Then I decided on a simple card design and went into mass production mode when it came time to assemble my cards. 
I absolutely love the white space and the soft & pretty colors.  Each card is a little different but the basic design is the same.  And except for the base papers, some grid paper, small paperclips and twine, the rest of my embellishments are from Gossamer Blue.  It's such a creative boost to take your kits and challenge yourself to use those items.  No hoarding, the idea is to use up as much of the kits as possible in one month.....knowing there will be new items coming in the next month's kit.  
I also challenged myself to use the Black Color Shine from Heidi Swapp in the March Color Kit.  I love how the tiny sprinkling of ink fills in the white spaces just a bit on my cards.  To get a very controlled area of color, I rip scraps of paper into small pieces and mask off very small areas on my cards.  That way the main image doesn't have blobs of color.  If you want teeny tiny specks, unscrew the spray nozzle from the Color Shine and flick off most of the color onto a scrap piece of paper ( I keep mine in a box to color the overspray)...when there is very little color left then I flick the ink onto my cards.  
For each card, I popped up the sentiment piece with pop dots.  I used a small Elle's Studio tag from the kits underneath + added a small Tim Holtz paper clip for interest.
On each of my cards I also added a tied embellishment to the jars.  I created these using the Mixed Buttons from Fancy Pants and the Chipboard pieces from My Mind's Eye in the March Add-on Kit #2. I absolutely love the stick pins from My Mind's Eye in the March Main Add-on kit.  These are something I probably never would have purchased while shopping online but they were such a fun addition to my cards.  Tiny buttons and enamel dots from other kits were added here and there too.
Oodles of little embellishments and papers that coordinated so well for this batch of cards.  I do hope you give the Gossamer Blue kits a try.
Note:  Most of the the March kits from Gossamer Blue have sold out but quantities will be increasing as Gossamer Blue grows it's number of subscribers.  Thanks for stopping by and I hope you make today a GREAT day!  To all my old Papertrey friends, I do hope you stop in to say hello.  :)

March 4, 2013

Spring Shop Update....

Spring is on it's way and I have some fresh new items in my shop.  

First up are some new gift bag sets.  I wanted some new packaging for my gift gifting so I stitched up some drawstring bags to have on hand.  I've seen the plain varieties popping up and thought that some colorful ones using trendy fabrics might be cute too.  As I create my own stash, I'll be sharing a few extras in the shop for you.  There are the blue polka dots.....
Chartreuse.......
 Grey paperclips.......
 And finally the multi floral gift bags.  Each bag measures approximately 6" x 8" and has a long cotton drawstring closure.  You'll also receive a paper sack, a paper doily, 2 manila tags, 2 clothespins and each style of bag comes with a special embellishment.
 Here's a sample of how I just wrapped up a few cards for a friend who did me a nice favor.  I have 2 greeting cards from my stash that I tucked into the paper sack.  I typed on the larger manila tag and adhered it to the sack with a paper doily and 2 kinds of Washi tape.  Very simple and quick.
 I added a bit of patterned paper to the smaller manila tag, cinched up the drawstrings and added the tag with the larger clothespin.  So simple, so easy but the idea of a handmade gift bag is so unique and fun. I'll be using these for birthday gifts, packaged cards (the clear card boxes fit into these bags), Christmas gifts....maybe to carry jewelry on trips.....little toys for the kiddos on road trips.  Endless possibilities.
I've got a few other shop items included glittery clothespins.  There are salmon colored clothespins....
 A fun aqua/teal color.....
 And a soft yellow....
 These small wooden spools can be strung up to create a garland or adhered to card fronts, etc.  Use your spray mists, spray paint or glitters to alter them.
 Just in time for Easter and Spring projects, I've got confetti sacks.
 These have confetti plus some snow fluff.  Use any other of the little sacks from my shop to create confetti sacks to add to cards, scrapbook pages , gift sacks, Project Life pockets and more.
There's lots of other new goodies too.  Thanks for stopping by.

Note:  International orders are welcome as long as items are current in the shop.  Please email me for a shipping quote.  And as always, I am happy to refund excess shipping costs back to your PayPal account.  It's always tricky to get it just right in advance.  :)

March 2, 2013

Project Life 2013...Week 6

First off, I'd like to report that our girls pulled off a big win last night and will be playing in the championship game of Sub State play!  Woohoo!!

Okay, on to a project.  Today I'm sharing Week 6 of my Project Life 2013.  This was a busy week as both my girls were going to Winter Ball.  I had dresses to mend, flowers to order, hair appointments to make, transportation to plan, etc.  I used my Project Life notebook to sketch out all of my photo layouts.  I didn't get to the inserts yet but those are next on my list. 
For this week, the Echo Park Photo Freedom patterned paper drew my attention.  All of products you see below were from the March Main Kit from Gossamer Blue.  The Main Kit is now sold out but you can find the patterned papers I used in the March Main Kit Paper Only.  Almost all of the March items from Gossamer Blue sold out speedy quick but quantities will be increasing monthly.  I'm really excited to be joining GB in it's growing stages and I can already see our community growing quickly.  

So that paper with the 3 x 4 and 4 x 6 cut outs was just perfect for this week's Project Life, I decided.  It was a great way to plan out a very busy week ahead of time.  
With all of the fun, coordinating embellishments like the Elle's Studio circle tags, the MME Enamel Dots, the label stickers and the small alphabet, it would be easy to add my photos and accents.  
First thing I did was cut apart that sheet of Project Life patterned paper.  I created just a few customized cards using strips of patterned paper and the rest of the pieces were just put into place.  I used Project Life grid cards as blanks, not knowing if those spaces would be filled with photos, journaling cards, etc.  It was so nice to have this week pre-planned. 
Once I had my photos I referred to my sketch to see if it would work with how I spread out the inserts.  It was pretty easy to print my photos to the sizes I needed.  Below is a photo with all the photos plopped on top of the inserts.  I love when I have lots of photos because that is always the focus of my albums + it means that it takes less time to embellish.  
Here's my finished Week 6.  First thing I notice is how colorful this week's layout it.  What a great set of kits Gossamer Blue put out this month.  I use lots of white backgrounds to offset such a colorful mix.  
The left page of my Week 6.  
The right page of Week 6.
This is my Calendar Card which features the week #, the dates of this week and some fun embellishments.  I love the sticker alphabet font from the GB Main Kit + the little Elle's Studio circle tag peeking through.  The enamel dots added in some fun dots of color too.  I had an extra photo I wanted to use that didn't fit in the main layout so I just added it here.
On to the 4 x 6 inserts.  Here I stitched a pocket which holds a printed copy of some emails Eric sent to me on the anniversary date of my brother's death.  Always a hard day to include in my albums but it's part of my life so in it goes.
Here's a photo of the girls + Charlie face timing with their Dad while he was in Las Vegas for The World of Concrete Convention.  I know, right?  We laugh too.  The repeated green letter stickers pop up all over my inserts for this week.
More from Vegas, this time we have a winner.  I added a screen shot of some texts from Eric showing me his winnings.  
My Gossamer Blue kit items before I dug into them.  The striped chipboard flag is from the MME embellishment pack from the Main Kit. More enamel dots are sprinkled here and there.
I loved this 4 x 6 piece.  So graphic with the fun arrows.  I added coordinating enamel dots to three of the arrows.  Charlie got a new bed....so far so good.
On to the 3 x 4 inserts.  I  loved this "for the record" insert but didn't really have anything specific from this week to add.  So I just typed in a little note to my family and used a sticker from the Main Kit.  On the right I used more stickers to embellish an Instagram photo.
On the left below, I simply added a photo and typewriter journaling.  On the right is a card that I created using strips of patterned paper + another circle tag from Elle's Studio.  I love those little things.
More of the same below.
Here I used the big quote bubble to capture a conversation from Josey about keeping her room clean.  Sorry to report that her room looks just like this....again....and again.  The clothes mountain gets her every time.  Since my kids are such good girls, it's just one of those things I have to overlook.  We go round and round but in the end, who cares right?  On the right is a photo of my barkin' dogs after a full day of transporting the girls around on the day of the dance.  Josey's first up do was a big hot mess and she was very upset.  We ended up finding another stylist and had a second up do done.  I can't wait to document that story in a separate insert.

March 1, 2013

How I organize my kits & newest supplies...

Hey there, today is the March release date for the newest Gossamer Blue kits.  This month's kits are full of vibrant colors and fun embellishments, perfect to lead us out of this wintry season.  You can find all the kits for March at Gossamer Blue's home page.  You can also visit the blog for some inspiring projects and more details. March kits go on sale today at 10am PST.  

Before I share my projects throughout this month.....I created almost 30 items from the kits.....I thought it would be fun to share my storage system for organizing monthly kits and my newest supplies.  I dug this wire dish drainer out of my stash and keep it on a table top in my craft room.  I don't have a source as I've had it quite awhile. I don't believe it was vintage so you might be able to find something similar if you're interested.  I also keep a stack of vintage milk glass relish dishes handy.  

This type of storage would work well for any monthly kits you receive or perhaps you just want to showcase some of your newest items.  I firmly believe that if you keep items out in full view, you will be more likely to use those supplies.  It definitely works for me.  Note: all of the supplies you see below are from a mix of this month's kits from Gossamer Blue.  It's like a rainbow!
The divided milk glass dishes are perfect for storing the tiny bits and pieces from kits.  I like to take everything out of the packages and just dump them in.  I do keep a few of the packages in case I want to store them away once the next month's kit comes along.
The dish drainer has a smaller section which is originally intended for cutlery and silverware.  I use this spot for the next biggest items in my kits.  Supplies like the enamel dots, small stamps, journaling cards, smaller packages of buttons and brads, mists, etc go in here.  I can easily thumb through them.
The largest section of the dish drainer is intended for standing up plates.  I use those divided sections to hold larger flat items like sticker sheets, chipboard sheets, 6 x 6 paper pads, larger packages of embellishments, etc.  When I get paper scraps, I clip them together with a clothespin and store them in a section too.  The dividers provide just the right separation for me to easily see what I've got in there. 
On the side of the dish drainer, I prop up my 12 x 12 patterned papers, sticker and embellishment sheets, etc.  I keep a piece of 12 x 12 cardboard at the very back so that the papers don't bend over.  A clothespin keeps the papers all clipped together.  
I love this storage system.  It's neat and tidy...unlike some other areas in my craft room.....and it's always a nice visual reminder.  It's also fun to see the kit items dwindle as the month progresses.  I mix and match in other items from my stash but I really try to reach for a kit item when I can.  When the month is over, I decided whether to store the unused items away, donate, sell, etc. It's the perfect time right then to make that decision instead of stuffing all the items away.  I keep the box that the kit items comes in under the table. I am constantly adding items to this box and when it's full I decide what to do with it.  My kids' art teacher is very fond of me as she loves my donations from my craft stash.

Okay, off to take Jordan in for her driver's test.  This kid....most want to get their learner's permit the day after their birthday.  Not her, she's waited til the last minute and she has Driver's Ed this next semester.  So off we go.  Then it's Sub State play tonight for Josey.  Go Cats!!


Related Posts with Thumbnails