June 15, 2011

Looky here....

**SOLD OUT**
Look what I found over the weekend........more vintage tins. I kept a few unique sets for myself like squares that I've never seen before and a few heart tins. But the rest are for you. I'll be sharing them in the shop this afternoon. Happy shopping.


June 12, 2011

Happy Trails

Hey guys. I had an email asking which stamp set contains some of the paint splatter images that are on my projects today. To clarify, some of the paint splatters are actual stamps contained in the Happy Trails stamp set. Other splatters were made by me using my Studio Calico Mister Huey's mist sprays. (many of the mists are sold out at this time). If you scroll through my post again, look for the orange type and I'll show you which are stamps and which are sprays. To achieve the splattered look with the sprays instead of an overall mist, simply unscrew the top of the bottle and use the nozzle hose to drip drops of ink....or flick the end of the nozzle hose to get a more splattered look. I use a large piece of cardboard to catch any overspray. You could also use an empty box. To see other projects where I've used the mist sprays click here & here on the strawberry card & here. Hope that helps and feel free to ask me anymore questions in the comment section. :)

Welcome to the second Group Post for the Papertrey Design Team + Nichole. Today we'll be showcasing a new set designed by Nichole called Happy Trails. Each main image can be paired up with a swirly trail stamp to create a whimsical focal point image. And the sentiments + font combinations in this set are fabulous...some of all time favorites. I'll also be using Nichole's new flower building set called Daydreamer. Another favorite of mine from Nichole with more great sentiments.

For my projects today I wanted to create a look of vintage wallpaper. I created my own using a piece of Rustic White cardstock, various PTI inks and the two stamp sets mentioned above. Zoom in for a look...I love how it turned out.

On my homemade patterned paper, all the splatters are from stamp images contained in the Happy Trails stamp set.
Next up I die cut and stamped images which coordinates with Happy Trails.
I then selected lots of patterned papers from Papertrey + other sources (many are Sassafras).
I die cut lots of strips using various Papertrey dies, including rick rack, scalloped borders, the ticket die, the eyelet lace border, the simple circles border and more.
For my first project I set out to create a notebook. One of my favorite things to make. I selected about 10 die cut strips and laid them out, layering them so that the patterned edge still showed.
I then cut these strips to the width of my notebook cover and attached them with a tiny bit of adhesive. I then stitched about the notebook front to secure all the layers. I ended up with a somewhat ruffly, mixy matchy look. Note: Many of you ask for the measurements of my notebook covers. I don't measure. I always mark with my fingernail where I want to cut and then trim with my paper trimmer.
To further embellish my notebook I just knew I had to use Nichole's nicely illustrated pencil with a squiggly line stamped in gray. You all surely know my love of all things office supply-ee, right? I adhered the pencil to my notebook with pop dots. I then used a scrap of my hand stamped patterned paper to punch out a circle. Then stamped it with a sentiment from Day Dreamer. A few Vintage Buttons tied with Rustic Cream Twine finish off the notebook front. Love.

At the top of my notepad, I used spray mists to splatter droplets of ink onto the base of the notepad.
Here you can see all the stitched on die cut pieces. Isn't it just fun looking?
Here's the open notebook. I used two Vintage Cream Notepads for this one notebook. I suggested that Nichole design these notebooks when she created the Take Note stamp set with me. Such a fun grouping of products with endless possibilities for notebooks.
Here's a card I created with more die cut strips. I especially love the simple circles die with the tied on buttons. A favorite accent of mine lately + I love the vintage wallpaper look I created. A few splatters of yellow mist ink adds a little color to the Rustic White background. If you'll notice, all of my projects today have a common theme of the stapled on hearts.

I've been using a lot of Rustic White for card bases lately. The ink splatters in yellow were created with spray mist. The orange splatters on the simple circles die cut piece are stamped from images in Happy Trails.
Here's a closeup of that fun simple circles border and the raised butterfly die which has been embellished with a tied Vintage Button.
Using more scraps I created a bookmark using the bookmark die. I tied it off with yarn I found at the thrift shop.

The yellow splatters on the bookmark are made with spray ink splatters. The green splatter on the rick rack border die cut are from a stamp.
And here's my finished ensemble complete with gift tag and sack. I love the soft colors and tiny little details scattered about.
I tucked all my goodies into a large glassine bag and used Washi tape to adhere my gift tag.

The yellow ink splatters on the tag are also from my spray ink misters.
A great little gift set for someone special. Hope you enjoy! And be sure to check out Nichole's + the rest of the Design Team blogs here for more Happy Trails inspiration.


June 11, 2011

Sweet Baby Inspiration

Welcome to the first Papertrey Group Post this month. Today the Design Team + Nichole will showcasing two new baby sets coming out this month on the 15th. I'll be working with Sweet Baby today. This set has the most adorable, chubby animals with coordinating die cuts.

For my projects today I made a set of cards to give to the expectant mother all wrapped up with a little gift card. Below are the set of cards I created...I'll probably add 2 more of each design to round out the gift set. I used colors of Sweet Blush, Berry Sorbet and Summer Sunrise. A little twist to the traditional baby pink colors we see so often on baby items.
I kept the card design the same so that I could mass produce elements such as the scalloped pieces of patterned paper (Sassafras), the sentiments, and the stamped heart borders. I switched out the inks to match each main color of the card. Cohesive but a little mixy matchy.
Look at these adorable die cut + stamped baby animals. So adorable and larger than I expected which I love! These look like little embellishments you'd purchase in a scrapbook store. I used Vintage Buttons to coordinate with the color of ink used on the stamped animals. The bottom strips of Bitty Dots papers also coordinate with the main color on the card.
To package my cards I used a large cello bag so that the cards would peek through.
To fancy up the packaging I created a large onesie that I stitched and added a few Vintage Buttons. The Onesie die is a new addition to the Shape Up Series. Perfect for baby or little girl projects.
On top of the onesie I placed a little gift card using the Tiny Envelope die with a small enclosure card. The green script sentiment on the card is from Bundle of Love, also being introduced into the baby lineup this month. A little ribbon + a tiny clothespins + a snippet of stapled on paper adds pretty little details to the ensemble.

Hope you enjoy! For more sweet baby inspiration, please visit the other Design Team blogs:


June 10, 2011

Art Quilt....rescheduled

Hi friends. Today I meant to have my first block of my art quilt up on the blog. I have a family member that went in for some unexpected surgery today so I won't get to my post today. Look for it next week sometime. Have a great weekend.

Papertrey Stamp - a- Faire...

Have you heard the news of Papertrey's upcoming, full day retreat? I'll be there along with other talented designers from the Papertrey team. Check it out on Nichole's blog right here.

June 6, 2011

More summer sewing.....Quilty Bag

Back again with some sewing goodness. Recently found the pattern to make this bag while visiting a local quilt shop......
And was so inspired by the colors on this bag found on Pinterest by Blueberry Park.
Picked out these fabrics plus a few more + some wonderful linen I found at my local thrift shop.
Can't wait to find time to stitch it all together.
And I found a new shop that sells the coolest stuff. I bought this coin purse made from upholstery + this fun crocheted flower that I'll add to my quilty bag. Love to shop local.
Got any sewing projects of your own happening in your neighborhood? I'd love to see hear about them!

June 5, 2011

Summer Sewing...Art Quilt

Hi friends. Hope your summer is going great!! Have I got something fun planned for you guys. My dear friend Melissa Phillips and I are teaming up yet again for some blogging fun this summer.

If you follow our blogs regularly, you know that Melissa and I both just swooned over Tara Anderson's art quilt. To quote Tara, she said, "with this project there were no rules, no boundaries, no directions, just creating something fun for myself!"

And that's exactly what Melissa and I are aiming for this summer. We're each going to make an art quilt.....or at least start out with the blocks....and see what we end up with. Here's Tara's beautiful art quilt below.
(photo from Tara Anderson)

This is one of the blocks up close. So many cute layers. I love the *no rules* approach.
(photo from Tara Anderson)

And so you can get a feel for my approach I'm sharing some photos from my Pinterest boards that have given me inspiration for my art quilt. Love the embroidery on this one.
(from Pinterest.....I don't know the creator but will certainly give credit if anyone knows)

And this beautiful pillow below with a row of quilted scraps + pretty fabric covered buttons.

Love the idea of this scrappy quilt made from layered squares. My art quilt might even inspire a larger sized quilt of the same fabrics.

This is a beautiful piece with muted colors and stitched on elements.

Love this piece with all the vibrant fabrics + series of words.

And this quilt done in total scrappy style.
(from Pinterest....via sewtakeahike)

Today Melissa and I will be sharing a few photos of the supplies we've gathered up for our very own art quilts. Not everything will make it into our art quilts but it's been fun gathering up supplies. This is a stash of vintage + brand new fabrics. I've come to the conclusion that I love to sew with new, contemporary fabrics + mixing in older, vintage fabrics. I want my projects to show a connection to the days of old but also add in what's new and fresh right now.
And just for fun, can you tell which floral is old and which is a brand new piece? Love them both.
Some other little additions that I've chosen for my quilt are possibly a few vintage hankies.
Lots of little trims + laces + doilies.
And just for fun, Melissa and I prepared a little care package for each other...picking out items with the colors we've chosen for our art quilts. Look at this fun stash of goodies Melissa chose for me.
The fabrics are especially gorgeous. The colors she chose are just perfect + they're tea stained too. And I swear they have the faintest scent of warm, sweet cinnamon. Soooo *melisssa* and I can't wait to use them on my art quilt.
Soooo, please visit Melissa's blog later today to see what she has in store for her art quilt. Our plan is to show you our completed art quilt blocks a little at a time over the summer. Come back on Friday, June 10th to see our first finished pieces. I can't wait to start working on mine. :)

June 3, 2011

girly birthday cards

Hey friends. What a week it's been! I don't even want to know the amount of $$ I've spent on gas this week hauling the reds around. And we're off for a weekend ball tournament tonight. The fun never ends!

Jordy has a birthday party to go to next week and I've noticed that I never have any teenage/girly type cards in my stash. So my goal this summer is to add a few fun cards in here and there. When I want teenage girl type cards, I always reach for my Stamping Bella stamps. I love the whimsical images, especially the one I chose to work with today called presentahbella.

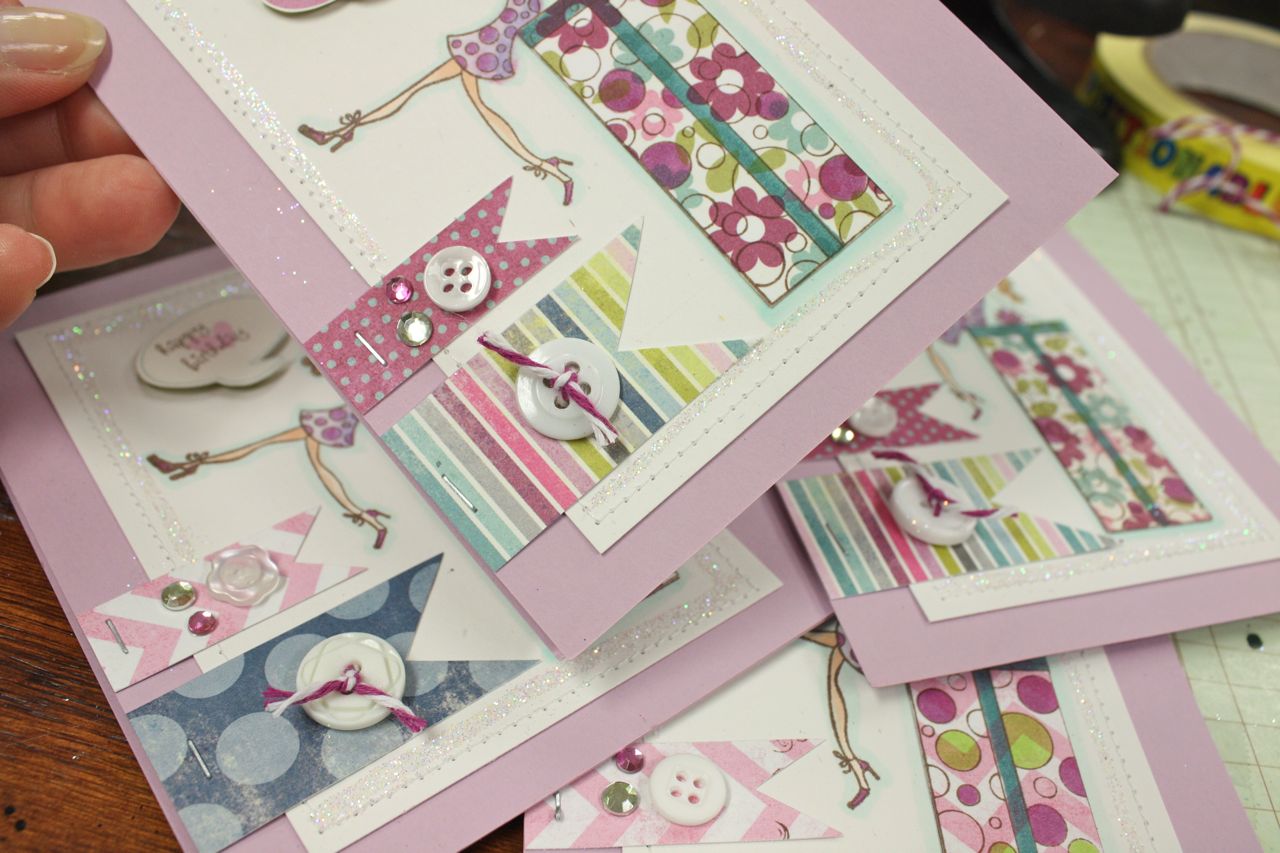
I stamped the images on solid cardstock and then again on some new My Mind's Eye patterned paper. Most of the papers and twine I used today are from the Lime Twist collection. I used my Copic markers to color in the girls on the solid cardstock and a few more to color in some spots on the paper pieced presents.
I adhered the presents to the main images and added a few quote bubbles that I cut out from this adorable paper. I stamped *happy birthday* sentiments onto the bubbles and popped them up with pop dots.
Next up it was time for a few embellishments. Using more of the Lime Twist paper I cut some strips and then notched the end to create little flags.
These were adhered to my card fronts and then buttons were added using some Lime Twist twine.
I also added some staples using my Tiny Tim stapler + some clear rhinestones that I colored with my Copics. Instant matching.
And here's my little stash-o of birthday cards for the girls to choose from.
I stitched around the focal image to add a little interest to the white + I added some glitter. Love all the mixy matchy colors in this one line as you can see on all my little notched strips of patterned paper.
Again, I love those little quote bubbles. Just too cute.
Hope you enjoy! Do you have some favorite stamps to use for teenage girl cards? I'd love to hear about your favorites.

Okay, we're off to see the Wizard. Well not really. We're really off to see Bud the softball coach. Catch ya later, peeps. Have a great weekend! Stay tuned because on Monday I'm teaming up with a crafty friend for an ongoing summer project. We'll be blogging our progress and I'll tell you all about it June 6th!
Related Posts with Thumbnails