Showing posts with label Inspiration Photo. Show all posts

March 20, 2014

Front door Spring decor...vintage umbrella floral arrangement

Happy Spring everyone!  I so look forward to this time of year.  Charlie and I were just out in the flower beds, digging to see if we could find new little plant sightings.  Sure enough there are lots of new, green sprouts peeking out.  

With Spring comes a time of renewal, a change to change things up and start fresh.  Ever since I saw this umbrella floral arrangement on the cover of a Midwest Living magazine I've wanted to find an old umbrella and do the same.  I believe this is the cover photo but I'm not exactly sure...pretty close if not.  This photo is pinned on my March Inspiration Board: Going Green. 

One day while out junking I found a vintage umbrella with a beautiful ivory looking handle.  I knew it had to come home with me and I knew exactly what I wanted to make with it.  A trip to Michael's for some fake florals and I was good to go.  The girls helped me select these flowers.  I love that they selected colors that just happen to coordinate with my color kit that I've recently been using for my Color Studio class assignments.  Large peonies are always a favorite flower of mine and these look pretty realistic. 
Here's my finished umbrella on my front door.  Pretty simple in nature and I added in my old chippy chair, suitcase and watering tins for a fun photo shoot.  
Such pretty colors and a fun welcome to our guests.
I just tucked in the florals, using a few grocery sacks for stuffing here and there.
My tried and true favorites, my watering cans are like old friends to me.  The suitcase?  I jokingly tell friends that I keep it packed with a few of Eric's things....just in case.
I'll be filling these up soon to water those first pretty flowers of the season.
Bright and sunny and so welcoming.  Bring on Spring...I'm so ready for you.  
Now.....I must go dig in my flower beds a bit more.  The girls made their first big outing in their new truck today with a friend.  They ventured into town for some Orange Leaf yogurt.  I worry.  Like all mamas do.  I worry more now.  I know they'll be okay.  But I worry....

March 19, 2014

Workspace Wednesday...Inspiration Photo on my Table

Today's Workspace Wednesday post is all about what's currently sitting out on my work table.  After the girls' accident, I wasn't feeling very crafty there for a while.  I can say though that just sitting at my work table and staring at my pretty things brought me some much needed peace.  I think that when you surround yourself by people and things that you really love, life is just better.  I've learned it's best to keep your favorite people and favorite things close to you.....the rest (people and things that clutter your life) can go by the wayside.  

So here's my workspace today.  It's looked this way pretty much all week as I tend to work in spurts with certain products. 
I've been loving my watercolor palette and have recently acquired some new brushes.  I'm testing them out and will giving a review of my favorite watercolor products here soon. 
This fun color kit that I created for a class assignment has been seen lots of attention this week.  Creating a kit like this is a fun way to focus on just a few products from your stash at a time.  
These papers have all been cut into and are now scattered about my table. These are some of my favorites that I've been hoarding but I finally took the plunge and started using them. 
Here's a little something that came about from fiddling with my color kit. 
It's the little tidbits of Washi tape, buttons tied with twine, machine stitching, little flowers and stamping that all add so much detail to a card.  I grabbed some Medium White Parcel Tags for easy sentiment placement. I'll be sharing how I used dollar store flower bundles on my cards in a future post.  It's a new fun find that I'm loving lately.
Thanks for stopping by today.  I'd love to hear what's on your work table that is inspiring you.  

March 18, 2014

Card from inspiration photo + altering patterned paper with watercolor paint

Yesterday I shared an inspiration photo from my March Pinterest Board: Going Green.  
I also shared this color kit that I created for a class assignment for the Color Studio class at Studio Calico.
Today I'm sharing a card I created with my kit contents.  I started with this beautiful patterned paper that you see with the white background below.  I had fun altering the look of the paper with some simple watercolor paints.  If you look at my inspiration photo by the aqua flower you'll see a pillow with yellow flowers and a blue background.  That's the look I was trying for with my patterned paper.  I love the results. 
I trimmed off some of that beautiful paper and created a thank you card for a dear friend who stayed with us the entire day in the emergency room the day of the girls' accident.  
I used lots of items from my color kit you see at the beginning of this post.  I also added a Medium Manila Parcel Tag and some stamps.  The thank you is from a Studio Calico kit and the other is from a Papertrey Ink set..Signature Greetings, I believe. Dainty Doilies can be found here.
During difficult times you sure find out who your true friends are.  It's only fitting to let those dear people know just how much they mean to you.  A simple card with a handwritten note is such a nice gesture.  I've got lots of cards to send out which means my family is so blessed with good friends.

Have a great day everyone!

March 17, 2014

Creating a color kit from inspiration photo...

Hello friends.  I want to thank you all for your kind messages to me about the girls.  They are doing great and are enjoying the start of Spring Break today.  The girls are healing physically although we found out that Josey tore some tendons in her shoulder.  They both are quite impressed with their own doctoring skills...Josey removed her stitches by herself and Jordan dug a piece of glass out of her head yesterday.  Me...I'm a little scatter brained lately.  My attention span is pretty short and I can cry at the drop of a hat.  Time will help us all though and getting back to "normal" is our goal. 

In the crafty world, I did take some time to treat myself to a fun class over at Studio Calico called Color Studio.  Lisa Truesdell is doing a fabulous job of teaching the class and I'm finding the refresher/reminders about the color wheel to be very inspiring.  One of the first class assignments was to find an inspiration photo full of color.  I chose this photo from my March Pinterest Inspiration Board: Going Green. Happy St. Patrick's Day, by the way!

Another class assignment was to create a color kit inspired by our chosen inspiration photo.  This was right up my alley as you all know I love to assemble little kits.  A goal of mine is to revisit some of my older supplies so I made sure to do some rifling through my older stash of items.  I started with some wonderful patterned papers that reflected the patterns in the pillows.  I love the cottage-like colors and patterns. 
Next I went to work on fitting some crafty items into a vintage green utensil drawer.  I thought the green was so fitting for my Going Green Pinterest board theme.  When assembling little kits like this to work with I like to limit myself to a particular sized container.  Otherwise I could pile my whole craft room into a kit. 
I chose little bits & pieces from some Gossamer Blue kits....my vintage green typewriter Instagrams...and some die cuts from leftover kits.
Next I chose some spools of thread...Washi tapes....dimensional flowers....and jars of buttons.
I had some ideas for painting some clothespins so I grabbed some of those along with some acrylic paints.  I spy two of my new watercolor brushes tucked in there too.  I'll be sharing my favorite watercolor supplies in a new post soon. I also purchased the new Studio Calico Color Theory inks.  I'm impressed so far and am looking forward to inking those up more soon.
I've been dabbling a bit with some cards and I need quite a few thank you cards....so I'll be posting some creations made from my color kit items soon.  

Thank you so much for visiting.  It feels good to be in touch again.  

March 4, 2014

Green typewriter cards....inspired by Going Green Inspiration Board

Today I'm jumping right into using my March Going Green Pinterest Inspiration Board as inspiration for some cards.  You can view the Going Green board here.  For inspiration I created a collage using the Pic Collage app on my iPhone.  I then printed my collage onto a sheet of 8.5 x 11 glossy photo paper.  I also created a smaller collage of some of my cards that I've created that I like to use for card sketches.  I was inspired by the cell phone cover with the typewriter sitting in the grass.  I took a photo of my typewriter, changed the color to green and printed a mini Instagram sheet.  These will be available in my online shop soon. 
For my cards, once I have an idea of what I want to create I select papers and embellishments to create somewhat of a mini kit to use.  I like to have this little messy pile of goodies all fanned out.  The creativity just starts to flow once I see color and patterns and unique embellishments.  For my mini typewriter Instagrams, I trimmed four of them down to little squares. The patterned papers are from the March Gossamer Blue 6 x 6 paper pad in the Bits & Pieces Kit.  On the right side of the photo below you'll see that I stitched with green thread down the side of some Basics Journaling Cards.  I absolutely must have these in my stash to use for card fronts.  Love them to pieces.  
In my inspiration collage there's a photo of a butterfly on ledger paper (you can see all the photos better on my Going Green Inspiration Board).  I dug out one of my old ledger books and tore out a sheet to cut up for a bottom layer of my cards.  
Here are my finished cards.  I love the office supply feel that the typewriter Instagrams, lined journaling cards and ledger paper lends to these cards.  The color definitely says green too. 
Here's a nice shot of all the layers the cards have.  I just love stitching and stapling pieces of paper together.  
I found plenty of embellishments and twine from the March Gossamer Blue kits this month. Those little daisy brads...oh, I could use full packs of them.  If you're liking the gold and silver twines, I do carry some in my shop.  Silver is here.  Gold is here.  
The little typewriter Instagrams.  I keep adding these to my stash/shop because they just come in so handy for cards and little packaging items.  For the sentiments, I used the "just my type" stamp from a previous Life Pages stamp set from Gossamer Blue.  For the other sentiment I typed those out with my vintage typewriter.  You can also get a glimpse of my favorite product from this month's Gossamer Blue kits.  It's the wood tape from the March Life Pages Themed Add-On.  You can stitch on it, trim it with scissors or a trimmer, die cut it....you really will love this.  And this kit is one of the few remaining over at the Gossamer Blue store. You'll also really love the My Mind's Eye wood dots in this kit too.  Oh and then there's gold shimmer paper, a Brilliance ink pad and the most beautiful journaling cards.  Just a fun, fun kit. 
I wanted to share a fun tip for you to try the next time you work with 6 x6 paper pads.  Lots of times the 6 x 6 sheet will have a border at the top with a perforated line for tearing the sheets out.  When I tore out my sheets, the whole page ripped out.  So I just rolled with it and used the torn edge + the cream border with the hole as the bottom of my patterned paper layer.  And I love it so much.  It just adds texture and a little something unexpected to the card design. 
Thank you so much for stopping by today & I hope you enjoyed my cards.  I really am getting so much inspiration from my Pinterest boards.  I'd love for you to link up your creations in the comments section if you are inspired to create something from my Going Green board.  I'll be back with more projects all month long and be sure to check the shop soon for some new green items + fun kits, etc.  As always, thank you for leaving a nice comment.  They do mean so much to me. :)

February 14, 2014

February Inspiration Board...Wood You Be Mine?

This year I started a monthly series of inspiration boards over at my Pinterest site.  Each month I'll select a group of images that I've collected from my various Pinterest boards and use them as inspiration on a whole new board.  February's inspiration board is called Wood You Be Mine?  

I was inspired to create this board after seeing this image below.  It reminded me of all the Aspen trees we saw in Colorado last Summer while riding our Gator on some mountain trails.  We'd see carvings on trees just like this.  Although we wouldn't let the girls carve their initials on any trees, I did find the carvings endearing.  So fast forward to February and I thought that hearts and woodgrain would make a perfect pairing.  

Since so many of us pin a lot of inspiring photos from Pinterest I wanted to share how I actually use the photos to jump start an actual project.  I know....actually creating something from a Pinterest pin...novel idea, right?  

Here's a few photos that I pulled from my February board and how I might use them on a project.  I loved this handmade bag photo and have admired it for some time.  To convert the idea to a paper project I like the idea of using the design for a card front.  I could use woodgrain paper and maybe a few other patterned papers to create a striped background layer.  Then I could use layers of other papers, maybe a ledger paper, and some stitching to finish off my card.  I like the idea of the neutral backgrounds and maybe I could create a whole stack of those to use on cards anytime. 

From this photo I was simply inspired to use more ribbons on a project.  I'm giving ribbons a comeback this year on my projects and this is a fun reminder that there are lots of fun ribbons just waiting for me in my stash.  The neutral background could easily be switched out with a woodgrain pattern.  Love the color inspiration from this photo also....minty greens, salmon and the neutrals.  

From this photo, I'm combining two recent loves....hand lettering and floral clusters.  I'd love to just print this photo off for inspiration then get to work on practicing my hand lettering.  Then I'd love to make some hand lettered card fronts then stamp on some little floral clusters...maybe adding some hand painted floral elements into the mix.  Sometimes I  really like the idea of the stationery look with flat layers as a contrast to heavily layered cards. 

I hope I've inspired you today to select a photo from my Wood You Be Mine? Pinterest inspiration board and create something special. The inspiration is plentiful, we just need to put it into action.  I'll be keeping all of my monthly inspiration boards active so they'll be at my Pinterest site from month to month for 2014. 

Happy Valentine's Day to you all!  Hope your day is lovely.  We celebrated with a wonderful dinner and little gifts last night....tonight we'll be watching the girls play basketball and will have hotdogs from the concession stand.  :) Looking forward to a relaxing weekend with warmer temperatures after tonight.  

Note: I will be still be posting my December Memories remaining pages.  Please don't let my last few unseen pages stop you from working on your album though.  I'm not quite sure when I'll get to posting all of the remaining pages but they'll trickle in here on the blog sooner or later.  :)

January 6, 2014

Radiant Orchid Inspiration Kit...

If you've followed along this month, I've started a new monthly feature where I share a Pinterest board with specific themes.  I'm pulling photos from each of my boards to create one very special board a month.  This month's theme is Radiant Orchid, the new Pantone color of the  year.  You can read about the original post here.  Today I'm sharing some color inspiration that I pulled from my own stash of items and a new kit with a sampling of Radiant Orchid items. 
I am so inspired to reach for my paints at the moment.  I'll be sharing some behind the scenes photos of my watercolor and acrylic painting sessions soon with some projects. 

 I love the background on this floral invitation.  Lots of color bleeding and very saturated colors.

 I've always been fond of draping ribbon and I'm bringing it back this year.  Nothing finishes off a card or pretty package like a width of ribbon.

 Old stacks of books inspired me to find a fun purple book of my own.

 Vintage linens are so whimsical and colorful.  I found a few purple tones that will work well with this month's theme.

Here's the kit I pulled together for the shop.  This orchid color is kind of hard to photograph because it's so vibrant and beautiful.  The kit contains a little sampling that you can sift through to create a few projects.  Just a little of the Radiant Orchid color here and there gives a wonderful boost, especially during this cold Winter we're having here. I've included a vintage book page, a pocket stitched with Radiant Orchid colored thread....
 This beautiful collection of ribbons.  There's three yards each of the two seam bindings and the exquisite hand dipped silk ribbon.  I have been saving this silk ribbon for years because it's just that gorgeous to look at and it was very pricey if I remember.  The entire spool of ribbon was hand dipped in beautiful inks to create this mirage of vibrant colors.  It's delicate, drapes beautifully and it will create a one of a kind look to a special project.
 I had a fun afternoon of painting yesterday with both acrylics and watercolors.  You'll get 2 of each kinds of tags...both have shimmery colors which are so pretty when the light catches them just right.
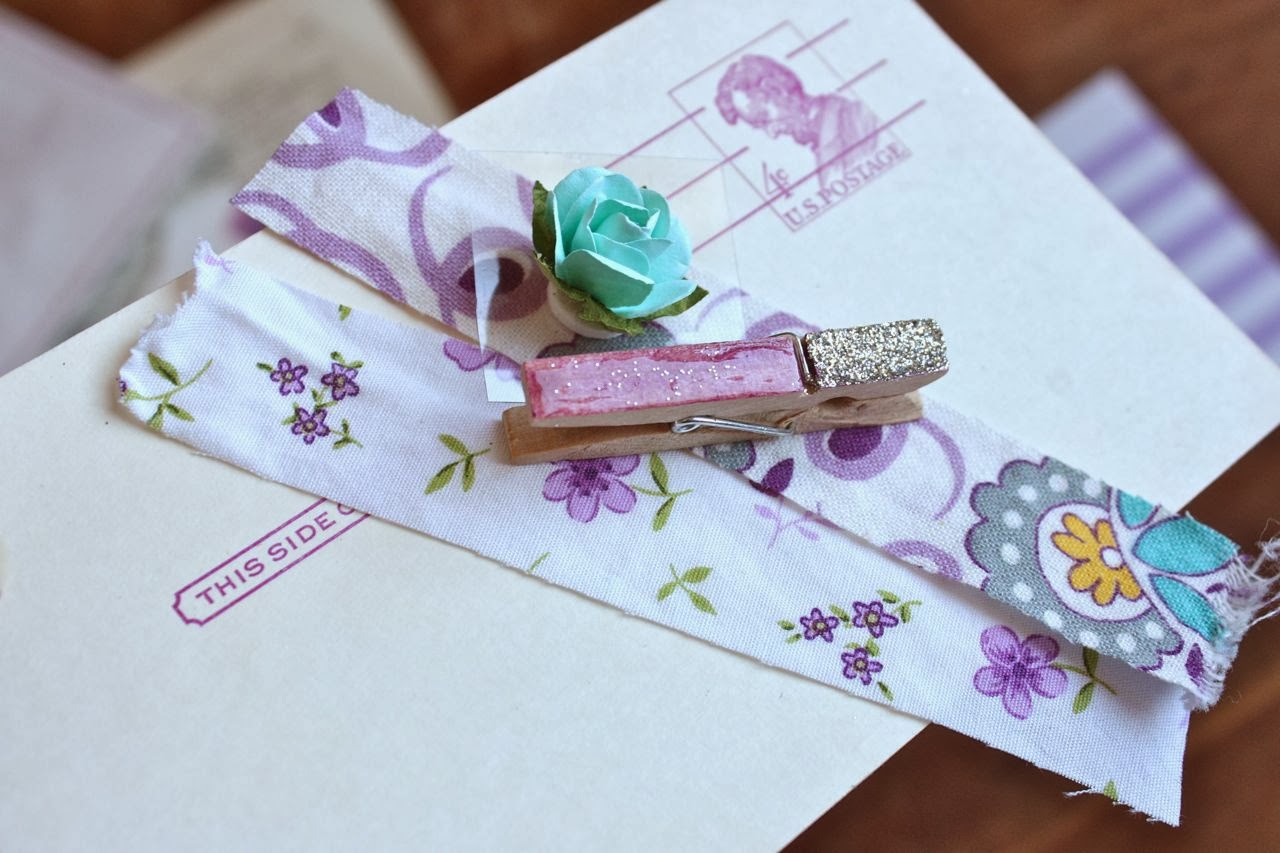
 I found some pretty, vintage postcards in my stash that were too perfect not to share.  I also snipped some vintage fabrics that could be wrapped around a card front to create a little tab or stapled over a sack for a finishing touch.  Or gather up and create a tiny ruffle.  The paper flower and shiny small clothespin are small additions that will be just too cute.
 The kits are listed in the shop now in limited quantities and ready to ship out.  I hope you enjoy them.
The girls go back to school tomorrow so I'll be spending more time at my work table, creating a few new things with some of the kit items.  Stay tuned....and stay warm if you're enduring this dreadful cold we're having!

February 21, 2010

Papertrey Luck of the Irish

St. Patrick's Day definitely makes me think green. Nichole's new Papertrey set called Luck of the Irish was a requested set to fill some stamping needs. I think she did a great job and it will be fun to send some cards out this year. The cards you'll see today were in my PTI gallery on release night but I wanted to show you my process for making them.


I started by gathering up some green goodness. Lots of Vintage Buttons with some Aqua Mist thrown in........
Various shades of green ribbons..........
And a sampling of Spring Moss and Aqua Mist patterned papers.......
I created my cards using the same method that I used for my Valentine bookmarks shown in this post. I cut strips of patterned papers from Pretty Pastels and the Everyday Blessings collection, and ribbons that would fit onto card fronts.
Next, I adhered the papers and ribbon strips using adhesive and Scor-Tape for the ribbon. When everything is in place, turn the cards over and trim with scissors. Now I'm ready to decorate the card fronts.
I used punched shapes from the Luck of the Irish stamp set along with a sentiment, tied Vintage Buttons and circles that I punched from old ledger sheets I got at an auction. The ledger sheets had the word *rating* on them so I punched out that word and added *#1* using Simple Alphabet.
Lots of fun details for some fun St. Patrick's Day cards this year.
Enjoy!!
Related Posts with Thumbnails