
Okay, on to Week 12. This was Spring Break week for the girls. It was rainy a lot but we ended up with some sunny, bright days towards the end of the week. I had some colorful photos that actually had some purple in them. I hardly ever use purple but I knew which products I wanted to reach for right away. The My Mind's Eye Lime Twist Happy Go Lucky collection was calling my name. I usually like to be a little more mixy matchy with my products but everything coordinated so well, I just rolled with it. You can see that my 2 page spread is very colorful this week.
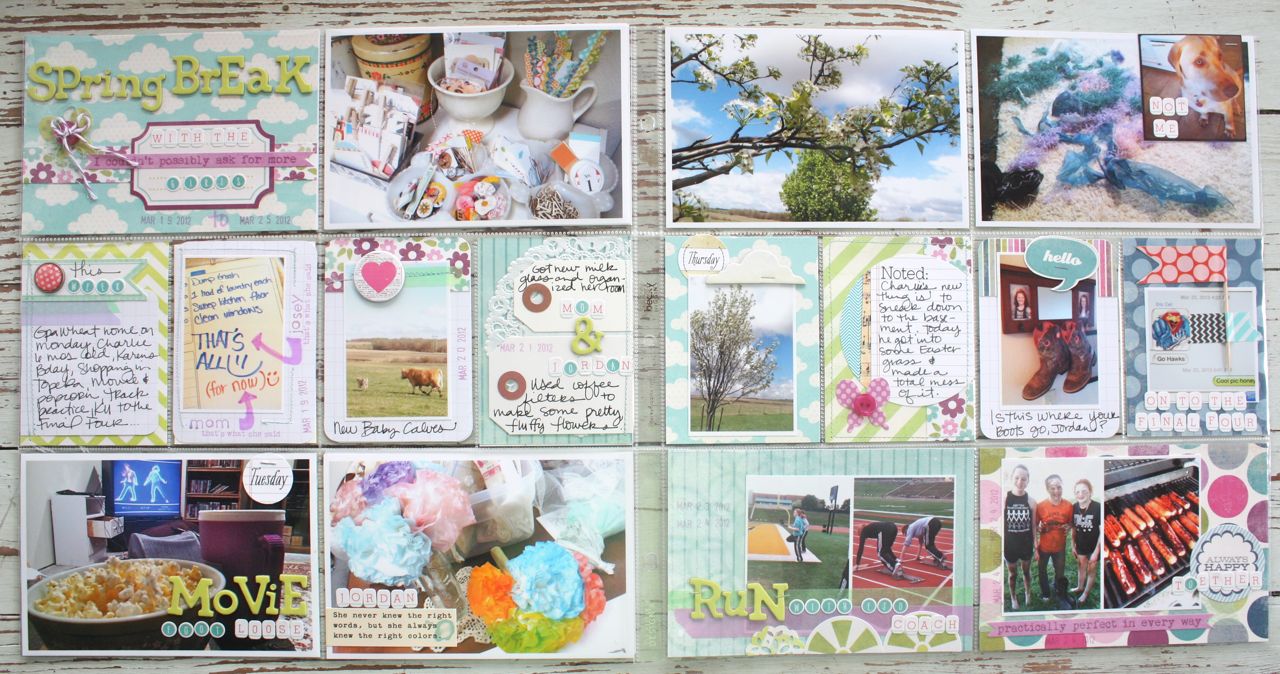
 Here's the left page.
 And the right page.
 And now for the 3 x 4 inserts. I ended up using a ton of letters from this sheet and this sheet. You'll see them a lot on my 3 x 4 as well as 4 x 6 inserts. The left insert is my week in review, with a sticker flag and polka dot brad added. On the right, I have a photo of some chores written on a whiteboard for the girls. I used Hero Arts letters, Studio Calico stamps and a Bic Markit pen to add some hand drawn arrows. We just love whiteboards in our house.
 Here I used a heart chipboard accent from Banana Fish Studio on top of the photo with a mama and her newborn calf. On the right I used a Small White Parcel Tag and a Medium White Parcel Tag for journaling + more stickers. The small tag refers to the photo above the insert. The medium tag refers to the photo below the insert. I might go back and add some arrow stickers to signify that.
 Here on the left I used a Studio Calico chipboard cloud + an Elle's Studio accent circle over my tree photo. On the right I used patterned paper from the MME Lime Twist line + a large circle piece from Elle's Studio.
 Here on the left I used a cut out piece from this patterned paper for the quote bubble. I later found out that Jordan had hung her boots up so that Charlie wouldn't run off with them. On the right I used a text message from Eric about KU + added a little flag from a Studio Calico monthly kit. I adhered the flag down with Washi tape.
 And now on to the 4 x 6 inserts. This is my main, dated insert. I definitely wanted to make an insert noting that it was Spring break. Stickers and papers are from the MME Lime Twist line.
 Here you can see that I used more of the lime green chipboard sticker letters along with the MME letter stickers for journaling. It was so fun to change things up a bit and use the sticker letters.
 More of the same here with some photos of the girls working with a college track coach over break. Washi tape provided a nice horizontal accent for the letters to rest on.
 More stickers and MME accents here on these photos of Jordan and her friends that got in a mud fight. Weenies on the grill afterwards for a fun BBQ.
 And now on to my insert for the week. I'm reaaalllyy trying hard to do the inserts as the same time as the main layout for the week. Otherwise I just don't seem to find the time to go back and add them in later. This one is fun! If you remember, I like to keep all of my inserts a smaller size than the 12 x 12 main pages. I like to be able to see the 2 main pages, with the inserts being smaller additions. This insert started out as a 12 x 12, 9 pocket photo sleeve. The finished size is 8 x 12. I trimmed off the last row of vertical squares from the sleeve and then did a little sewing to create a new flipper style photo sleeve. You can't really tell here.......
 But I further trimmed the excess down to two squares and then stitched that piece to the top of my trimmed down 8 x 12 photo sleeve. On the top I used some more of my My Mind's Eye papers and accents to create a little title page.
 Under the flipper I included an extra photo showing the neon trend we noticed while shopping over Spring Break + I was able to add some journaling. Eeeek, so fun!!
 Here's the back side of that 8 x 12 insert page. More photos of some outdoor activities we did over Spring Break.
 Annnnd, I couldn't let that one leftover square that I trimmed go to waste. I used for another flipper on this back side of the photo sleeve. So I ended up using all 9 squares of the photo sleeve......just rearranged to make a smaller size page + it made for some fun new flippers!
 Hope you give the flippers a try! This was a fun, fun week of Project Life.....lots of pretty colors to work with, a cute line of My Mind's Eye goodies, the fun flipper pages & of course the memories we made over Spring Break. Life is good.
 Here's the left page.
 And the right page.
 And now for the 3 x 4 inserts. I ended up using a ton of letters from this sheet and this sheet. You'll see them a lot on my 3 x 4 as well as 4 x 6 inserts. The left insert is my week in review, with a sticker flag and polka dot brad added. On the right, I have a photo of some chores written on a whiteboard for the girls. I used Hero Arts letters, Studio Calico stamps and a Bic Markit pen to add some hand drawn arrows. We just love whiteboards in our house.
 Here I used a heart chipboard accent from Banana Fish Studio on top of the photo with a mama and her newborn calf. On the right I used a Small White Parcel Tag and a Medium White Parcel Tag for journaling + more stickers. The small tag refers to the photo above the insert. The medium tag refers to the photo below the insert. I might go back and add some arrow stickers to signify that.
 Here on the left I used a Studio Calico chipboard cloud + an Elle's Studio accent circle over my tree photo. On the right I used patterned paper from the MME Lime Twist line + a large circle piece from Elle's Studio.
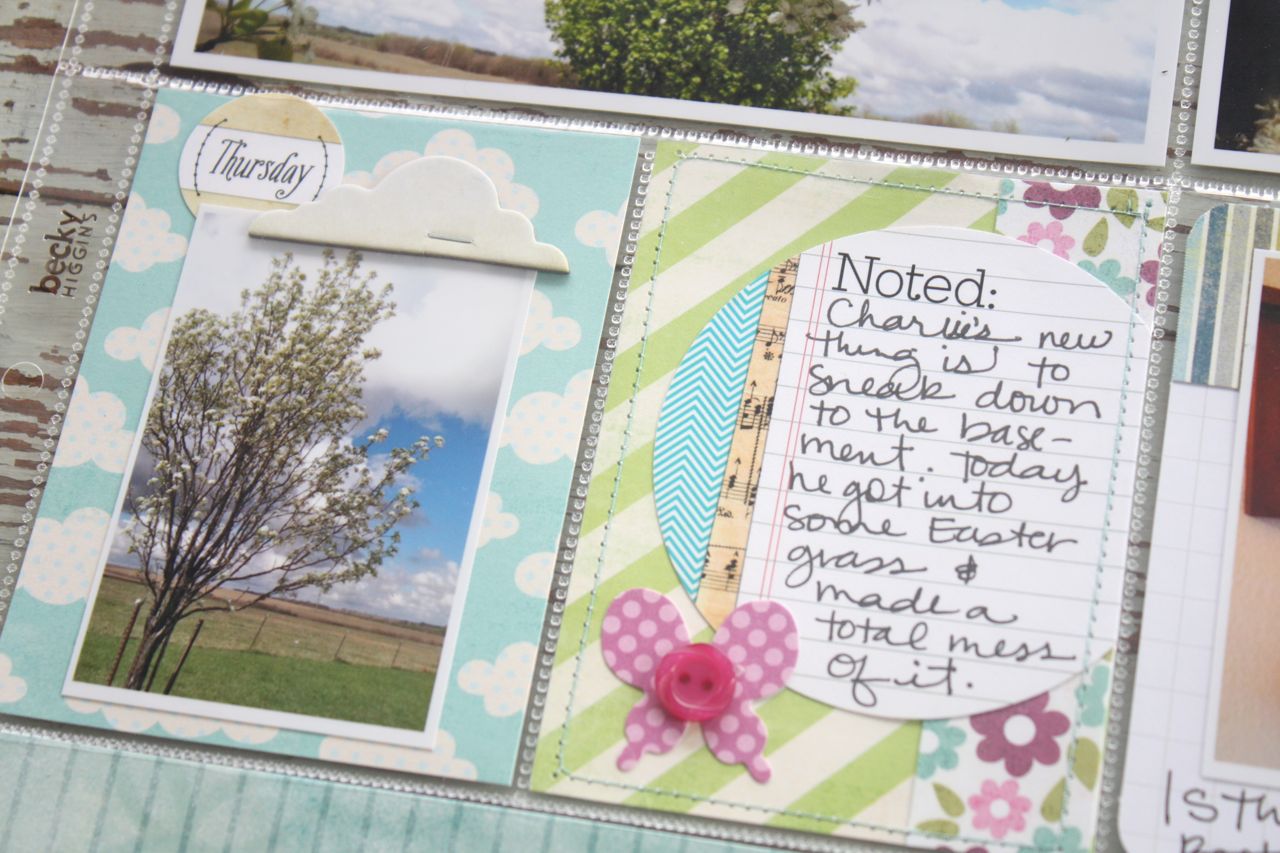 Here on the left I used a cut out piece from this patterned paper for the quote bubble. I later found out that Jordan had hung her boots up so that Charlie wouldn't run off with them. On the right I used a text message from Eric about KU + added a little flag from a Studio Calico monthly kit. I adhered the flag down with Washi tape.
 And now on to the 4 x 6 inserts. This is my main, dated insert. I definitely wanted to make an insert noting that it was Spring break. Stickers and papers are from the MME Lime Twist line.
 Here you can see that I used more of the lime green chipboard sticker letters along with the MME letter stickers for journaling. It was so fun to change things up a bit and use the sticker letters.
 More of the same here with some photos of the girls working with a college track coach over break. Washi tape provided a nice horizontal accent for the letters to rest on.
 More stickers and MME accents here on these photos of Jordan and her friends that got in a mud fight. Weenies on the grill afterwards for a fun BBQ.
 And now on to my insert for the week. I'm reaaalllyy trying hard to do the inserts as the same time as the main layout for the week. Otherwise I just don't seem to find the time to go back and add them in later. This one is fun! If you remember, I like to keep all of my inserts a smaller size than the 12 x 12 main pages. I like to be able to see the 2 main pages, with the inserts being smaller additions. This insert started out as a 12 x 12, 9 pocket photo sleeve. The finished size is 8 x 12. I trimmed off the last row of vertical squares from the sleeve and then did a little sewing to create a new flipper style photo sleeve. You can't really tell here.......
 But I further trimmed the excess down to two squares and then stitched that piece to the top of my trimmed down 8 x 12 photo sleeve. On the top I used some more of my My Mind's Eye papers and accents to create a little title page.
 Under the flipper I included an extra photo showing the neon trend we noticed while shopping over Spring Break + I was able to add some journaling. Eeeek, so fun!!
 Here's the back side of that 8 x 12 insert page. More photos of some outdoor activities we did over Spring Break.
 Annnnd, I couldn't let that one leftover square that I trimmed go to waste. I used for another flipper on this back side of the photo sleeve. So I ended up using all 9 squares of the photo sleeve......just rearranged to make a smaller size page + it made for some fun new flippers!
 Hope you give the flippers a try! This was a fun, fun week of Project Life.....lots of pretty colors to work with, a cute line of My Mind's Eye goodies, the fun flipper pages & of course the memories we made over Spring Break. Life is good.
For more inspiration using flippers, be sure to check out Mary Ann Penner's blog. She's got some fabulous pages up as of recent.
Note: I slipped the photos/embellished pieces into the pockets before stitching, just so that I made sure the inserts would fit.


9 comments:
love the light feel of your pages... and the colors this week, all the details are fun...I went to a crop this weekend and spent a lot of time trying to figure out what I wanted to do with every insert, it was a luxury and fun!
http://aprilbest1981.blogspot.com/2012/04/project-life-weeks-13-and-14.html?m=
So pretty. The pebbles flag and green thickers for right in with lime twist.. I always used it for my son's pages, but it so cute for girls too.
Love the colours this week and adore the flips... Great way of reusing the bits you cut off! Thanks for sharing your PL week.
great photos and a beautiful spread. you do a great job with telling the stories!
This is so pretty! I love the colors you used on these!!
So many little details on your pages that are pure fun to look at!
I usually take a quick glance and then go back and take a second look, that is when I find the tiny bits and pieces that make this project so interesting to me. I love all the layers and really want to train myself to look at an insert as something I can ADD to and embellish instead of a flat piece of ....3x4 cardstock.
My favs are the insert with the 2 tags on the doily and the one with the text message. I have some great txts that I would like to use in a project.
QUESTION:Did you simply take a photo with your camera and print it? Can it really be that simple?
Thank you for sharing, it makes the everyday details of weenies on the grill and dog messes look so much more fun when done in a scrappy style :)
What a super fun spread! I adore the flipper idea - totally want to try that!
beautiful, i just love the colours you worked with this week
Just love the colors you used for this week. So spring ! Every detail is nice ! Just beauty to the eyes !
Post a Comment