January 31, 2008

Crafty Secrets Preview!

Crafty Secrets is gearing up for another fabulous time at CHA. There are 11 new stamps coming out after CHA. One of the eleven new sets called Cherish is available now HERE. I have to say that these new sets are some of my all time favorites from Crafty Secrets. Cindy, the graphic artist for Crafty Secrets, has done a beautiful job of creating awesome new images and sentiments.

So this card below features 3 images from the Cherish set. The couple with the moon, the sentiment and the little flower bouquet to the side of the sentiment are all separate acrylic images. I colored the image in with Copic markers and then airbrushed the sky to be a pale purple. Patterned paper by Crafty Secrets. Be sure to zoom in on the Prima flower. I added droplets of Ranger Glassy Accents to resemble wet dew drops on the flower. Then I added some of Ellen's Dew Drops around the flower to resemble bigger water droplets. So pretty!! The two cards below feature some absolutely darling images from another new set being released after CHA called Sweet Kids. I just LOVE this set so much. There are lots of sentiments and smaller images to pair up with each main image which makes this set *all inclusive*.....you just need this one set to create fabulous projects. Notice that the smaller circle accents have small images that match with the bigger main image. I colored these images with Copic markers....you will want to RUN for your Copic markers when you see all of these new sets. They just BEG to be colored and airbrushed!! Background paper is from Crafty Secrets. And zoom in on the River Rock cardstock strip on both cards below. They were stamped with yet another new Crafty Secrets set coming out called Flourishes. Lots of swirls and twirlies that will make fabulous accents, borders and more!


If you are heading to CHA, be sure to check out the Crafty Secrets booth. Tell Sandy that I sent you looking for these three cards because I just mailed them off to her yesterday for booth samples. *Sniff sniff*, I was sad to see these cards go because I think they're so cute. Anywho, I'll be showing your more samples when the sets are available. I don't want to torture you too much with products that you can't purchase yet!! Hope you enjoy!!

Other supplies: Copic markers (check out Ellen's NEW colors), the Copic airbrush system and the Dew Drops can all be purchased at Ellen's online store. Eclectic Paperie sells the Crafty Secrets stamp sets.

January 30, 2008

Lockhart Pink Ovals

HUGE ANNOUNCEMENT: Spellbinder's has done it again! They will be debuting the brand new Excalibur motorized die cutting machine at CHA in February. Prices and shipping dates will be announced at CHA, shipping will begin around May 2008. I can't wait to try this out!!! No more cranking!!!!!!!!!!! Check out the post at Ellen's website HERE to read all about it!!


Also, thank you for your great response to my Sketch Book kit idea. I will be working on a kit to add to Ellen's store as soon as CHA is over. You'll love it!! As far as writing a book or selling my sketches.....hmm, you've really given me something to think about!! I'll have to ponder on that one!


Okay, now onto today's samples...............
Remember my Candy Stand Kits? A while back I did up some ovals showing you lots of options for stamps to use. Well, these cards are made from those little samples. This first one shows Karen Lockhart's baby Bib stamp, colored with Copic markers, airbrushed and blinged up with a few Dew Drops. Background paper is from Memory Box. This next cards uses one of my favorite Lockhart stamps, the stack of cupcakes called Best Cupcake. Again, colored with Copic markers, airbrushed and finished off with Dew Drops and a pretty green ribbon tab. Memory Box patterned paper.
And here's another Valentine card for my stash. I love the pink and brown combo on this one which features the Lockhart Folk Heart stamp, colored with Copics and airbrushed. I cut apart the stamped *be my valentine* sentiment and finished off the tag with pink Dew Drops. Patterned paper by Stampin' Up!
These cards showcase a fun way to build up your stash a little at a time. You can work in stages: stamp the images and cut them out, color them at a later time, assemble the cards at yet another stamping session. I do this a lot so that I don't spend all my time on making one card at a time. Having stamped and colored images ready to go is a very good time saving process. All of Karen Lockhart's stamps can be purchased at Ellen's online store, along with the Copic markers, Spellbinder's Nestabilities and Memory Box papers.

January 28, 2008

Rubber Soul Sketch Book Cards

I've got a ton of work on my plate right now so I needed some quick ideas. I reached for my handy dandy sketch notebook and these four cards came together very quickly, indeed. With each card, I've also shown my sketch layout that inspired the card. I highly suggest you create an idea notebook so that you can have some *go to* layouts for when you're pressed for time, need inspiration or just want to remember those layouts that you think are awesome. Would you be interested in a kit to make your own idea notebook? Let me know your thoughts.......

Now on to the cards. All of the images used on these cards are from Rubber Soul. Be sure to check out all the stamps in the Valentine/love section as there are some darling images and sentiments. I love this layout below because it uses two pattern paper designs. With all of the fun coordinating papers that companies are coming out with now, I love to mix and match papers from the same line. The paper for all these cards is from Cosmo Cricket. And aren't the bees just too cute? And I knew I just had to have this cake stand stamp and cupcake stamp. Cupcakes are all the rage, you see them everywhere! The cupcake on the right is cut out and raised up with a pop dot. The inside sentiment is shown on the wood stamp and says *have a delicious birthday*. That's a must have stamp for cupcake cards!
This is a favorite go to layout of mine because I love that you can add some type of embellishment at the top part of the card. I usually use buttons but the possibilities are endless. The two hearts on this card are separate wood stamps. I used Eclipse Masking Tape to mask the pink heart, then stamped the second yellow heart on top to create a layered look. Notice that I store my masks right on the wood stamp front. No need to cut a new mask each time.
This little honeybee is so darling! I kept the image and matting small and then used lots of patterned paper to add some vibrant color. Again, another layout that lets you use two paper patterns. Two gold brads secure the horizontal band in place.
For all the colored images, I used my Copic markers......have you seen that Ellen has new colors????? Heaven!! Well I hope you enjoy today's cards and my sketches. Where do I get my ideas for my sketches? I get ideas from card magazines such as CARDS and Paper Crafts, scrapbooking magazines such as Creating Keepsakes, idea books from companies like Stampin' Up!, Splitcoast and from my stamper friends. Many of my ideas are also my own originals. I like to keep my sketch book by my side or actually make sticky note sketches, then transfer them to my idea sketch book later. If you're like me, I know you have lots of ideas jotted down here and there and on the back of grocery receipts. But I bet when it comes time to stamp, you can't find 'em right? Create your own idea sketch book so that your ideas can be kept in one place. You'll love it, I guarantee. If you are interested in creating your own sketch book, I'm thinking of designing a kit for Ellen's store.......anyone interested?

January 27, 2008

October Afternoon Bella

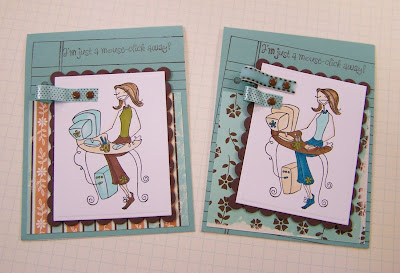
Just a few Sunday afternoon cards for you. Girl image stamps are from Stamping Bella, lined notebook backgrounder is from Ellen's online store, Copic markers, Spellbinder's Die Templates. Patterned paper from October Afternoon, a new company I absolutely LOVE! Can't wait to send out some of these cards. The computer cards with the *I'm only a mouse-click away!* will be perfect for my online friends.

You can check out all of the Cornish Heritage Farms Backgrounder stamps at Ellen's store. She has them all and they are wonderful!!! I've got more coming soon so stay tuned!!

January 24, 2008

January Card Club

We had January Card Club last weekend. It was SUCH a fun time and all the ladies were really excited to be stamping again after the holidays. All stamps, papers and ink are from Stampin' Up!

I tried to make all the cards with two options....so that the gals could make them into Valentine cards or just regular greeting cards with different sentiment options.

Remember that one card I made for our anniversary a while back? I adhered to pieces of white cardstock to the inside of the card. One side was for my message to my husband, the other was for my husband to write a message to me. I love this type of card. My husband gets a break from card shopping and we both end up with a nice momento and hand written notes to each other. This version below is for our Valentine card to each other.
Love the paper on the card below, it's one of my new SU! favorites. And this is one of my favorite new card layouts. It went directly into my idea sketch book. That swirly flower background is just darling!!
The cards below are versions of the original cards....I love to use the leftover supplies for myself! My girls always love to make a card or two also.

And LOVE this bird from the Always set. This stack of cards below got all kinds of sentiments. They will make good February cards due to the Valentine-y colors.

Hope you enjoy!!

January 23, 2008

Introducing Riley the Moose!

Riley the Moose stamps are new creations from Hanna Stamps, available February 1st! Aren't they cute? Be sure to check out the new Splitcoast Stampers Hanna Stamps forum/gallery for even more cute cards made with Riley!. They are single stamps, wood mounted, excellent quality. All cardstock and patterned paper is from Stampin' Up!, Spellbinder's Nestabilities Die Templates, Copic markers, brads from Star Lit Studio. The *good stuff* sentiment from Creative Cafe, *happy st. patrick's* sentiment from Rubber Soul.


Also, be sure to check out the SCS Hanna Stamps forum this Friday, January 25th for Kristi's birthday bash celebration. There will be lots of give aways so join in on the fun!!


January 22, 2008

More Valentine Samples

I made some more Valentine cards. I had every intention of filling my stash basket with fun new cards.......but I'm keeping these all for myself!! Do you ever do that? I need to just make my list of people I want to send cards to and just hog all the good cards for me. Do you think my card purchasing customers ever know they're getting my leftovers?? LOL!

The papers used all these cards are from the Making Memories Noteworthy collection. White card base with the new SU! ledger background. (can't remember the name right now). Valentine stamp set is from SU! and is called Happy Heart. Girl on the chair is a Stamping Bella stamp. Love word stamp is SU! hostess set, which is one of my faves from the new catalog. And check out the delicous colored images. I love my Copic markers and there are so many great colors. I just can't say enough how much I love them!!! The circle and scallop punches on the elephant cards below are from Stampin' Up! Sentiment from Stampin' Up!


Well I'm off to sub all this week so wish me luck with the little darlings!!

January 21, 2008

Rubber Soul Valentines

Dani from Rubber Soul just sent some of the cutest new Valentine stamps. I paired them all with Stampin' Up! patterned paper and Spellbinder's Nestabilities Die Templates. These cute, entwined giraffes are from an acrylic set called Love in the Air. I love how their necks form a heart shape.
This is a single wood stamp called Love Heart with a wood mounted sentiment. The font on this one is so quirky and fun! I'm loving this card layout too. I've added it to my idea sketch book as a keeper.
Here's a couple of love struck birds from the set called Love in the Air. The sentiment just cracks me up. Definitely a fun card to send to your lovey dovey.
This cute little kitty is from an acrylic set called Animal Love. I bedazzled her eyes with pink Amuse Twinkle Sequins.

I just love having a stash of new Valentines. These sets would make perfect little kids Valentines too.

January 19, 2008

Happy Heart Valentine Mice

How bout a few Valentine samples? We're in between basketball games right now so I have just a short little bit of time. All of the paper supplies and stamps are from Stampin' Up! Copic markers, airbrush and Dew Drops are from Ellen's online store.


January 17, 2008

Pastel Lockhart

I'm having so much fun creating new cards for my stash basket. Birthday cards were definitely a must have. First I stamp for my own personal stash. I make a list of all the cards I need for the month and make sure I create enough for myself. Most of the time I stamp enough for months in advance but I'm really running low because I gave away a bunch of cards for Christmas gifts. So once I'm done with picking out my cards, the rest go into my stash basket for customers......and my mom.

These are birthday cards created with the Lockhart Single Cupcake stamp. It's so cute, I just love it. I cut out the cupcake with Spellbinder's Die Templates and stamped the mini dot circle border from Papertrey Ink around the edge. Background paper is from Making Memories, sentiments from Stampin' Up, images colored with Copic markers! You'll be seeing lots of cards this month with white for the base. I am loving this look, so clean and crisp and everything matches! These are some cheery get well cards. But what I love about the Lockhart Robe and Get Comfy sentiment is that they go beyond *get well*. Get Well to me means that someone is sick and sometimes you need a card for those that need something a little different. One of these hit the mail box this morning for my mother's good friend who just had knee replacement surgery. She wasn't sick but definitely could use a nice card. So I thought the robe and this sentiment would be perfect. I couldn't have picked two better stamps to use for Marilyn's card. So good thinking Karen when you were designing these stamps!! Karen's slippers or socks stamps could also be used for these types of cards. Cards were made from the same supplies as above....rectangle Spellbinder's Die Templates, SU! ribbon, Copic markers.
You can purchase the following at Ellen's online store: Copic Markers, Spellbinder's Nestabilities Die Templates, all Karen Lockhart stamps.

January 16, 2008

Valentine Purses and Candy Bars

How about starting the day off with a few Valentine items? I went *shopping* at my Inspiration Station and just started creating. First in line are these giant Dove candy bars covered in patterned paper. The cute little stamp is from Stampendous. Twill ribbon is from Martha Stewart, paper by Daisy D's. I HAD to wrap these Dove Bars up or they would have been consumed...by me...can't resist Dove chocolate. These two will probably go to my girls for Valentine's Day. Next up are these little candy purses. Nichole Heady from Papertrey Ink designed these and they are oh so simple to make......and oh so darling too! You find complete instructions on her blog HERE. And let me say that I'm not a real *measure and cut and follow a template* kind of stamper but these were easy peasy to make. They are made from the clear stationery boxes that Papertrey sells, you just cut one in half with a craft knife. Nichole lined her box twice so that she could have patterned paper on both the outside and inside of the box. I chose a double sided cardstock from Daisy D's so I only had to use one piece of patterned paper for each purse. You can see a little snippet of the inside of the purse on the far left.....the red polka dot paper. The tag was made from the SU! Valentine set called Happy Heart. Martha Stewart twill ribbon for the handles, it's one long strip adhered with sticky strip. Be sure to use a ribbon that will stand up fairly stiff so the handles look cute. I made 6 of this style for teacher gifts and have an order for 10-12 more for a friend. Can you believe I had to purchase more Valentine paper? I actually NEEDED more......actually RAN OUT......USED all my stash....it's amazing!!

Cleaning Acrylic Blocks

Sometimes, ya just have to take a break from all the fun and do a little cleaning up. My acrylic blocks were a nightmare to say the least! The photo below shows two of my dirty blocks on the left on a white paper towel. They were discolored with ink, greasy, gunky,and sticky from the adhesive and cleaners I use for unmounted stamps. So much so that my stamps weren't adhering to the blocks correctly and I was making messes on my clean card stock. The blocks shown on the right side have just been cleaned, just so you can see how dirty most of my blocks were. Here's how I clean my blocks. I lay out dry, white paper towels so that I can see the dirt on my blocks. Then I take baby wipes and clean off the first layer of ink and gunk. For those hard to remove ink stains and gunky adhesives, I needed a little bit more help though. So I got out my StazOn All Purpose Cleaner. I found mine at my local scrapbook store. The applicator is made of a foam type material that really allowed me to scrub on the blocks. For the toughest stains, I applied the StazOn cleaner onto the block and let it sit while I was working on another block. With a little elbow grease and patience, all of my blocks were soon sparkling, clear and clean again.
I also cleaned some of my stamps that had been stained pretty badly with black ink. Not all of the ink comes off but it cleans them up nicely and removes a lot of of the staining. Hope this little tip helps........now I'm inspired again and am heading to my stamp room to have some stamping fun!!

P.S.........Many of you are missing my blog banner. Here's the deal: I am not good with computer stuff and friends have been helping me out with resizing, and a bunch of other techno junk. But I don't want to bother them so until I can figure out the banner thing myself, I'm keeping it simple and off to the side. Digital scrapbooking and altering of photos is on my to do list this year so we'll see if I can EVER get the hang of it. In the meantime, I'll let my projects take front and center. I might show you my new hair cut though soon! :) I'll be back with lots of new projects soon! Thanks for visiting!

January 14, 2008

More Candy Kit Ideas

Good morning everyone, I hope you had a great weekend!! Today I thought I would share some additional ideas for my Candy Stand Kit. In the kit, you receive supplies to make 12 favors. This includes the cello sacks/cardboard stands, ribbon, pink card stock and white card stock. The stamp featured with the kit is the Tart of Hearts but it is an add on item. So this makes the Candy Stand Kit very versatile with it's intended use. In my first posts introducing the kit, I gave a ton of ideas for Valentine treats but today I've done up a bunch of other tags using other Lockhart images available at Ellen's store.
You could easily use the kit for birthdays by using the various cupcake stamps and sentiments. You could include candy or other small birthday items inside. I love to have some gift sacks on hand and all ready to fill with gifts. It makes those last minute gifts so easy to wrap.

The folk heart stamp shows just another version of a Valentine treat holder. I love to cut apart the sentiments and piece them together like I did below.

Of course weddings will be coming up soon too. Last year my friend had a pink and brown bridal shower for her daughter. Oh how I wish these kits would have been available then. Karen Lockhart has a beautifully detailed wedding cake stamp and also the pretty bride. The kits could be used for centerpieces at the shower or even at the wedding reception to hold candy for each table. Ever notice how little kids LOVE the centerpieces at weddings when they actually get to open something for them? I could see balloons tied on to these too.

Or how about the same idea but for a baby shower? Pink and brown would be SO CUTE for a baby shower. The little containers could be used as centerpieces with balloons tied on and be filled with small baby items such as bibs, pacifiers, small boys, creams, etc. And how 'bout one special one for the mother to be filled with wonderful chocolates?
So as you can see, there are lots and lots of uses for the Candy Stand Kits. I believe Ellen has all the supplies back in stock so you can simply click on the link at the beginning of this post to find the kit. All of the stamps shown here are designed by Karen Lockhart and can be found at Ellen's store too. Stay tuned, you'll be seeing these images again......but they'll be in a card formats. Since I don't have any baby or wedding events soon, I'm making all of these into fun cards. :)

January 12, 2008

Ohhhhhh Bella Girl.......

My personal card stash is BARE, nuthin' there! I desperately needed to stamp some birthday cards and some general friendship cards. I had colored these Stamping Bella stamps some time ago so I pulled them all out and got to work PRONTO! But first I created this *graphic* image type card using a Lizzie Anne circle Happy Birthday stamp and some other word stamps that I've collected over the years. Oh, and the new backgrounder lined paper stamp that Lisa Strahl designed for Cornish Heritage Farms. I dearly love stamps that are graphic in nature........word stamps, office type supplies, grid paper, lines, circles, shapes. And I really love word stamps that incorporate images in them or make a design like this Lizzie Anne circle stamp used on the card below. Oh, and the tab punch by Stampin' Up!, LOVE it! The card below was inspired by a scrapbook layout I saw on the Two Peas website. Always gotta stamp the envy too.
Then I moved on to my Bellas using a similar layout with the lined paper backgrounder stamp on a simple white base card. I haven't used a white base card in forever but I love the simplicity of it. You can zoom in to see all the different sentiment stamps I used. Don't you just love to see an entire little collection of cards together. That just makes me HAPPY! I love when I get to mass produce. And NO ONE else gets these cards, they're all mine to send out to friends and family. Here's some close up shots of some fun details. I used the SU! tab punch to make a file folder look on this card. *the good stuff* stamp is from Creative Imaginations. All scallop layers are from Spellbinders. Coloring is done with Copics.
How bout this little flag I made on this card below. I simply stamped a sentiment, cut it out with scissors and snipped the ends to make a little flag...attached with a flower brad.
And this sentiment from Stampin' Up!, I love it. I stamped the matching *thank U* sentiment on the inside of the card.
Well, my table is a wonderful mess now, piled up with colorful scraps and all kinds of word stamps. I was not a good girl......I left my mess out! So today, I have to clean that up and then I promised Jordan that we'd make some Valentine decorations. She's been patiently waiting since I told her last night. I better get to movin' girls, I can't keep my girl waiting!!

Tip of the day: When you use satin/silky type ribbons on your cards, the ends fray right? I use a clear glue on the cut ends and let it dry. This keeps the ends from fraying any further. There is actually glue formulated to use on fabric and I remember using something called Fray Check in college on my sample boards, do they still make that? Any ol' clear glue will work though.

January 10, 2008

Texture Embossing with Spellbinder's

Oh my gosh, I'm doing lots of experimenting with my Spellbinder's Nestabilities (Nesties) and look what I've come up with for today......TEXTURE EMBOSSING! It's so simple it's not even funny. And the possibilities are endless as to what you can use to emboss. For these samples I used a scrap piece of mesh type ribbon. Check out how beautiful Karen Lockhart's new HYDRANGEA stamp looks on this card. I textured the entire stamped image and then airbrushed the image while still in the Nestie rectangle template. Then I took a sanding block and rubbed over the ink to soften the edges and reveal more of the mesh look. I love it!! It just adds so much texture and adds to the soft country feel of this card. The card layout was inspired by a layout in the Stampin' Up! catalog. I also airbrushed the Prima flower to match my card stock a little better. A Dew Drop is in the center of the flower. Patterned paper by SU! Image colored with Copic Markers. I did the same embossing on this card but kept the inking to a light distress color. It's still very textured looking but with a softer look. This stamp is from Karen Lockhart also and is called COTTAGE FLOWERS. I think I have made summer bouquets that looks exactly like this, in the canning jars and all. I call them wild flowers........my farmer dad always teases me that I *sure got a nice jar of weeds there*. He tries to kill 'em and I'm putting them in flowers vases and think they're beautiful! Same card layout here with the stitching and ribbon. Patterned paper by My Mind's Eye. Image colored with Copic Markers. Slight water coloring around flowers and jar done with SU! Watercolor Wonder Crayons.
Soooooooo, you wanna know how to texture emboss with your Spellbinder Nestabilities? Okay, okay already. I'll tell ya. Here's the Spellbinder's sandwich for embossing, starting with the bottom layer:

white spacer plate

embossing object(mesh, lace, textured material, wire, threads, real flowers, leaves, etc)

Nestabilities die template with cut shape still in tact (I used a rectangle). You will have already stamped/colored your image and cut your shape with the die template. Your die will be placed down with the cutting side up and stamped image facing down on the embossing object.

tan embossing mat

white spacer plate

Run this sandwich through the Wizard and when it comes out, you'll have an embossed image on your shape. The outside edges will be embossed too, it does it at the same time. You can then airbrush the image or sponge with ink. You can sand over the embossing to bring out the texture and soften the edges. You can brayer over the embossing with a light colored distressing ink. And SOOO much more......I've only begun to scratch the surface of embossing with the Nesties/Wizard. I hope you try it!!

January 9, 2008

Crafty Secrets Prize Winner!!

Cathy, try emailing me again, I forgot a letter!! :)

Drumroll please..................the name of the Crafty Secrets give away winner is CATHY!! Congratulations Cathy!! Please email me at stamplady@satelephone.com with your full name and mailing address. Your goody package will be mailed out directly from Crafty Secrets! Woohoo!! And thank you to everyone who entered their name for the drawing, I had over 350 replies!!!

Cathy said...
WOW this is one AWESOME candy giveaway. I just love your vintage look on your cards. Pick ME ME ME...I have to have these stamps! Thanks for a chance and Happy New Year!cmeyers@hughes.net

January 8, 2008

Microwave Sweet Party Mix...Yummo!

Update on Candy Stand Kits: The kits are sold out at this time but Ellen has ordered more supplies, woohoo!! You can check back at the link...Ellen will put them on preorder and will ship them out as soon as the supplies arrive to her.

The two tiered stand that I have my Valentine decorations in was purchased at at store here in Kansas called Nell Hills. If you're ever in Atchison or Kansas City, you should definitely spend a few hours there. It's my favorite place EVER to shop!

Note: Be sure to sign up for the Crafty Secrets give away if you haven't. I'll be drawing a name tomorrow afternoon/early evening so check back to see if you're the lucky winner!!! Scroll down to my January 2nd post and leave a comment to enter for the prize drawing.

Today, I would love to share with a few things from my home. I always like to decorate for the holidays, my girls love it so much. So I thought I would show you my Valentine set up. I keep it pretty much to a few areas, one being a two-tiered stand that I keep on my dining room table. I put some shredded filler stuff in each tier basket and then just filled the tiers with all sorts of Valentine decorations. It's definitely a mix and match of *stuff*. That's what I love about this stand, I can just group together items of similar colors and/or themes and it makes a pretty fun decoration......without all these little items scattered around my house like Easter eggs!!

Here's the top tier of the stand. Those cute tea towels are from Target this year. Here's the bottom tier of the stand. The little tins tucked in the back will have little candies and treats for the girls on Valentine's Day.
And here's one of my most beloved recipes of all time.......YES I'm going to share it with you. YES, I should write a book, I KNOW!!! LOL!! The photo below shows a photo of a cute bunny rabbit my mom sewed many years ago, she is so special to me. And the little bowl she's holding holds a big batch of my SWEET PARTY MIX. It's so easy to make, doesn't take a lot of time and it's totally addicting!! You can add in seasonal colored M & M's to match any holiday, sports team colors or party theme. My friend Carmen gave me this recipe at a scrapbook outing and it's been a huge hit ever since!!

One of the main reasons I wanted to share this recipe at this time with you is because if you've purchased my CANDY STAND KITS at Ellen's store, a cupful of this in the treat bag with Valentine colored M & M's would be a perfect treat!!! (You can see my kit posts if you scroll down a bit). I'm going make a double batch and do this for Valentine gifts to teachers. So be sure to print off the recipe below, purchase your Candy Stand Kits from Ellen (they're going fast but I think there's more to come!) and you will be on your way to becoming one of the coolest gift givers in your neighborhood!!

Here's the recipe, Enjoy!!!!!!!

Microwave Sweet Party Mix

6 T margarine
3 T light corn syrup
3/4 cup brown sugar
1/4 tsp baking soda
1 large bag plain M & M’s (seasonal if you want it for the holidays)
1 jar honey roasted peanuts
4 cups Corn Chex
4 cups Rice Chex


Melt margarine, syrup and brown sugar in microwave for 1-2 minutes. Add baking soda and stir. Pour over cereals. Stir and cook in microwave for 3 minutes, stirring every minute. Pour onto waxed paper and let cool. Add ½ bag of M & M’s and ½ jar of peanuts. I usually double the recipe. Enjoy!!

Note: Use a glass dish if possible, as the liquid mixture gets really hot and will melt your plastic bowls.....trust me.

NOTE: Stay tuned for even more ideas and uses for the Candy Stand Kit....think baby and wedding.
Related Posts with Thumbnails