October 8, 2012

Project Life 2012, Week 29...

I'm back today to share Week 29 of my Project Life.  You can visit Becky's blog today too where she'll be sharing links to some of the Project Life Creative Teams' projects.  This week was so full of fun, Summer photos and....the color red! I had a ton of photos to use so I just made room for them by squeezing them into the 4 x 6 slots as well as the 3 x 4 slots.  
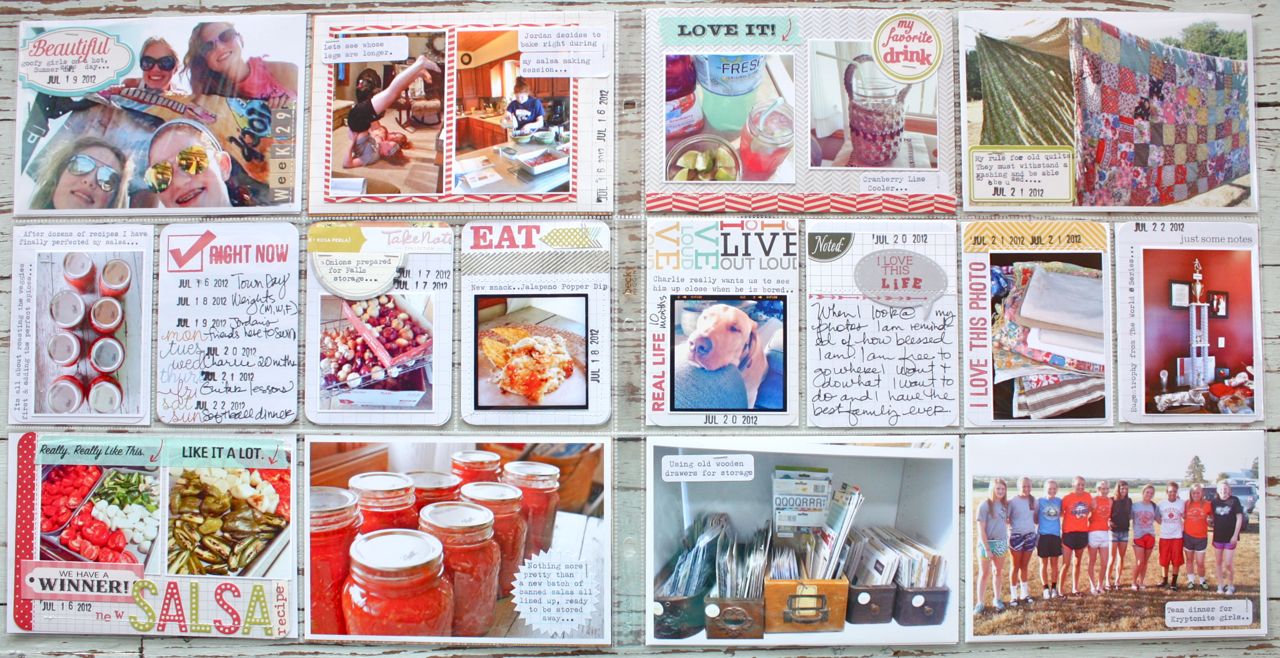
When using lots of photos like I do in my weekly spreads, it's a must that I sketch out my layout in advance.  I sit down with my calendar, my Project Life notebook to sketch the layout and my iPhone or regular camera with my photos.  I just plan the layout til everything fits.  Here's the left side of my week.  
Here's the right side of my spread.  Although my week is busy with photos I was still able to use my crafty supplies to embellish the inserts.  
I know this week will be a fun one to look back on.  There are some favorite photos tucked in here, like this one of Jordan and her three best friends.  No makeup, hair all a mess and just having fun in the buggy.  Love these sweet and silly girls.  
Just some fun around the house in these photos. The girls were seeing how long their legs were and Jordan decides to bake something right in the middle of my salsa canning.  Perfect timing, Jordo.  
A favorite insert.  I like to pick on insert if there's room and get really scrappy with it.  This was the one.  I used a folded Project Life journaling card for the base then added Washi tape, October Afternoon stickers and some stitching.  I added these photos particularly so that I could look back to them next year when it comes time to make salsa.  I can see how I went about making my new recipe.  
Love this simple photo.  Remember.....the photos are what it's all about.  My shiny new jars of salsa don't need any furthering embellishing other than a little starburst sticker with journaling.  
I used some new foodie stamps from Studio Calico for these two photos below.  My favorite drink and a fun new mason jar cozy I purchased from a local shop.  Love to support the local folks when possible.  
A new/old quilt noted with a typed October Afternoon label.  
Another photo of my salsa jars + my Week in Review card using a Project Life journaling card.  
These are some photos I added to journaling cards I made a while back.  So nice to just pluck a few from the basket.
Here I used a Project Life journaling card on the left and a card I made on the right.  Love using my stamps on my inserts lately. No bulk to add to my expanding album. 
And my last two inserts.  Simple photos with just a little stamping and typed journaling.  
And that's it for this week.  How are you coming along with your Project Life?  I've kept up with my goal to finish 2 weeks each week until November.  I really want to be caught up so that I can focus on my December Daily. It's taking a lot of effort in the planning the pages, emailing photos, and printing photos before I even get it all to my scrap table.  But it's going to be so worth it.  Thanks for stopping by today!

October 5, 2012

Happy World Card Making Day!

Let's start the party a little early, shall we?  Tomorrow is World Card Making Day.  How awesome is it that we crafters get a holiday all for us!?  To celebrate, I have some cards to share, a new kit and lots of awesome goodies to add to your cards.  I'll keep the jabber short cuz the family is off to a football game and I have the house to myself.  Hello, let's make some cards people!!

First up is set of 2 cards that I made from the contents of my latest kit called Happy Day Card Kit.  
A very simple design that be used over and over again to mass produce quick and easy cards.  
You can bet that I'll be using this design to create stacks of cards for different occasions for my holiday gifts.  The moms just love my cards.  Note:  The kit comes with a blank set of grid labels, there are no stamped sentiments.  
Here's the Happy Day Card Kit in it's entirety.  There's enough supplies to assemble 4 full cards with coordinating envelopes, sacks and tags.  I've thrown in a few extras like some large tags and some library cards with pockets so you can try out some bookmarks.  And looky, you get a FULL 6 x 6 pad of the Studio Calico Hey Day patterned papers.  You can create til your little fingers are all nice and inky.  
Lots of fun accents for these simple but oh-so-pretty cards.  Love the texture of the fabric tape and paper doilies. 
I've also added some fun extras to the shop like these stamped and embellished hexagon accents.  
 Little crocheted doilies.
 Aqua Striped Washi tape.
 Baker's twine bundles in a rainbow of colors.
 One of my favorite items.....stamped grid labels to use on card fronts!  You don't even to get your stamps out, just peel and stick these fun labels.  Note:  The grid on these labels is smaller than the regular blank grid labels.  Try out the Notebook Paper Labels and the Starburst Grid Paper Labels too.
 Buttons.  Just sweet as can be.
 Extra aqua envelopes.  Coming soon.....sets of cream and white blank cards with envelopes.
 And there you have it folks.  Some fun stuff.  I'm going to go dig into my stash right now!

Oh...

The Mixed Greetings Card Kit is still available with lots of goodies to coordinate.  And all of my Halloween/Fall items are on sale.  Happy shopping and Happy World Card Making Day.  Do you have fun plans?  Let me know.

Note:  All the ink and fun sentiments you see on my card samples are from Hero Arts.

October 4, 2012

Project Life Birthday Blog Hop

Please note:  I have TWO blog posts up today...this one and one for October Afternoon.  Be sure to scroll down to see my second post.  :)

The birthday celebration continues as Project Life turns 3!  The Project Life Creative Team is having a blog hop where you read about how Project Life has inspired us all AND you'll get the chance to enter for some fabulous Project Life products.  See the Creative Team links at the bottom of this post.  
So why do I do Project Life?  

For me, I want to create albums full of memories that my family will treasure for many years to come.  The big events like birthdays and the holidays are special but it's the everyday stuff that I think is so intriguing about Project Life.  I think about the things I would love to see in photos along with a short story.....like what my room looked like as a teenager, more photos of my siblings (especially my brother that died as a teenager), meals at our old dining room table, funny things we did, the toys we played with, etc.  Project Life allows me to capture all those memories of my family and more.  That's why I do it.  

What's inspiring me right now about Project Life?

As we move into October, my mind starts to think about the holidays and baking and crafts.  One of my favorite things to look forward to is Ali Edwards' Daily December album.  This year she is going to be working with a 4 x6 album format.  You can read about her upcoming Daily December album for 2012  here.  

I love the idea of working with the simple, smaller format but to twist things up a bit I've come up with a plan that will suit my needs.  I really want to be able to integrate my Project Life album and a Daily December album into one album.  So I'm going to use the 5 x 7 Horizontal Page Protectors that are just a size up from the 4 x 6 pages that Ali will be using.  This way I can fit a little more on my pages and nestle the pages right into my Project Album since those size pages for sure fit into my PL album.  I can still follow Ali's format for her album but just tweek the designs to suit my fancy.  
You can get an idea of what this will look like from the photos below.  These are the vertical 5 x7 page protectors that I used to create a 2 page mini album of sorts for a night at the county fair.  The pages were just tucked right into my Project Life album.
My idea for my Daily December 2012 is to just insert the 5 x 7 horizontal pages into the weeks where they seem to fit the best.  And the great thing is that if my pages get too bulky or I decide I want to create a separate album, I can just take out all the 5 x 7 Daily December pages and create an entire separate album. 

I'll have more about my Daily December process on my blog starting late October or early November.  Until then I just wanted to share my ideas and perhaps spark an idea for you.  I'll be using the October Afternoon Make it Merry collection + some of my own stash items for my DD.  And good for you, I'll be giving away a pack of the horizontal 5 x 7 page protectors!!
Keeping it organized:

To keep up with Project Life, we need to keep organized right? The Big Envelope Pages are perfect for storing all those bits and pieces of life that we collect.  You can use them for school papers, newspaper articles, photos, receipts, packaging....anything that you need to keep safe and organized until it makes it into your Project Life pages.  
I've been using some of the Big Envelopes to store my October Afternoon collections.  I tuck all the small items like the tidbit packages, buttons, brads and stickers in the large pocket.  Then the 12 x 12 papers are filed behind the Big Envelope pocket.  I use one Big Envelope for each collection.  I love that!!  

For my Daily December I am planning on keeping one Big Envelope pocket inside my Project Life album.  Here I will store photos, journaling notes and anything holiday related that I want to use.  No more having stuff scattered all over for the entire month of December.  I'll also be using a Big Envelope pocket to hold some of my smaller Daily December embellishments.  I WILL be organized this holiday season!!  And lucky for you I'm also giving away a package of the Big Envelopes!
Okay, I hope I've inspired you to geared up for the holidays. I'm getting very excited...to the point of where I want to play holiday music and set up the tree.  Uh just kidding, who does that in October right?  Thanks for stopping by and Happy Birthday to Project Life!

To enter for my drawing of the 5 x7 page protectors and the Big Envelope pockets:

Leave a comment on this post before Sunday, October 7th...10pm Central Time....telling me something unique you've done/could do with your Project Life.  Have you added lots of inserts?  Do you use it for a baby album?  Do you use special accents?  Do you keep it very simple?  I'd love to know! And sorry, but the contest is open to commenters with US addresses only.

More freebies:
Check out the Free Stuff Page at Becky's site for fun journaling cards + a few other fun items.  All for free!

Even more prizes: 

Here are the links to the Creative Team Member Blogs.  Be sure to visit each site and enter to win the awesome Project Prizes.


Michelle Wooderson:

October Afternoon Sketch Challenge

Hey there friends.  Today I've got two blog posts happening.  This is my first post for the day so be sure to scroll up to the top of my blog to catch my Project Life blog hop post.  

Today I'm joining in on a sketch challenge with Roree.  You can see her sketch and finished project over at the October Afternoon blog along with the Pinterest photo that inspired her challenge.  Roree's sketch reminded me of an idea I've been wanting to implement for a long time so the timing was perfect.  I've been wanting to make mini collages that I could plop right on a card front for quick and easy cards.  

I used the sketch to create these three pieces below.  All of my products are from the OA 9 to 5 collection, one of my all time favorites from October Afternoon.  I used a piece of patterned paper for the base and then added journaling cards, my own Instagrams of my vintage typewriter, brads and other little tidbits. I just kept layering and stitching items in place.  I also used some of the 9 to 5 stamps on the card fronts.  
Here's my three finished cards, all with a fun office themed look.  I simply added my finished collages then added Washi tape and stitched on a strip of OA patterned paper to the bottom of the cards.  
The cards are loaded with detail like the mini paper clips from my stash, machine stitching, little tidbits and more.  
 The Washi tape at the top of the card fronts followed the sketch perfectly.
 The brads give a great dimension to the cards and become the accent piece where the butterfly is on Roree's sketch.
 Lots of little stickers and tidbits + some stamping finish off the cards where the journaling is on Roree's sketch.
 A fun sketch which sparked a idea that has been brewing for a while.  Thank you Roree for having me play along.  I hope all of you give it a try!

October 3, 2012

October Afternoon Witch Hazel Blog Hop....see ya on the flip side

Edit:  Mindy Hook is the winner of my blog hop prize.  Congratulations Mindy, your prizes are on their way.  


Hey there and welcome to the October Afternoon Witch Hazel Blog Hop.  Many of the Design Team members have fun posts to share today + we have prizes!  So be sure to check out the October Afternoon blog for all the blog hop stops....then visit each blog to leave comments for the prizes.  

I've posted several projects on my blog using the Witch Hazel collection for Halloween projects.  Today I thought I would flip things over and work with the "B" side of the patterned papers.  Now the papers don't really say "A" and "B" but in crafty language we all know that the "B" side is usually the side that does not have the big pattern on it.  In the case of Witch Hazel I'm talking about the sides that don't have definite Halloween patterns. You can see the papers below that are "B" sides of Witch Hazel + I've set out some buttons, labels, tidbits and Washi tape that could be used on everyday type projects. 
For my cards today I've chosen 4 of the patterned papers to create some card front pieces + a punched and stitched garland.  I've also set aside some buttons and the black and white polka dot Washi tape. I stitched down the sides of my patterned paper pieces.
Here are the four cards I created which will be used as thank you cards for those who gave presents to Jordan for her birthday.
I stamped my Studio Calico words in different color inks onto Project Life 3 x 4 grid journaling cards.  
Next I cut out garland strips to add to the card front along with a tied button.  I added a strip of the Washi tape and torn strip of scrap patterned paper. Very quick and easy.  I love that the colors have a hint of Fall colors like the orange....but that they could be used for any time of year and for any occasion.
I also used some stamps from my stash and more Washi tape to create coordinating envelopes for the cards.  
I hope you enjoyed my cards today.  Remember.....those flip sides of themed papers make for some great everyday projects.  And before I go, I have a give away for both of the Witch Hazel Washi tapes. Awesome, right?  
 To enter for the prize drawing, leave a comment on this post letting me know what products are your favorite from the Witch Hazel line and what you plan to create with them if you ordered some.  Contest entries for my prize drawings need to be entered by Friday at 10:00pm.  If you haven't ordered any Witch Hazel yet, you can find most of the collection at 2Peas.
Be sure to stop by the October Afternoon blog to see the rest of the Design Team links for Blog Hop projects.  Thanks for stopping by!http://octoberafternoon.typepad.com/october_afternoon/2012/10/witch-hazel-blog-hop.html

October 2, 2012

Project Life 2012..Week 28

Today I'm sharing Week 28 of my Project Life.  I'm a little behind on my blogging my PL layouts as you can see because this spread is from a week in July.   I've got several more weeks photographed and ready to blog so you'll be seeing those posts soon.  

Week 28, Project Life 2012

This week was filled with lots of Summer time activities like having table tops lined with garden pickings and lots of softball.  Here's my 2 page spread.  
I'm finding that in order for me to get caught up and work on my PL pages in a timely manner, I need to simplify.  Having the 4 x 6 slots filled with actual 4 x 6 photos is a huge help.  The photos speak for themselves and don't need any embellishing.  
Typed journaling also helps me to keep my journaling blocks to a smaller size.  I use lots of the Grid Paper Labels on my photos to tell the stories.  I've also been taking note of how quickly my albums are filling up.  I'll definitely be needing 2 albums for 2012 but I really don't want 3.  I've been using flat embellishments like stickers, labels, patterned paper and lots of stamping.  I actually like how it makes my pages look more clean and simple.  I've also been filling the 3 x 4 slots with more journaling...more stories that I hand write or type....keeping the focus on the photos + the stories.  
This photo of the girls was one of my favorites from this Summer.  They were getting a little bored and I'd find them zoned out just listening to music....with pillows on their heads.  Ha.  
My tomatoes were plentiful this Summer, the best crop yet.  I made lots of salsa and we had lots of BLT's.  I love these photos I captured of them.  This Winter when I look back at these pages, I will be reminded of how bright and beautiful they were.  
This week was full of softball.  We went to a big end of season tournament and I took lots of photos of the girls' team taking 1st place.  Most of those photos will go into some insert pages that I still need to do.  The photo below is of a restaurant we went to.  I used Studio Calico stamps for the food theme. 
More Studio Calico stamps for these photos of Charlie.
Here I added an Instagram of all the date stamps of some recent PL inserts.  A label and Washi tape make for simple accents.  On the right I took a photo of some of the characteristics that a 13 year old like Jordan may have.  So true! This insert coincides with a photo of the girls getting their school physicals. 
Simple 3 x 4 inserts here, some of my favorites.  Love getting the stories told.  
Some more simple photos, typewriter journaling and stamping.  
So how are we coming along with our Project Life pages?  I'm behind but not too far gone that I can't catch up.  I sat down and devised a plan to be all caught up by November.  For me that means I need to do 2 PL layouts a week up until November 1st.  I did 2 for last week and am determined to keep on schedule.  I set the November 1st goal so that I could concentrate on making some Daily December pages in November and then actually creating my Daily December pages throughout December.  I'll be sharing my Daily December plans later this week in another Project Life post where I'll also have a give away.  In the meantime, come back tomorrow as I'll be sharing my project for an October Afternoon Witch Hazel blog hop.  :)

I'm loving the Witch Hazel collection for my Halloween projects.  I've been pairing the products up with lots of the Halloween/Fall goodies from my shop.  I'm determined to get all my little treat sacks done up early this year so I can pass them out to my little niece and the girls' friends + a few teacher friends.  My Mixed Greetings Card Kit is also still available in the shop.  I've already created a nice little gift for my mother-in-law using one of the cards for her actual birthday and a few to add to her stash for a gift.  

Okay, off to do some more creating and blogging for this week.  Be sure to check out Becky's blog for some birthday celebrations.  She has a very cool video to share today.  Thanks for stopping by.  :)
Related Posts with Thumbnails