July 20, 2013

Project Life 2-13...Week 18....a week with my sister

Hope you're all having a nice weekend.  We're off to see the matinee movie of Grown Ups 2.  I've been waiting for it all Summer.  

Today I'm sharing Week 18 of my Project Life 2013.  My sister was back staying at her lake house all week and we had such a blast.  
Just a fun mix of photos...lots of photos filling the pockets.  
We did a lot of thrifting so it was fun to add in those types of photos.
For the main, dated insert I used a Becky Higgins Project Life card which was adhered to a larger patterned pattern base.  I added lots of stamps, a Small White Tag, corkboard accents and one of my tiny little camera Instagrams.  
Here I added the weather insert and used an exclusive Gossamer Blue wood stamp.
Out and about on a walk, I need these reminders to keep on walkin'.
This was fun.  I stitched on a Rounded Flap Glassine Envelope then trimmed off the excess.  I then added a Large Manila Parcel Tag which was trimmed down too.  Just trying some new ideas.
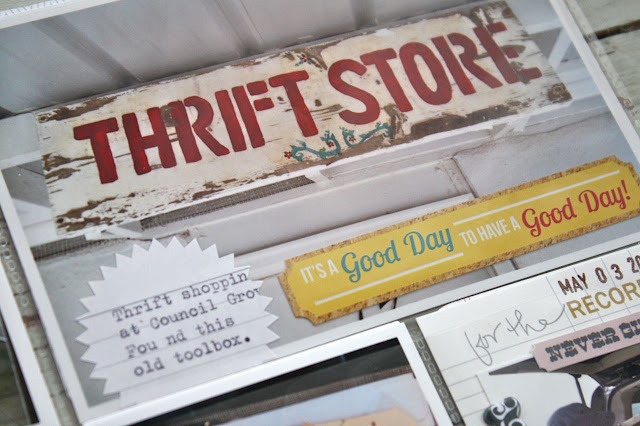
I love to add signage to my Project Life and this thrift store sign was cool.  I added typewriter journaling to a Starburst Grid Paper Label.
Here was another fun signage display of a banner.  I used another Starburst Label for journaling.
I had made these two 3 x 4 cards earlier for Gossamer Blue and am putting them to use this week.  On the left I used an Elle's Studio card and stitched on some vellum.  I cut the card at an angle then added a Medium Parcel Tag.  On the right I used another Elle's Studio card and backed it with a grid card.  I then stitched around the square, added a vellum piece with typewriter journaling & secured it with Washi Tape.  The stamps on this card are from Elle's Studio too.  
Here I used small square photos on some lined journaling cards.  Love little Stella, she rides on a little pillow and is such the licker and kisser.  Miniature weenie dogs have loooong tongues and will catch you off guard at any moment.
Vintage finds, these photos bring back good memories.  I love the orange took box and plan to display it with an old school map of the world.  It has lots of orange in it.  On the right, my sister has an ongoing joke with chickens.  We had to snap her photo with all of these chicken trophies.  Sometimes ya just gotta be there, I guess.  :)
I loved when the thrift store lady was adding our tags to her tally notebook.  It really puts it into perspective to see all the crap you're buying. Ha!  And on the right, my sister can pack a trunk load of junk like no other.  Just step aside and let the queen work her magic.
So, so happy to have this week in the books.  This is the type of week that I love.  Just a bunch of photos that evoke so many fun memories.  I know down the road, while my sister and I are sitting with stacks of hoarded junk all around us, we'll laugh at all the fun we had.  

Project Life status update:  I worked soooo hard yesterday on my album.  The girls got invited to the lake and then had volleyball practice so I had a full day to myself, the first time since school was out.  I fixed a huge iced coffee, got all buzzed up, and went to work.  :)  I was about 8 weeks behind and now I'm down to 3 weeks behind.  My plan is to get all caught up before we leave on vacation in one week. I know I can do it!!

July 17, 2013

July Gossamer Blue....Bucket List page

Hi there, today I'm back to share another project I made from the July Gossamer Blue kits using mostly the Simple Stories products.  This Summer we made a Bucket List of some things we hope to accomplish.  I used the fun 12 x 12 banner paper as my starting point, trimming it down to about 10 x 12.  I'll have to trim down a 12 x 12 page protector for this to fit in between a week of my Project Life album.  I purposely made this page smaller than 12 x 12 because I like all of my inserts to be smaller than a 12 x 12 size.  This will probably fit in a week that uses some of my embellished journaling cards from yesterday's post.  
My layout was put together by simply placing journaling card elements on the page, so a grid format is what I ended up with.  On the top I used chipboard and sticker letters to spell out "Bucket List". Fun stickers, cork accents and brads add some fun details.  You'll notice throughout that I used the white gel pen that was included in the Gossamer Blue July Color Kit.  So perfect for all the chalkboard accents this month. 
Here I used more sticker numbers, the fun puffy geotag sticker and a tied chipboard heart from the My Mind's Eye package.
A row of 3 chalkboard looking cards are lined up along the bottom.  I used the white gel pen to accent the flip flops and to draw lines and dots around 2 of the black cards.  White stitching also looks great on the black cards.  I especially love the how the MME brads color coordinated with the hearts on the journaling card.  Lots of stickers from a Simple Stories sheet were scattered about on the left card.
This is the back of the above page.  I decided to just use the chevron pattern as it will mostly be covered with photos.  My idea is to leave this page blank and adhere some of our favorite Summer photos (probably small Instagrams) as the Summer progresses.
I used a Project Life 4 x 6 journaling card as the base for a 3 x 4 Simple Stories journaling card, lots of letter stickers to form phrases, a puffy ampersand sign, some Ali Edwards stamps and the insta summer stamp from Elle's Studio in this month's kit.  Brads and enamel dots + some more white dots from the gel pen adorn the camera.
Fun stuff, I can't wait for this page to be added into my Project Life album.  Thanks for joining me today.  So tell me, how are you keeping up on your Project Life or scrapbooking projects?  I'm  behind about 5 weeks but I have photos, daily notes and a new system for keeping it all organized.  So I'm not stressing at all....just trucking along and still enjoying the process.  We have a vacation coming up so I'm trying to decide how to handle all the extra photos we'll be taking.  I'm thinking that the August Gossamer Blue kits will help me tremendously.  There just might be some fun travel themed items coming.  :)

July 16, 2013

July Gossamer Blue....handmade journaling cards using Simple Stories

Hello, I'm continuing the blog posts this week with lots of Project Life inspiration using the July Gossamer Blue kits.  As our little community continues to grow the kits are selling out a little quicker.  So be sure to visit the store first thing on the 1st of every month....or shop a day early if you are a subscriber.  As a reminder, in August Gossamer Blue will debut it's first Life Pages kit.  I've completed my first full spread using just the Life Pages kit and I love how it turned out.  I'll be back later this week with some sneak peeks and tell you a little bit more about how the Life Pages kits will work for you.  I'm so excited.  Oh, and just wait until you see the list of all the new Life Pages designers.  It's gonna be so awesome... 

Today I have another lot of embellished journaling cards using a lot of the Simple Stories products from the July Gossamer Blue kits.  There's something about sitting down with the kits each month and just embellishing journaling cards.  Like I've said before, it's a great way to give journaling cards your own handmade style + if you have some journaling cards sitting there that are like Baby & always get stuck in the corner...it's time to give them a makeover.  "Cuz nobody puts Baby in the corner".  And now I want to watch Dirty Dancing...again.  "I carried a watermelon".  Okay, I'll stop. 

Okay, here's some 4 x 6 inserts that I just love.  The fun part about all of the Simple Stories products is that they already have a handmade flair to them.  When you look at their finished products, sometimes you can't tell if a layer is printed or actually separate layers.  I love that.  
So then when you add more of your own embellishments, it's super fantastic.  Super fantastic?  The girls and I just made iced coffees and mine must be super strong for me to be this spastic.  :) Anyway, this is probably my favorite piece I made all month.  The postcard is so cute and when topped with the puffy geotag sticker, the camera brad and the cork arrow...what could be better.  
I'm always a sucker for pretty florals so this 4 x 6 insert was fun also.  So who got a Gossamer Blue July Color Kit? This was an awesome kit because it has all kinds of chalkboard surfaces and chipboard pieces + a white Signo Uniball pen and a white chalk pencil.  Hello?  You'll see that I used these products a lot on my projects this month. On this insert I used the gel pen to make white dots and to draw a circle on the round chalkboard sticker.  
Here are my 3 x 4 journaling cards.  Fun little topper strips, handcut flags, more of the chalkboard pieces with the gel pen outlines.....and stitching on all of them. 
These were already made pieces but I added some ink splatters, enamel dots and some dots using the white gel pen.  
And look at what I have still have leftover.  I put all of these goodies into a big Project Life plastic envelope and will use them on upcoming spreads.  Kind of like a mini kit to use throughout the month. 
So many little tidbits ready to be plopped on some inserts.  
Lots of the chalkboard stickers were embellished with the gel pen and little phrase stickers.  
Some outlining and doodles on the chalkboard stickers.  I think I need to sharpen that chalk pencil and write some words on them now.  
Okay, that's it for today.  Jordan is convinced that she's making a pie today from our Amish cookbook. This definitely needs to be monitored so I better head up to the kitchen.  Thanks for stopping by and may I highly suggest you grab an iced coffee today!!  

July 15, 2013

Project Life 2013.....Week 17 using arrow grid labels & manila tags

Back to the work week, folks.  As I've been working hard to catch up a bit on my Project Life pages, I've neglected to blog my weeks lately.  So today I'm sharing Week 17 of 2013.  It was April...a time for Spring to come which we saw glimpses of but also more snow and freezing temperatures.  It was also Prom week which added for some fun photos.  

I'll try to keep the chit chat short as I have lots of weeks to share soon.  Here's the 2 page spread.  
The left page where I used a photo from nature as the main, dated week insert.  
The right page which includes lots of photos from Prom night.
Here I used my date stamp to stamp the week's time frame right onto my photo.  I also used a Small Manila Parcel Tag to note the week. 
I also had some fun this week with my Grid Paper Arrow Labels.  I run them through my vintage typewriter for the journaling then stick them right onto my photos.  I used a white thick pen to outline the arrows. So fun to use when there are blank spaces on the photos.  
I used the same idea on this photo, adding a chipboard #4 and a staple.  
Here I used some glittery foam letter stickers with the white pen again.  I've been adding a simple date stamp right to photos lately, using an archival black ink pad. 
Another Small Manila Parcel Tag with a punched Martha Stewart circle, stamping, typing and red stitching.  
I really got on a roll with the white pen.  Here I used it on my weather photo pointing from a question mark.  On the right I printed a mini Instagram of the current weather map with more SNOW!
For these 2 inserts I made use of some journaling cards that I altered previously.  On the right I used half of a Grid Paper Label for typed journaling. 
More altered journaling cards here with typed journaling.  Love this photo of Jordan with her 2 crazy friends.  They didn't get invited to Prom this year so they made a night of it at the local dollar store and Walmart.  Coconut bras made for great entertainment.  
Another journaling card with a little stamping added.  A photo of my nephew, another red head, on the right.  
I'll be back soon to post more Project Life pages, some more of my handmade journaling cards made from the July Gossamer Blue kits + I'm gearing up to share lots of new content starting in August when Gossamer debuts their brand new Life Pages kits.   I might gather up some sneak peeks of the August Gossamer Blue kits too.  Sneaks start today.  :)

July 10, 2013

July Gossamer Blue...handmade journaling cards from Main Kit only

Hey everyone, these journaling cards are up on the Gossamer Blue blog today so I thought I would share them here too.  My method for creating handmade journaling cards for my Project Life pages is to take journaling cards that I have in my stash and then fancy them up a bit.  All of these cards were embellished with papers & such from the Gossamer Blue Main Kit.  
I have learned to keep the cards very simple,  leaving lots of room for my typewriter journaling, small Instagram photos and other embellishments that will be added later.  
I loved these Elle's Studio Saltwater Frames.  I backed them with a regular journaling card adding vellum pockets and sequins to a few.  These will be perfect to just plop a mini Instagram on and slip int a pocket.
I stitched around them to give them a nice finished look. These would be great on a card front too.  I'm going to have to set a few aside and try that out for a birthday card or something.
Two of my faves, the one with the vellum pocket and tag and the one with a window with sequins behind it.  I could totally see the sequin card being used for a birthday theme with maybe a flair button on top or a fun dimensional sticker.
I've got more handmade journaling cards to show you still this month so come back soon.  Enjoy!

July 8, 2013

July Gossamer Blue.....cards using hand cut vellum banners

Today I'm back to share some pretty cards I made using the July Main Kit from Gossamer Blue.  These product selections were my favorites from the Main Kit by far.  I love the floral paper combined with the text and polka dot papers.  
The fun embellishments made it so easy to make little collage areas.  I also loved the combo of the chipboard cork letters with the sticker letters.  
Another favorite piece from the Main Kit was the 12 x 12 sheet of chevron vellum.  I cut it apart like crazy to make little notched banner flags to add to my cards.  I simply stitched them on here and there.
You can see the vellum banners more here....
Here's a second set of cards using more of the same supplies.
The puffy geotag sticker pack got put to good use this month.  I think I used almost all of those little gems.
Here I added a little watercoloring to the background paper for fun, just under the vellum banners.
That's it for today.  Hope you enjoy.  

Note:  my Sweet Summertime Class starts today and there's still time to sign up for class until July 10th.    We're starting to assemble the main banner today and the gallery and forums are now open.  You can sign up for class right here.  

Have a good week, everyone.  

July 5, 2013

July Gossamer Blue....Summer notebook

Hey everyone, I'm back today after our big July 4th celebration.  While the kids are out picking up fireworks leftovers I thought I would sneak away to share a project.  Today I have a notebook to share that uses lots of items from the July Gossamer Blue kits.  The mason jar journaling card from Simple Stories was one of my favorite pieces this month.  I held it back and saved it for a fun notebook that I can use all Summer long.  
I embellished the top of the notebook with all kinds of fun tidbits from the kits.  Love those little resin flowers from Skipping 5 that are in the July Bits & Pieces Kit.  
I added lots of little bits and pieces to the journaling card including machine stitching, cork circle, enamel dots and the really fun puffy stickers from Skipping 5.  Those were definitely a favorite embellishment from the kits this month.  The geotag is from the July Main Kit and the ampersand is from the July Add-on Kit #2
I loved this fun little discovery of trimming down a die cut piece to fit the plastic flap on the notebook which I found at Target a while back.  
One more item I wanted to highlight from the July Gossamer Blue July Bits & Pieces Kit this month is the fun Elle's Studio stamp set.  It's perfect for Summer pages and I'm especially excited to keep it out on my desk so that I can add images to my Summer Project Life pages.  


Hope you enjoyed my project today & thank you to everyone for the nice comments on my Hero Arts blog hop project.  Now that the 4th is over, which included a big party and Josey's birthday celebration, I'm looking forward to tackling some of our Summer Bucket List items & planning our vacation to Colorado.  I'll be back all month long to share more Gossamer Blue July projects.  If you do Project Life, I have posts you'll especially love.  

Note:  If you signed up for my Sweet Summertime class you will be receiving a welcome email today.  From there you'll get all the information you need to log into the classroom and Flicker gallery.  My first post will be up on the 8th of July.  You can read all about the Sweet Summertime class here and registration is still open until July 10th.  You can sign up for class at this link.  

July 3, 2013

Stamp Your Story Blog Hop with Hero Arts...

Hi everyone, today I'm blog hopping with Hero Arts as they share creations using the Stamp Your Story line of stamps.  You can find the Stamp Your Story line of products in the Hero Arts Online Store or at  your favorite local shop.

For my cards today I'm using the Not Perfect stamp set, the Texture and Shape stamp set and the Brush Strokes stamp set.  I created  some very simple thank you notes for Josey to use after her birthday on the 4th.  The patterned paper is from October Afternoon's Travel Girl line and the thank you stamp is from Avery Elle.  The white sequins are from my Neutral Sequin Collection.
I love the artistic flair the Stamp Your Story line of stamps has and it was fun combining the different brush stroke stamps.  
To add a whimsical touch to the thank you notes, I slipped the finished cards into Vellum Envelopes.  The cards take on a soft, muted look but still show through the envelopes.  I also stamped on the outside of the envelopes with some of the same stamps used on the card fronts.  I added star Washi tape to the bottoms of the envelopes.  
For address labels, I used some sticky backed label paper and drew an outline with a red pen.  Next I stamped a fun sentiment on the label.  Here Josey can write the addresses.  You can see that with just the right placement that the label will cover up the thank you sentiment so that when the recipient opens the card it will be a surprise.  
I hope you enjoy my cards today.  I still think it's very important for kids to write thank you notes and to know how to address an envelope.  I'm still surprised when kids don't even know where the stamp goes on a card.  If you'd like to follow along on the Hero Arts blog hop, you'll be clicking over to Lisa Spangler next.  You can also click on the Hero Arts link at the top of my blog post for all the participants.  There will also be a prize drawing randomly drawn from all of the blog hop participants blog posts today......so be sure to enter by leaving a comment at the end of this post.  Winner will be announced on the Hero Arts blog soon. Thank you to Hero Arts for inviting me to blog today!  
Related Posts with Thumbnails