January 13, 2013

Valentines from shop items...

With Christmas behind me now, I always look forward to working on some new projects like Valentine  goodies.  This week I re-opened my shop after a holiday break and there are some fun items to help with creating Valentine cards and packaging.  I thought I'd share a few of the creations I made with the items today.  And thank you for all the nice comments left about my Project Life + One Little Word posts.  I love the feedback you guys give & hearing your own little stories as well.  :)

First up today I have some peeks at some items from the shop.  The Heart Confetti Packaging Kit is very simple in nature but when you add your own patterned papers, stamping or embellishments your project will come to life.
 Glittery Gold Clothespins will add the perfect sparkle to a project.  Use them as closures for Valentine treat sacks or to clip a special message or fun tag to a card.  I like to keep a stash of these with my Project Life supplies to clip together snippets of patterned paper or journaling cards.
 Here I have a gift sack and a card using the Heart Confetti Packaging Kit + the Glittery Gold Clothespins.  I used patterned papers from Crate Paper and some grid circles that I typed a sentiment on.
This year I'm experimenting with being a little more hands on with my projects.  For this card I just sat down with a little pile of supplies and used my scissors to hand cut some papers....I layered a lot of little scraps I had laying around....I used simple graph paper for a sentiment.  A fun little trick I've been adding to my projects is to use one large staple from a regular stapler then a small staple from my tiny attacher.  Stapling is so much easier than using adhesive.  I stapled 6 layers together on this card before using just one swipe of adhesive to adhere the layered piece to my card.
 I used a Medium Glassine Sack to create a fun place to tuck in a simple index card on the front of the card.  I could easily attach a gift card or write a special message.
 On the Valentine gift sack, I used the brown paper sack, a small glassine sack, both the snow and the sequins and the baker's twine from the Heart Confetti Packaging Kit.  I love creating these fun confetti pockets to add to packaging.  I'll probably slip in some stamped cards for the recipient.
Next up there is the Just a Note Tag Kit.  Very simple in design but you can add the stamped grid vellum pieces and tags to any project like cards, notebooks, gift sacks, or Project Life journaling cards.
 Here I used the tags and stamped circles for some Valentine tags.  The medium glassine sacks are the perfect size for tucking in a wrapped treat or candy bar for Valentine's Day.  I used plain Small Clothespins and Valentine Confetti (now sold out) to fill some small, clear bags.  The patterned paper is from My Mind's Eye.
 If you like the look of adding a confetti sack to projects, the Sack Assortment for Confetti is handy.  The small, medium and large glassine sacks are also sold separately in the shop.  If I'm going for a bold look I like to use the clear sacks...if I want a more subtle look I like to use the glassine sacks.
The Vintage Valentine Kit is what you'll find me working with today. My poor little niece broke her arm last week so I think a little care package would be just the ticket for her.  The vintage floral enclosure cards with the wheelbarrow images were an extra special find one year.  I'm happy to finally be digging those out of my vintage stash. 
Cards as gifts.....finally for today, if you're like me you used up a bunch of cards from your stash for Christmas gifts.  I think I gave away nearly 60 cards so I definitely need to build up a new supply.  What I typically do is find a box and make chipboard dividers with the names of people I give cards to.  Our moms always get a stash of cards for their birthday + Christmas then I also add Eric's grandma and my sister + some teachers, etc to the card list.  That's a lot of cards to create throughout the year.  No way do I want to try to create these cards all at one sitting.  I like to create as a I go and just hold some back for their stash.  

If you'd like to follow along with my plan for building up a card stash, I have two card kits in the shop that would help you get a jump start.  The Mixed Greetings Card Kit and the Happy Day Card Kit are both on sale at this time.  

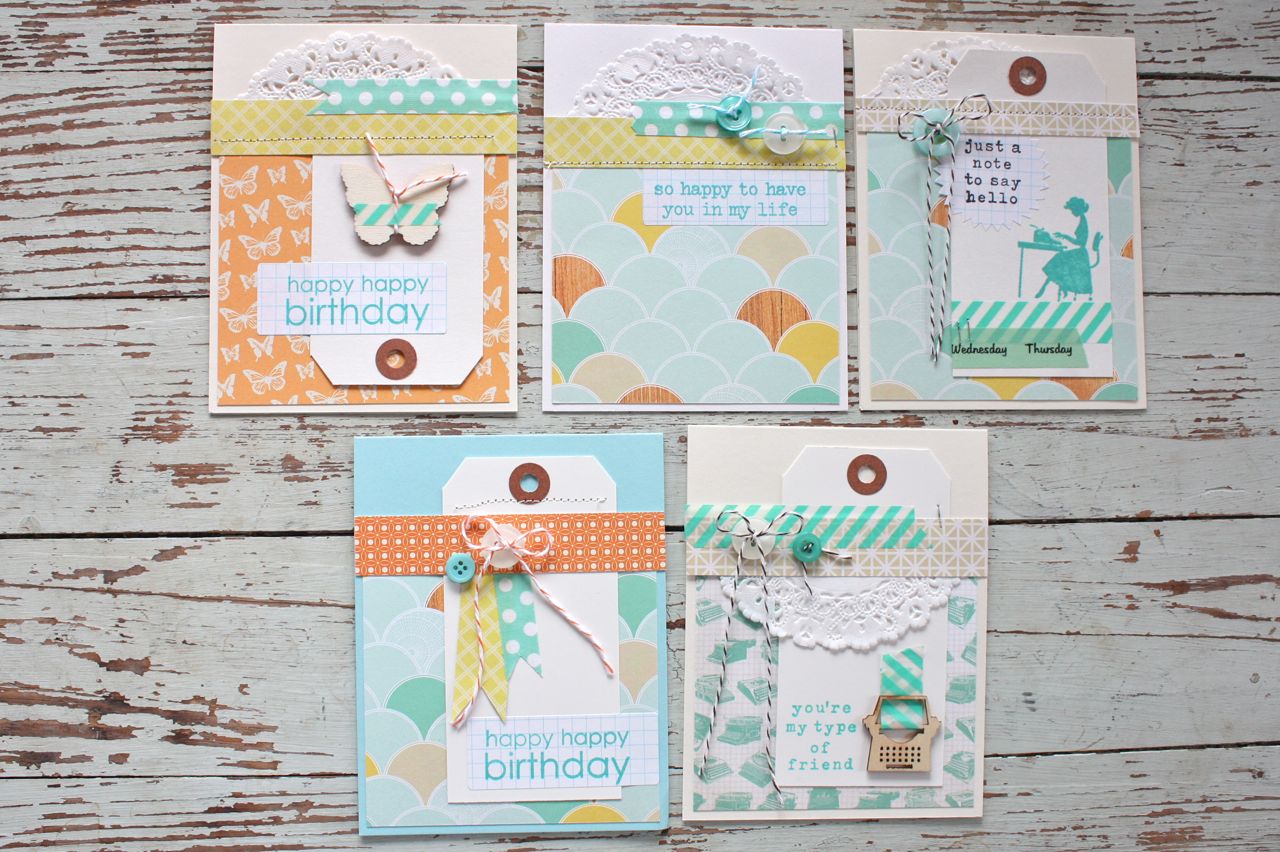
These samples are from the Mixed Greeting Card Kit.  You get all the pre-cut supplies to assemble 5 cards very quickly.  Simply add your own sentiments using a stamp or run them through a typewriter.  
 The samples that follow are made using the Happy Day Card Kit.  You get enough pre-cut papers and products to create 4 quick cards + you get a full 6 x 6 paper pad to create even more creations.
 A very quick and easy way to add sentiments to cards is to stamp them on my Grid Paper Labels.  You  get a sheet with the above card kit and you can also purchase them separately in the shop.  I also have Notebook Paper Labels and Starburst Grid Paper Labels.  I'm all about making things simple and easy this year and the labels are such a great go-to item.  They take ink well and they are very fun to run through a typewriter.  Be on the lookout for other grid label shapes coming to the shop.  Below are more samples of cards I made when I needed some quick and easy cards to add to my card giving stash.
 The simple Dainty Doilies are still a favorite to add to cards and projects.  I like to cut them in half usually and get double duty from them.  All of the basic tags in the shop are a staple item for me when it comes to crafting.  I use them on cards, for tags, notes to teachers, lists, Project Life inserts,etc.  At this time I carry pink, manila, white and grey tags in assorted sizes.  They are great to layer with strips of patterned paper and Washi tape plus they fit into the small sacks for journaling pockets, etc.  You can see the full line of tags and all of the other shop items at the main link here.
Thanks so much for stopping by today.  I can't tell you how much I enjoy sharing my creations with you.  Your wonderful comments and links to your own projects and fun ideas just make my day.  Here's to great, crafty year....I hope you're off to good start.  Let me know what you're up to in the comments section.

Coming soon.....I'm working on sorting and putting away all the holiday products in my work room.  After that I'm going to snap a few photos to show you of how I'm storing all my crafting supplies this year.  It won't be anything magazine worthy but who cares, right?  I'm looking to re-purpose some fun junkin' finds and just make my space functional.  I've also got a ton of 2012 Project Life pages to show you, including my finished Project December pages.  

Have a great day everyone!!

January 11, 2013

One Little Word 2013....

I decided to choose One Little Word for 2013. My word is find.  I was looking for something to add to my blog and I decided that choosing a word for the year might pose some interesting conversations.  I was looking up a few words and came across the word find for a synonym for another word I was looking at.  The brainstorming began and I found myself with lots of inspiration.

One Little Word is a concept by Ali Edwards.  You can more information at Ali's blog here.
A few of the intriguing points that caught my eye about my word are some of these definitions/phrases.....to come upon by chance, to discover, to feel or perceive, to become aware, bargain, gem, good buy, treasure, happen upon, light upon, locate, notice, run across, spot, stumble upon, uncover, acquire, believe, deduce, get the idea, suppose, think, propose, and uncover.

I also made a few starter phrases that I could be fun to tinker around with this year.....finding out, I find this to be true, find a way, find yourself, finding the perfect, finding your style, finding out this or that, finding time for, the perfect find, and you'll find me here.   I'm hoping to really get into the stories that go along with my Project Life and I think that my One Little Word might trigger a few ideas.  I hope you'll join me as we might just find out a few new things this year.

I thought perhaps some Friday finds might be fun so I'll be adding some fun links for you from time to time.  A good way to pass the time while waiting for the weekend.....

a slow cooker recipe...
I found this one from The Crockin' Girls called Mandy's Big Mess and it is a repeated favorite.  It also freezes very well, just dump all the ingredients into a freezer zip lock bag.  I use smoked turkey sausage, leave out the jalapeno sometimes and usually double the recipe so that I can send leftovers over to my folks.  Also the Slow Cookin' Companion cookbook by The Crockin' Girls is a great resource.  I gave a copy to my mother in law for Christmas and she loves it too.  I'd look on Amazon for a better deal perhaps.

an inspiring new friend....
I've recently had a few chats with Naomi Atkins.  She is delightful to share fun stuff with like paper crafting, photography and junkin' finds.  I think we could do a mean road trip together.  Have you seen her scrapbook layouts?  Naomi is a photographer and takes the most dreamy, vintage and well posed photos using lots of junkin' props.  Then she takes them, blows them up wayyy big and creates the most fantastical scrapbook layouts.  Her designs and color/paper choices are so wonderful.  Always a good time to take a break when I see a new layout from Naomi.  And a new friend to chat with....always welcome in my book.

a pretty little place....
I'm craving the fresh greens of Spring.  Let's go here.  I'll bring the stumpy chairs.

a little artsy love...
Really wanting to get out my paints & art supplies this year and just see what happens.  This is awesome.

a cool blog and magazine....
FOLK magazine and blog..a fresh approach to simple, authentic living.  Telling real stories of American life.  Great photographs, articles from lots of contributors and a nice little place to visit. Subscriptions are just $10 bucks right now.

a few new finds in my shop....
I just updated the shop this morning with some new Valentine themed products.  You can find them here.  You can see new sample projects along with the items listed.  I'll have those up on the blog this weekend for a better view.  Here's a little sampling for today...
Thanks for joining me today.  You'll find me working on my first week of Project Life 2013 for the rest of the morning and then I'll be at the basketball games tonight.  Tomorrow you'll find me at a rodeo.  Yup,  the hubby donated some equipment use to the rodeo people and he got free tickets in return.  I said I wanted more road trips this year....so here we go.  ;)

January 3, 2013

Finding your own style + creating your own product kits...

I've been wanting to share a post of this nature for a while now and a fresh, new year is the perfect time.  When I knew my one year term with Becky's Project Life Creative Team was ending, I was left thinking what now, who will I identify with in terms of my Project Life?  Then it dawned on me that this is the perfect time to just be me.  Although I'll be using some Project Life kit products from various companies this year, I'm really looking forward to having my own creative style shine through in my albums + my cards & packaging and other crafty ventures.

With those thoughts, I want to do two things to start off this new crafty year:

1.  First I want to find out what my style really is, or do I even have a style? It's sometimes so hard to look at our own creations and nail down a certain style or type of design or category that we think we should fit into.  

2.  Secondly I want to make sure that my Project Life pages and other creations reflect my style.  I want my creations to represent the things I like, the colors & patterns & products I love, my artistic/design style.....the way I roll.  I want to make sure that my creations aren't dictated too much by kit items or a certain type of product.  

So first off I set out to find my style.  Hang with me because this is where lots of photos come into play.  I went through my photo galleries and Pinterest boards and picked out my favorite photos.  
Mish Mash
 It was amazing how you can get your style to shine through if you do this little exercise.
Mish Mash
 I started off with inserts from my Project Life pages.
Mish Mash
 The same colors kept popping up...aquas/robin's egg blue, peaches, pinks, greens, chartreuse, yellows, oranges.  Every color of the rainbow showed up.  But I noticed they were all in muted, toned down colors.
Mish Mash
 I noticed that I like to use nature as inspiration like flowers, butterflies, birds and natural fabrics and linens.  I found that I like to add handmade touches that give a homespun or maybe a country feel.
Mish Mash
 I found that I like to use lots of layers and machine stitching. And that I love pattern.
Mish Mash
 I found that my style really is a mish mash of this and that.
Mish Mash
 I then picked out some favorite greeting cards that I created last year.  The same was true as above.  I love to mix and match colors and patterns.
Mish Mash
 There were lots of layers.
Mish Mash
There is lots of little details scattered here and there.
Mish Mash
Nature and floral prints were a favorite.  
Mish Mash
A mixture of rainbow-y colors are all splashed together onto paper.
Mish Mash
And lots of vintage items and papers like phone book paper, ledger paper, and old grid papers find their way onto my projects.
Mish Mash
I found the same rang true when I looked at photos of items I gathered together for kit items for my shop.  Lots of softer colors + neutrals were used.  
Mish Mash
I used the same style on gift and packaging type items like tags and bookmarks.  Lots of colors that maybe wouldn't be normally grouped together but I threw them all into the mix.
Mish Mash
Keeping with the layers and little details.
Mish Mash
Soft whites and neutral Krafts were used to keep the patterns and colors from becoming too busy.
Mish Mash
More florals and some bolder patterns + layers.
Mish Mash
Some favorite photos were selected for this mini album I need to finish.  Lots of vintage items and small details.  
Mish Mash
Then I moved on to my Pinterest boards.  Checking out what you pin is a great way to discover what you like and what your style may be.  The same colors and floral designs kept popping up.  
Vintage items, lots of color and muted tones. 
 Bits of handmade items showing through.
A mixy matchy style of combining patterns and colors.  
Pinterest Link
Mixing a rainbow of patterns and colors together just to see what I come up with.
Pinterest Link
Loving the handmade touches and the attention to the little details on so many projects I pinned.
Pinterest Link
Loving the handmade embellishments versus using all packaged items.  
Pinterest Link
Putting it all together in a fun way.
Pinterest Link
The neutrals always pop up, especially natural linen colors, tans, browns, greys and all colors of whites and creams.
Lately fine linens have become inspiration for color schemes and textures.
Pinterest Link
Household items that are more neutral in nature are also very inspiring to me lately.  These beautiful ironstone pieces have such a variety of whites and creams.
Pinterest Link
Taking the time to sort through lots of photos was so helpful in pinpointing my style.....I'm not sure my style has a name and it certainly isn't for everyone....but now I have an actual view in front of me of what I like and what appeals to me.  

So now this brings me to part two of my post today....making sure that my style shines through on my projects.  To do this I'm creating my own product kits and am building a stash of items that really represent my style.  I'm planning to mix and match these handpicked items in with other kit items.  I'll use these products on not only my Project Life but for greeting cards and packaging too.  I want to be surrounded by products that I really love.  This means I'll be doing a lot of purging this year of products that are great but maybe don't fit my style anymore.  

I'm not sure if I'll do a monthly kit or perhaps keep a small crate full of items nearby my work table that I just keep adding to.  I'm  thinking I will allow myself a monthly budget to purchase a few new items here and there.  I thought it would be fun to share some of those product picks here on the blog so that perhaps you can be inspired to create your own kits too.  

To keep ideas flowing of products I want to add to my own kits, I created a private Pinterest board.  There, I pin products that I like as I see them in online stores or on blogs.  When it's time for me to place a fun order, I'll just open up that Pinterest board and add a few of those items to my online shopping carts.  My goal is to use my stash then add just a few items here and there and keep my kit full of a rainbow of colors, patterns and accents. I'm not looking to purchase full lines of any products but rather collect a mixture of this and that.  This way my products all mix and match.  Any scraps that I collect are going into a tray where I'm planning to create fun thank you tags for my shop customers.  

I'm very excited to have taken the time to check out my style and I'm really looking forward to creating my own creative kits this year.  I hope I've sparked a few ideas for you as well.  Stay tuned as I'm working on some product organization posts + I'll be sharing my new ideas for my Project Life process this year too.  :)

January 1, 2013

Project Life 2012...Week 39 + What I like for PL 2013

Happy New Year everyone! Today I awoke with 5 teenage girls sawing logs & scattered about our basement.  Some of them stayed up to nearly 4am and I think they just dropped and fell asleep at some point.  I stumbled into a disaster of a kitchen with 5 gooey crock pots, cups everywhere and lots of dishes.  I spent an hour cleaning that up just so that we could fix a triple batch of pancakes, sausage and juice for the little sleeping beauties when they awoke.  Then it was clean up time again in the kitchen & off to basketball practice.  They'll all be back here this afternoon to gather up their things and then I'm kicking them all out.  Ha!  Josey made sure to clean up everywhere else so I'm looking forward to an evening snuggled in by the fire.  Life is so good.  I'm looking forward to another year of good times with my little family.

My online shop has re-opened today and I'll be adding in new items very soon.  Until then I'm sharing more of my 2012 Project Life spreads.  Today it's Week 39, a favorite of mine for many reasons. There's many things in this spread that I want to continue for 2013.   

First I love the colors I used this week.  My photos were fairly neutral so I just chose papers and embellishments in my favorite colors of robin's egg blue, a yellowish Chartreuse and a few bits of orange.  
Secondly, I love that this week's spread stayed pretty flat but still had some embellished touches.  My goal is to keep my Project Life 2013 to only 2 albums, which includes ALL of my scrapbooking.  To do this I'm going to have to be conscious of of bulky, dimensional embellishments and the number of inserts I add to my albums.
Third, I like that I used what I wanted this week as far as product picks.  I particularly remember taking time to select a few favorite patterned papers, tags and just a few embellishments for this week's spread.   I was Project Life-ing just for me.  No assignments, no specific products that I had to use....I just sifted through my stash of products, looking for just the right creative touches.  I'm looking forward to a lot more of this in 2013 and will be posting some new ideas on getting creative with PL pages. 
Lastly, I like how clean, fairly simple and straight lined my spread looks this week with the full intention of keeping the focus on the photos.  I like to try to keep my photos as large as I can if space allows, keeping the full 4 x 6 and 3 x 4 sizes if possible.  I always want to keep this goal in mind of keeping the photos as the focus of my albums.  I want my family to remember the events, not that I crammed as much product onto my pages as I could.  They don't really care about all the products, I really feel that that part of the creative process is just for me.  

The photo below starts my 4 x 6 inserts.  Love this one which uses some favorite patterned paper, a pre-cut embellishment and a doily from my shop.  I typed the Week 39 using my typewriter and added some stitching.  I'll be changing this insert up a bit for 2013 and will post more on that soon. 
More patterned paper from this beautiful My Mind's Eye collection, typewriter journaling + a photo created with the Diptic phone app.
Moving on to the 3 x 4 slots, I have a Week in Review card + a 3 x 4 photo of Jordy & Charlie.  I've loved having this Week in Review card but it gets a little tedious to create at times.  Plus I feel that I might need that 3 x 4 slot more in 2013 to prevent extra inserts which could lead to a 3rd album.  So I've got plans for the Week in Review.  I'll try it out on my first Project Life spread for 2013 and show you my ideas.
Here I used a strip from the bottom of a piece of MME patterned paper for a journaling card topper.  I really love the look of the white grid cards from Becky's Project Life + adding my own embellishments to create my own 3 x 4 journaling cards.  I'll be trying out a few different kits for PL 2013 but I want to make sure that my album doesn't get taken over by kit products.  Since my Project Life pages are the bulk of my scrapbooking, I want them to reflect my own style.  I'll be sharing a new idea on this as well in an upcoming post.  I think this idea could be one of the things I'm most looking forward to for my 2013 crafting.
Maybe 2 of my favorite 3 x 4 cards for 2012.  On the left I used some packaging from some My Mind's Eye product.  Their packaging is really pretty and totally recycle worthy. I added typed some journaling on some MME patterned paper, adhered it to the back side of the square opening and then stitched on the card.  Date stamps, what can I say?  Love them and they'll be making a come back in 2013.  On the right I created my own pocket card using patterned paper and a stiff vellum.  I love using my manila parcel tags for pocket inserts.  Just trim them down and they nestle right in.  Some washi tape, a sticker and a wood veneer asterisk finish off this pocket.
Another typed journaling card + a photo of my goofball Jordan.  One thing I'm going to keep up for PL 2013 is adding in the "real stuff".....if my dog swam in poop or my daughter poses with balloons as boobs, that's my life.  I'm keepin' it real. So if I offend anyone with a little family tackiness...well it won't be the first time. ;)  Real life is what Project Life is all about.
This week also had a few inserts.  It was Jordan's 14th birthday and those special occasions usually mean more photos that are certainly deserving of an insert page.  Below you can see the smaller 5 x 7 horizontal insert + a full 12 x 12 insert.  I like to keep my inserts smaller than 12 x 12 but this one slipped it's way in.
 A simple 5 x 7 photo of Jordan and her three best friends.  I kept it simple because that's all that was necessary.  Four best friends, no makeup, mis-matched Sunday afternoon clothes and none of them probably brushed their teeth.  And all of them are beautiful in their own way. Who could ask for more?  My eyes are getting all moist at the message this photo conveys.....true friendship, no strings attached.  Oh, the power of scrapbooking.  
The back side of the above 5 x 7 insert features a mini layout with journaling that goes with the insert below this photo.  Jordan and her friends love to take the buggy (Gator) down this old lane with antique cars.  They found a what must have been a dumping spot because they find treasures each time they go there.  They have designated a spot in my old locker bin for a new treasure each visit.  On this day, they found the motherload.  I snapped a photo and them told them to pick a few items cuz not all of this crap treasures was coming back to my lockers.  

What I love about this small 5 x 7 insert is that it packs a punch.  It floats my boat.  It rings my bell as far as creativity goes.  I was able to create a mini layout using a photo, some journaling and some creative accents like the stitched patterned paper, the washi tape and sticker arrows & stamps.  I've found that I don't need to create a 12 x 12 collaged layout with one photo to fulfill my scrapbooking desires. I can do it all within my Project Life pages and that's like icing on the cake for me.  Wrap it up, I'll take it!~
The insert below has all the photos from Jordan's birthday celebration with her friends + their little adventure.  I like just dropping the photos into page protectors sometimes.  Sometimes photos are worth a thousand words.  Why mess with that?
And the back side of the above insert has photos from Homecoming week.  The big parade in our small town is pretty exciting stuff.  Plus Charlie got to ride on Jordan's Freshman float & he got to dress up as a buffalo.  A big BBQ in the park always follows and this is the first time I've captured that photo of all the kids.  Capturing hometown traditions is good.
And with that, the girls are back basketball practice.  Gonna go give all the girls a hug and a Happy New Year wish before I shove them out the front door before they want more food.

Thanks for visiting today.  I'm looking forward to sharing more of my Project Life with you in 2013.  More of the good stuff about scrapbooking....not just my layouts....but the guts of why we scrapbook and finding ways to make it more fun and interesting.  Ways to really capture life in between the pages. Ways of keeping it real. I hope you'll join me!

Hey, what about One Little Word?  I've found my word.  Not sure what I'm gonna do with it but it might just find it's way into my blog posts this year.  What about you, do you have One Little Word?
Related Posts with Thumbnails