November 9, 2012

Project Life 2012, Week 34 + my Project December plan

Yesterday I shared my product picks that I'll be using for my Project December pages....Project Life combined with Daily December.  Today I'm sharing Week 34 of my Project Life album so that I can give you visuals of what my plan of attack is for my Project December pages. 

Some thoughts first.....
I pondered long and hard about how I wanted to approach doing a Daily December this year.  Last year I kept my Project Life pages and my Daily December album separate.  I ended up getting confused as to what photos to include in Project Life and what to include in the December Daily album.  There was overlap of photos and stories.  It was time consuming trying to figure it all out.  I got frustrated and still haven't finished the last 2 weeks of Project Life 2012 and my DD album is about half finished.  When I look at my PL album, there seems to be lots of gaps for the month of December.  It looks like we didn't celebrate much for the holidays.  That got me to thinking...what if no one ever knew I did a DD album for last year?  My PL album wouldn't have the stories or the photos.  

Fast forward....
So moving on to this December, I have made the decision to combine my Project Life with a December Daily.  I'm calling it my Project December.  I will continue to complete my December PL pages as I've done all year long.  For my DD portion, I'm going to be adding inserts right in between my PL pages.  I'm not going to worry about what photos and stories go where but my basic plan is to have the every day happenings go in the PL 12 x 12 protectors and the holiday happenings go into inserts that are any smaller than 12 x 12.  I'll be using Project Life page protectors and some others from my stash.  

Some visuals...
Let me walk you through my Week 34 of Project Life to show you some visuals of how my Project December might look this year.  This was back to school week, Jordan got her braces off and it finally rained after a long drought.  I had 3 inserts in addition to my regular PL pages.  There are lots of photos so I won't go into detail about the happenings of Week 34...but there's lots of good stuff if you'd like to study the photos on your own.  Here goes...lots of photos so hope you stick with me. 

This is the 2 page regular Project Life week.  This is how I still plan to handle December's PL.  I will have an insert that denotes what week it is in the upper left hand corner. 
The rest of my inserts will continue to be a mix of 4 x 6 photos, 3 x 4 photos and journaling card inserts.  I also plan to have a Week in Review insert for each week.
I am planning on using a color scheme that is definitely holiday-ish for the entire month of December.  I am adding aqua and yellow and wood grain to a traditional red and green theme.  I debated on this for the events that won't be holiday related but here's my final thought.....you decorate your house with holiday items for the entire month of December even though it's not Christmas every day.  So why not let my entire month of my Project Life album look festive too?  You'll see in my upcoming posts that even though I'm using holiday colors, my album will still look fairly neutral at times.
The weekly inserts will continue as this is a fun way for me to get all scrappy.
I've also been experimenting with the Phonto app on my iPhone.  When I have a few minutes here and there I've been adding journaling right to my photos.  I save them to my photo album on my iPhone and my journaling is done.  I'm definitely going to continue this idea + it's fun to add chipboard letters or stickers along with the photo journaling.
Some 4 x6 inserts with smaller and multiple photos.  A great way to get scrappy and use up those fun holiday products.
For those moments when I take a bunch of photos, I'll be using the Diptic photo app on my iPhone to make collages.
I've been converting a lot of photos to black and white.  These photos of the girls were somewhat blurry and the night time lighting was awful but you can't tell as much when they're converted to black and white.  I like the contrast to all the colors, especially with a mix of holiday colors coming up in December.
More Phonto journaling on a photo + stamping + Washi + stitched on accents.  This December I am planning on using red thread for most of my stitching.
Here I combined the Phonto journaling on the photo with a wood veneer arrow.  Just a little pre-planning and you can have some really creative inserts.  I'll also be giving the typewriter a work out.  I love that I can fit a lot of stories in by typing vs. using my somewhat large and loopy handwriting all the time.
The Week in Review inserts.  I'll be making these in advance so all I have to do is type or write in the events.
Some 3 x 4 slots will have photos, some will have journaling cards.  I'll be using lots of labels from my shop for typing journaling + shop items like my manila tags that are so easy to run through my typewriter. And date stamps.  There are so many that have fun sentiments along with the dates.  I love them.
Here I had an extra 4 x 6 photo that I just didn't want to crop down.  So I used (2) 3 x 4 slots and just trimmed my photo in half.  I used the Photo app on this photo too.
Fun graphic inserts where I perhaps didn't have a photo or particular story to tell.  This is a great space to just up more of your fun holiday supplies. I think I might need more chipboard alphabets.  Making a note to self.
Okay that was it for the main PL spread.  Moving on to the smaller inserts, here's what the 3 look like between the PL pages.  For me, it's very important that the 12 x 12 main spread be visible.  So all of my inserts will be smaller than 12 x 12.  Doesn't matter what size...6 x 6, 5 x 7 , 8.5 x 11, 8 x 10.....just smaller than 12 x 12.  I have to say I love my weeks where I have inserts because I know there are lots of good stories in between those pages.  
Here, I turned the first insert over to reveal the next inserts.
And again, I turned the page to reveal the next set of inserts.  Can you see where I'm going with these inserts?  These will be the guts of my December Daily portion of my Project December.  These will hold all those extra holiday moments and stories.  They'll just blend in with my regular PL pages.
Here's the last insert on the left, below.  I'm not really going to worry about if my December Daily portion is actually "daily".  I'm just looking to capture the events of December.  I have lots of numbers for 1-31 for the month of December which I'll be using as accents so if I do take a photo daily I'll use them.
Here's an insert that is a traditional scrapped layout.  I don't do many of these because they are more time consuming, take up a bunch of space in my album and quite frankly, big pages intimate me a little. I prefer to work with card size inserts probably because I've been a card maker for so long. But I do love a good layout once in a while.  This is an 8.5 x 11 page of having 2 high schoolers now.
I like to fill traditional layouts with larger photos like the 5 x  7 size I used on this layout.  Less space to fill up.  Typewriter journaling on textured vellum + lots of fun embellishments.  I'll probably use my favorite photos in December to create a few traditional layouts.  There's just something about a giant photo that I love.
I love the mixy matchy look of chipboard alphas & stickers.  It's kind of a good plan because then it looks like you planned to be all mixy matchy from the get go....especially when you are nearing the end of December and start to run out of specific letters.
Woohoo, a second traditional 8.5 x 11 layout. This week took me forever, I tell ya.  This was another favorite photo that I snapped of Josey in her bed.  So many wonderful details about my teenagers that I wanted to capture.  This would be a great idea for a layout you might do in December of your living room all decorated...you could make notes about each little item, etc.
More chipboard letters, tags from my shop for little typed details, stapled on journaling spots, etc.
This is a Project Life insert of when Jordan got her braces off.  In December this might be for one event or I might have a photo from several days here.  I'm just gonna go with the flow and see what happens.
All of the inserts were photos except one which I got a little scrappy with.
Below shows 2 inserts, side by side.  Again, these might contain just 2 separate stories in December or they might hold photos from several different days and events.
I'll save at least a few inserts to get scrappy and add some journaling.  Here I used papers, embellishments and a tag from my shop.  So easy to keep the tags on hand to run through my typewriter.  For me though, I want to keep the photos front and center. I don't want my album to look like a decorated Christmas tree, drooping with embellishments.  Keeping it simple, friends. But with a little holiday bling here and there.
Here I added 2 scrappy inserts for journaling + an additional photo on each.  I much prefer these smaller inserts than a giant 12 x 12 layout.  I've still captured all the stories.  So glad I took that pressure off of myself that I don't have to do big layouts all the time. Remember, there is no norm to follow.  Do your own thing and be satisfied with it.
This insert looks kind of like a traditional layout....but it's not.  Great compromise, huh?  Just imagine that these photos and embellished inserts will look holiday-ish in a few short weeks.
Neutral papers with graphic designs are a great way to add pattern to your inserts without too much color or themed holiday designs.  Anything with grids or a ledger pattern is A-okay in my book.
My library cards are another great shop item I carry that I'll be using for journaling or stamping.  They're just the right size to run through a typewriter.  Picture that stitching in red for the holidays.  It's going to tie all the little elements together.
And, the end.  I know this post was like reading a book but I wanted to give you the big picture of what's to come.  There are lots of you out there that are wondering what to do with your Project Life and Daily December albums too.  I think I have the perfect solution for me....and perhaps for you too.  Thanks for stopping by and I'd love to know your thoughts or tips or suggestions for what you're doing this year.  And Lisa.....my heart was happy to know that you pulled over in the Starbucks parking lot to read my post.  I've spent a lot of time compiling these posts to share with you all so it's good to know that they are useful.  :)  Speaking of sharing.....I have the super duper fun posts coming up now.  I have journaling card inserts, pocket pages, Week in Review cards, embellished envelopes and more to share all throughout the month.  So come back soon.  

November 8, 2012

Project December 2012...the products

Hey everyone, I've been working hard behind the scenes to get my December Daily and Project Life organized for December 2012.  I'm combining both into my Project Life album this year thus the name Project December.  Project Life + Daily December = Project December.  I'll discuss more of this concept and my reasons for this decision in my next blog post but for today I have all of my holiday product picks to show you.  These products have been selected from my stash and/or purchased specifically for this year's holiday projects.  If you remember my Inspiration Stations, this is kind of like that....all of my holiday product picks in one location.  Let's get to the products (with links provided where I could) + I'll also be showing you my storage ideas for this year.  

First things first.  Let's do some clean up.  I definitely needed to and I bet you're in the same boat.  Swimming in a sea of craftiness up to your eyeballs.  Maybe a 12" spot to work on...if you shove some things to the side.  I was right there with you.  But I knew that my holiday projects would come together easier and it would be so much more enjoyable to work in a tidy space.  It took me days and days to clean, I won't lie.  But now I have 2 full tables cleaned off and ready to go.  For my main table, I covered it with Kraft paper so that I don't have to work about clean up.  Ink stains, adhesive, coffee mug rings....no worries.  
October Afternoon...Make it Merry Collection
My most favorite stash of holiday goodies this year comes from October Afternoon's Make it Merry collection.  It's not in stores quite yet but it will be soon.  I'll be sure to link you up.  In the mean time you can look at the OA website here to get a glimpse at all the patterns.  It's all right up my alley...whimsical, vintage images...fun colors of red & green plus some aqua and yellow thrown in...great embellishments.  Love it all and you'll be seeing it all throughout my projects in December.  Plus, be sure to check my previous posts and the OA blog for lots of Make it Merry Inspiration.
Elle's Studio
Elle's designed some fantastic journaling cards, tags and stamps for this holiday season and I think I got just about all of it.  You can find many of Elle's items at 2Peas right now...and at 25% off!  That's the brand new stuff too! The Exclusive Christmas Stamp is fantastic!
Gossamer Blue
Lori from Gossamer Blue has a stellar line up of December Daily products this year.  All of the items below are pieces from some of the various kits that are mostly sold out now.  The Daily December Tags are still available and I just love the vintage images.  If my husband ever gets a big buck this, not including the one he hit a week ago with his car, I'm totally going to use those deer images.
Ali Edwards for Technique Tuesday
I've already dug into this stash of Story Cards and they are a go to item...for the holiday projects and every day!  You need them.  You can find them at 2Peas here along with some of the stamps I have shown too.  The Story Cards are 25% off for a limited time.  The back sides of the Story Cards are similar designs but with no words so very versatile if you want to stamp in your own sentiments, etc. I've used and really love the December Daily stamp set and the December Joys stamp set.  Great designs this year, Ali.
Studio Calico
The Wonderland collection offers some great holiday designs.  Some of my favorite papers are the B side of Glad Tidings, Toboggan,  and Mistletoe.  I'm also using lots of wood accents this holiday season so the Wood Veneer Snowflakes and Trees are a must have item. I also got a 6 x 6 paper pad, some journaling cards, a sticker sheet and other various papers and such.  The entire line of Wonderland is on sale for 25% off right now at 2Peas right here.  Great sale at 2Peas so act quickly!
Banana Fish Studio
France, owner of Banana Fish Studio, designs the coolest tags, journaling cards, numbers and stamps.  You have to act quickly because like me, she is a one woman act and supplies are limited....and mostly sold out right now.  I just saw a tweet of hers and it looks like some new stamps are coming soon though.  Just let me get mine first then they're all yours.  :)
Mish Mash
That's my little shop.  I've pulled out some of my favorite, basic, go to items and gathered them all in one spot.  Tags of all kinds, clothespins, paper doilies, sacks....it's all being used this year.  Most items in my shop are very neutral in color and design so they work great for not only the holidays but all year long. I've got a few sale items there + the regular basic items.  
I've got other little tidbits of papers and embellishments in my holiday stash but the items mentioned above are the biggest part of my product picks this year.  Below, I snapped a photo to show you how I use my small clothespins to keep all like items clipped together.  I tend to get a little crazy once I get to working on a project but I really like to keep items clipped together for organization as much as possible. 
To jump start the holiday crafty season, I've been doing a little prep work ahead of time.  Not only will all of the supplies above be used for my Project December pages but they'll also be used for handmade cards, tags, gift wrapping and more.  For items that need to be cut apart like the October Afternoon numbers and images sheets, I went ahead and trimmed them all in advance.  You might have seen all the cards I've been creating already with the vintage images on the right side of the photo below.
I also did the same thing with many of the Elle's Studio sheets.  A total time saver to have them all ready to go come show time.
Washi Tape
Oh, the Washi tape.  You didn't think I'd forget about it, did you?  I tried to pair down my picks but this is as low as I could go.  Many are from October Afternoon, Freckled Fawn from 2Peas,  and some from Etsy shops.
Storage Units
So how do you store it all? This is the most fun part for me because I love digging out my vintage boxes, trays, cutlery boxes and tins. No plastic for me please, I'll take something old and worn for my goodies. I've got three main storage units this year that sit on a table next to my 2 big work tables.  This old cutlery drawer holds my doo-dads like the wood veneers in old jello tins, my Washi tape, all the small tags, buttons, twine, etc.  
This wooden cheese box was chosen for it's red and green holiday fonts.  It holds sticker sheets, chipboard letters, and some stamps.  Notice that I labeled each box with a tag that I added some lined paper to with red machine stitching.  That red stitching is going to be the signature look for my holiday projects this year.
Here, my third storage unit is an old sewing machine drawer.  It's perfect for all my patterned papers and paper pads.  A thick piece of cardboard in the very back helps to keep items upright.
And here's the handsome threesome all lined up.  There's a ton of product here...more than I'll ever use this holiday season....but I limited myself to the 3 boxes and just stuffed them full.  I have to say that I've been working behind the scenes a LOT to create some of my Project December inserts and pages + lots of holiday cards and I've been able to keep my products organized.  Each time I'm finished with a certain project, I've been cleaning up.  So the next time I need to work everything is neat and tidy.  It's really like shopping your own stash if you organize it this way.  I highly suggest you find some fun and unique storage pieces for your holiday goodies.  This way it just becomes part of the decor.  Fun!
Scrap Box
You might have noticed in my very first photo that I have this empty old in/out tray on my work table. This is where all the small scraps of patterned paper, doilies, old book paper, etc goes.  I can leave this sitting out to collect little odds and ends without a big mess piling up on my table.  Plus I love to dig through my scraps to find just the right pieces for a project.  Those little tiny pieces make for some great gift tags!
Sewing Machine
My sewing machine gets quite the work out.  I use this Audrey one from Baby Lock.  Red thread is going to be my go to color this holiday season so I have a spool ready to go at all times.  I might want to change up things a bit and use a green, white or cream so those are handy too.  Tip:  use a plain white or cream thread in the bobbin with any color.  It doesn't show, you can have lots of extra bobbins ready to go and it's a good thing.  Nothing worse than having to stop and wind a bobbin.
Typewriter
My vintage typewriter is my best friend in my work room.  I love to use it for tags, typing out journaling cards or pecking out the perfect sentiment on a greeting card.  Look for these at garage sales and thrift stores...or Ebay and Etsy.  I wouldn't pay more than $20 bucks or so for a good working model.
Okay Holy Holly, that was a long post.  Are you still here?  Good.  Cuz I'll be back with my next Project December 2012 installment very soon.  I'll actually be sharing Week 34 of my Project Life album so that I can give you visuals for how I want my Project December 2012 to look.  If you're doing Project Life and want to take on a December Daily this just might be the ticket for you.  I'm excited!  :)

November 7, 2012

October Afternoon Make it Merry Blog Hop

Hello friends.  I'm back again today to kick off the October Afternoon Make it Merry blog hop.  I'm so very excited about this holiday line and I can't wait for it to be available to you soon.  One of the best things about October Afternoon is that the collections have a little bit of everything in them.  Make it Merry is one of my all time favorite holiday lines.  From the versatile patterned papers to the embellishments, there's so much variety to choose from.  Plus the patterns range from total Christmas-y to neutral enough for everyday projects.  

So let's see what I made.  I've got a bunch of cards to show you today.  I love to send out handmade holiday cards so little by little I've been adding to my stash.  I chose a card design and created four cards that followed my basic sketch.  I love all the fun layers and dimensional embellishments.  
 Each of my cards has a manila tag with a stamped Ali Edwards/Technique Tuesday holiday image.  I also used two October Afternoon patterned papers for each card + some old sheet music from my stash.
 I found the wonderful printed doilies on a recent junkin' find.  Talk about a good score!
 Each card has the holiday date stamped on it somewhere, a fun addition to mark the Christmas holiday. I also added machine stitching and finished each card off with red and white baker's twine.
 Each card also has a fun Make it Merry Tin Pin placed on top of some October Afternoon 9 to 5 Date Washi Tape. This is a great way to use all the Tin Pins and embellishments that have the December 25th date on them.
 I also added one more card to my holiday stash using an image from the Make a Card patterned paper. If you love vintage images you'll definitely want to add this paper to your wish list.  Cards come together so quickly using these cut images.  I add some patterned paper under the image, added a little stitching and a Make it Merry Tidbit with a vintage sequin.
I hope you enjoy my cards today.  I was having so much fun creating these that I didn't want to stop. The fun continues though with more Make it Merry projects from the Design Team.  Visit the October Afternoon for a full listing of blog hoppin' team members.  Next up on the list is Danni.

All the blog hoppers are giving away Make it Merry prizes too.  Be sure to leave a comment on my blog, the Design Team blogs and the October Afternoon blog for a grand prize of a Make it Merry Collection Kit.

To enter for my prize drawing of the Make it Merry Designer Brads, please leave a comment on this post telling me a crafty project you're hoping to create this holiday season.  Are you making handmade holiday cards?  Creating a wreath for the front door?  A great Pinterest project?  Let me know what you're up to!  Entries can be made until Friday, November 9th at 10:00am Central Time. Winners will be posted next week. Good luck and thanks for stopping by today.http://octoberafternoon.typepad.com/october_afternoon/2012/11/ho-ho-ho-were-having-a-make-it-merry-blog-hop-join-in-and-win.html

November 5, 2012

October Afternoon Postcard Challenge...

Hey everyone, how are you adjusting to the time change if you endure it?  I'm not a fan I have to say.  My body does not say, "Yay, one more hour of sleep" anymore.  It says, "Get up!"  Plus, as the cold winter days approach the days get darker earlier.  I like lots of sunshine so I make sure to soak it all up when there is a sunny day.  But I do love all the seasons so I will adjust.  

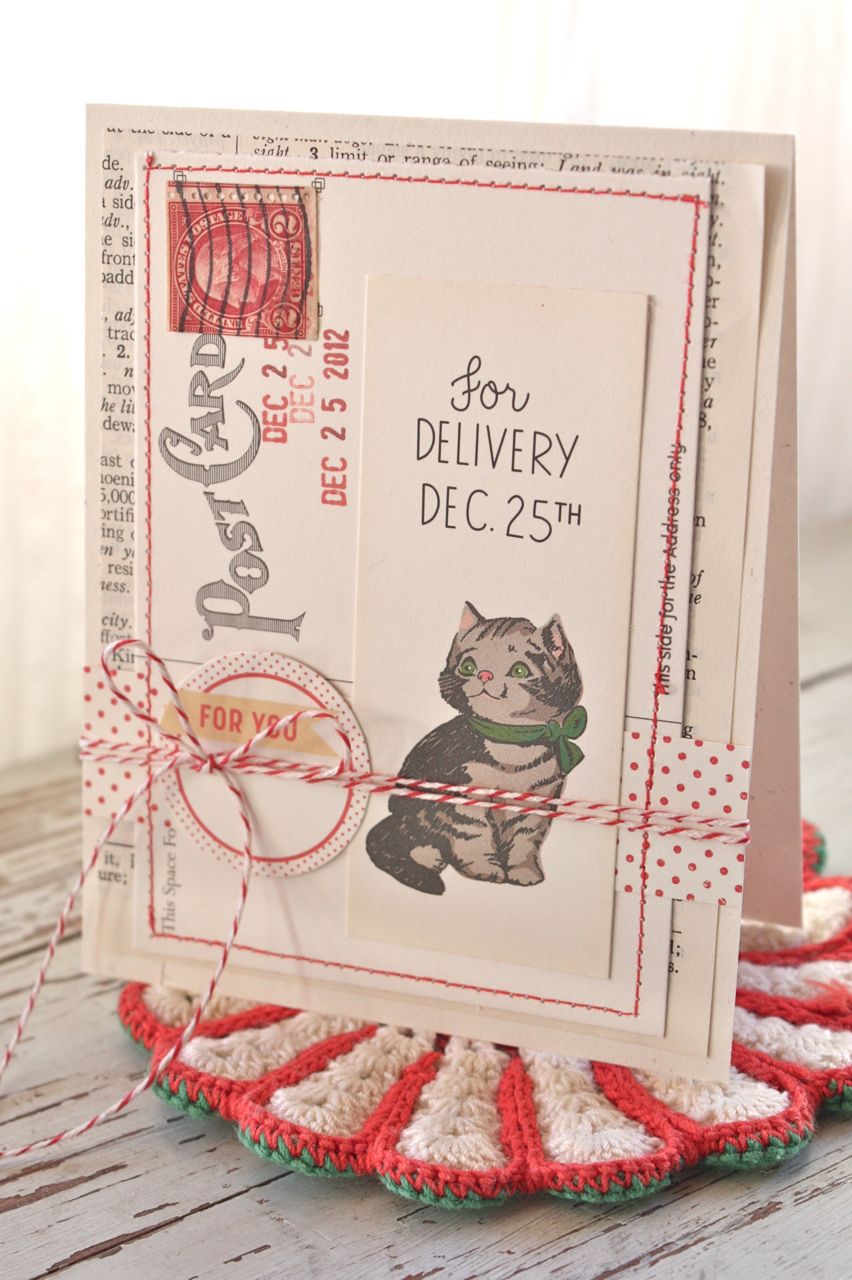
Today I have some holiday cards to share with you.  Jill is hosting the October Afternoon challenge over at the blog and I am joining in too.  Jill's challenge was to use the flip side of some October Afternoon products.  We both worked with the back sides of some Make it Merry postcards.  I created this set of 3 holiday cards.  

The fronts of the postcards have some darling, vintage images that I just love but the back sides of the postcards feature some nice vintage graphic words as well.  They made the perfect bases for layering on some cut out pieces from the Make a Card patterned paper
 I first stitched around all the postcards using red thread.  I then layered on strips of other Make it Merry patterned papers, the vintage images, and some Tidbits.
 I then tied each card with red and white baker's twine.  There is something about red and white for the holidays that really appeals to me.
I just love using an entire collection like Make it Merry for holiday projects.  Everything coordinates but  October Afternoon has a wonderful way of making things look mixy matchy, just what I like.  
 For a finishing touch I adhered some vintage, cancelled postage stamps from my stash.  I then used my date stamp and red ink to stamp on the Christmas date.  This gives the feel that my postcards are perhaps real and were actually sent through the mail.
 I hope you enjoy my cards today.  Have you gotten a start on your holiday crafting?  I am finding that I now prefer to create holiday cards a few at a time.  Although I love the mass production method, my time seems to allow for shorter crafting sessions.  So I end up making 3-5 cards at a time, then put away my supplies....then come back when I have more time.  I really like that I get a variety of cards this way too.  How about you, are you making holiday cards this year?  What is your process?

Okay, lots to share for the holidays.  I'll be back tomorrow with a tutorial on the October Afternoon blog.  Plus Wednesday, you'll be seeing lots of Make it Merry inspiration from the entire team.  Then it's time for Daily December and Project Life.  I'll start sharing my product picks, my process and some of my finished elements later this week.  I hope you'll join me.  :)

November 2, 2012

2012 Holiday Planner

Thank you all for the nice notes on my post yesterday.  If you're like me then you're hoping that this year the holidays are relaxing, stress free and that you get the hustle and bustle out of the way early.  We say this every year, right?  Well, why don't we make it happen then?  I'm going to do my best.  

To kick off the holiday season, I always like to make a Holiday Planner for me, my friends and family. You can scroll through my "notebooks" posts and see more planners I've made over the years.  These below are the first of my Holiday Planners for this year.  My sister is back in town tomorrow and we're dropping everything to head to the city for a little junkin'.  We just talked yesterday about how we don't need another thing.  However, our conversation ended with a junkin' date to one of my favorite places.  
These Holiday Planners are the perfect size to tuck into a bag.  I am never without mine until well after the holidays are over.  I use them for gift lists, grocery lists, party planners, projects, Christmas card lists, etc.  Everyone that receives one absolutely loves it.  
I use two lined Papertrey notebooks for my Holiday Planners, so double the list making.  The supplies used for my notebooks came straight from my December Daily stash that I'll be sharing soon.  So you get a good feel here at what my Daily December will be like this  year.  I used papers from Studio Calico (top red) and October Afternoon (holly).  Medium Manila Parcel Tag is from my shop along with the vintage buttons. "December Notes" stamp is from Elle's Studio's Exclusive Christmas Stamp.  Flair buttons are from October Afternoon as is the brown mist.  Diagonal stripe stamp and gold/hemp twine are from the Gossamer Blue December Daily collection of items.  Yellow stripe washi is from My Mind's Eye. Small staples are from my Tiny Tim attacher.
I hope you'll be inspired to create a Holiday Planner of your own.  It's a great way to kick off the holiday season.

I came across this pin on Pinterest and thought it would be perfect if I could follow this rule.  I'm going to make a list for the girls to fill in with these 4 things.  I'll probably get back some front and back filled list with a request for more line items but hey it's worth a shot, right?  I really love this idea though.
(pinned here)
Speaking of making lists, how about I list a few things that I'd love to share this holiday season.  Here goes.....

1.  holiday home decor
2.  junkin' finds
3.  my new love of slow cooking and my meal planning system
4.  sewing and quilting
5.  Pinterest projects
6.  food as gifts...canning, baking
7.  housewarming ideas
8.  a new acquisition that makes me so happy....road trip anyone?
9.  Daily December and Project Life albums....this has been in the works for over a month so I have high hopes to complete both this year in a timely fashion
10. good books
11. cards as gifts/Christmas cards

We'll see how many items on the list make it to the blog.  I'm pretty excited to share some new things with you.  Thanks for stopping by.  I've got my list made for today and ow I'm off to shop.  Check.  

November 1, 2012

Home for the Holidays...

Hello everyone.  As I'm enjoying a favorite time of year, I am realizing that the seasons change so quickly.  Time seems to pass right before my eyes.  When I enjoyed this beautiful scenery with Eric on our anniversary last month, the trees were all ablaze with bright, colorful leaves.  A few days later the leaves were mostly fallen.  
Then Halloween came and passed in an instant.  The days of dressing up for my girls are over but they still enjoyed time with friends and managed to nab some candy too. Jordan carved her yearly Jack-o-lantern and I am reminded that I have pumpkin seeds to toast for her.  
Now we sit back and enjoy the month of November as the Fall season turns colder and the colorful landscape fades.  We recently enjoyed a visit from my sister, my niece and her two young boys.  I can't tell you how wonderful it was to have little ones in the house again with toys strung all over.
My sister and her husband just purchased a new lake home near here.  I'm hoping we'll see them lots more and that my sister and I can actually spend time quilting, junking and chatting it up over crock pot dinners.  
Spending time with my family is high on my list this holiday season.  There's nothing better than those little moments like when your dad and sister come knocking on the door with a colorful bundle of Bittersweet branches they just picked.  Or sitting around the holiday table for a big Thanksgiving dinner.  Or finding a new deer antler for my collection while on a walk in the woods with the girls and Charlie.
I definitely plan on spending lots of time by the fire just reading, snuggling in a warm quilt and visiting with my girls about basketball and their days at school and upcoming dances.  And looking at the photos on the deer camera that Eric shows us every couple of days.  That big buck is out there just waiting for him. (uh, not the one he hit with his car this week though).
Yes, I'll be home for the holidays.  I hope you will join me for some very fun festivities happening here on the blog all throughout the holiday season.  I'll be back tomorrow with a list of all the fun happenings....and perhaps an actual list that I can write them all down in.  See you soon.

Oh, by the way......is this thing on?  Just making sure I still have blog readers out there.  ;)
Related Posts with Thumbnails