My new printer is an Epson Artisan 730 and it's awesome! It prints crystal clear quality photos and is easy to use. I definitely recommend it if you're looking for a good photo printer. I got mine right from the Epson online store because at the time there was a $50 rebate. I also saw them on Amazon.
If you'd like to send your photos to a printer instead of printing at home, the Postal Pix app is awesome for that. You order from your phone and the photos are delivered right to your door. They print 4 x 4 photos which is great for the Instagram size.
Instagram is phone app that is used to turn photos into squares with an added variety of scenes which alter your photo slightly.
I'll also be using an app called Diptic which helps you combine multiple photos to create 4 x 4 photo collages. It works hand in hand with Instagram...love that.
 Photo 2:
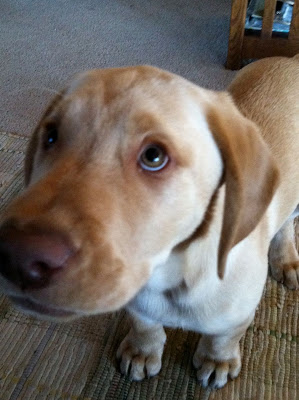 Photo 3:
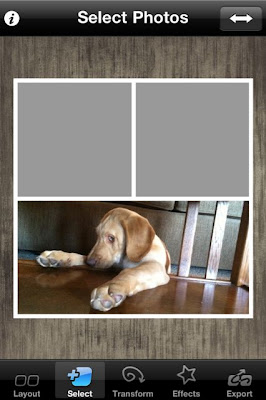
 First I wanted to create a Diptic collage of the 3 photos. I opened the Diptic app and selected the layout I wanted to use. I believe the app is free but I paid an additional fee to get more layout designs. From the screen shot below you can see that the original layout is grey. By tapping on each grey block you are prompted to select your photos. I choose to select mine from my existing photos. Continue for each grey block using your fingertip to move the photos around and resize.
 This is my finished Diptic 4 x 4 collage. Like above, it has the white border around it as all theDiptic photos do. When you're done creating the Diptic collage, tap the export button and you can save it right back to your iPhone photo library.
 Next I wanted to add an Instagram scene to alter the look of my collage. I opened the Instagram app and selected the saved Diptic photo above to work with.
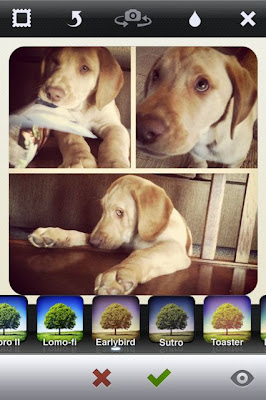 As seen above from the screen shot, there are scene applications that you can apply that will alter the look/color of your chosen photo. Each scene has a different border too that goes along with it. You can see the little row of trees above...click on each one of those to see what your photo will look like. I chose Earlybird for my photo. It's a favorite of mine because it mutes the photo, makes it look a little vintage and it adds a white frame with rounded corners. Once you're done using the app, save your photo back to your phone library again.
All of these steps for Instagram and Diptic that I'll be sharing are done right on my iPhone. I selected the following 3 photos of Charlie to work with. He got in *twouble* and I couldn't resist snapping a few photos of that sad little face. These three photos were in my iPhone photo library.
Photo 1:
 Photo 2:
 Photo 3:
  First I wanted to create a Diptic collage of the 3 photos. I opened the Diptic app and selected the layout I wanted to use. I believe the app is free but I paid an additional fee to get more layout designs. From the screen shot below you can see that the original layout is grey. By tapping on each grey block you are prompted to select your photos. I choose to select mine from my existing photos. Continue for each grey block using your fingertip to move the photos around and resize.
  This is my finished Diptic 4 x 4 collage. Like above, it has the white border around it as all theDiptic photos do. When you're done creating the Diptic collage, tap the export button and you can save it right back to your iPhone photo library.
  Next I wanted to add an Instagram scene to alter the look of my collage. I opened the Instagram app and selected the saved Diptic photo above to work with.
  As seen above from the screen shot, there are scene applications that you can apply that will alter the look/color of your chosen photo. Each scene has a different border too that goes along with it. You can see the little row of trees above...click on each one of those to see what your photo will look like. I chose Earlybird for my photo. It's a favorite of mine because it mutes the photo, makes it look a little vintage and it adds a white frame with rounded corners. Once you're done using the app, save your photo back to your phone library again.
 Below is the finished photo collage of Charlie that has been altered using Diptic and Instagram. Oh, that sad little face.
 Now that the photo is in my iPhone library, I can either order a print from Postal Pix.....or now I can print at home. How do I do that? Again I'm using the Epson Artisan 730 printer so the instructions may differ for your printer...or you may have a better method. This is just my way of doing it that I found was pretty easy. I'm also using an iMac computer with Iphoto photo storage.
 Now that the photo is in my iPhone library, I can either order a print from Postal Pix.....or now I can print at home. How do I do that? Again I'm using the Epson Artisan 730 printer so the instructions may differ for your printer...or you may have a better method. This is just my way of doing it that I found was pretty easy. I'm also using an iMac computer with Iphoto photo storage.
To print Instragrams at home:
First, email the photo you want to print to your home computer(or plug in your phone to download the photos...or I believe iCloud transfers the photo for you). Open that email with the photo. I right click on the photo and open with (it says "other") and Iphoto will be an option. This saves the photo to my iPhoto library on my computer. From here you can make even more edits to your photo if you'd like...like increasing the brightness, etc. Find the photo and click "File/Print". From there I choose the photo paper I'm using from the "Presets" pull down menu. Then I choose my "Paper Size" which is 4 x 6 with or without border. Since this Instagram has a border, I choose no border this time. Next I select the "Print Size" and click on the "Custom" pull down menu and type in 4" x 4". Do a preview to make sure the 4 x 4 photo is within the 4 x 6 photo size. There will be white space on the right and left that you'll have to trim off. Print your photo. Trim to a 4 x 4 square. Easy peasy! With other printers, you might have an option to unclick buttons like "fit picture to fit page", etc. Good luck!
Stay tuned for a Project Life that uses an Instagram/Diptic collage in a fun way!!


18 comments:
thank you so much for this! an iPhone is on my someday wish list...and seeing this makes me soooo excited!!
iPhones are the best aren't they. Thanks for the tips. I have instagram but not Diptic and I have been looking for something like this. I usually upload my pics to photobucket and edit them there but I like the idea of the different layouts. Merry Christmas!
AWESOME, MICHELLE! lOVE IT!!! :)
thank you! This is a great tutorial!!
You should try the app PhotoSync for iPhone. It will download your pictures right to you computer without having to email them. I love it and got it from the iShot That class that I recently took. It is so easy to use.
ah! for some reason I didn't realize instagrams were 4x4. This explains why they didn't print well at all at cvs with the 4x6. Thanks!!
Thank you, Michelle! I have been looking far and wide for some info on printing from my phone... instagrams and more. I have also been looking for a good AirPrint printer. Glad to hear you like this one. Think you just sold another one to me! You are one of my reasons to start up PL this coming year! Great post
malika
I'm so glad my400 tweets to you explaining how to do this made sense! (i was worried you'd think I was crazy!)
These look great!
i`m gonna have to try this!I love my iphone! and how could you stay mad at that face? hes so cute! thank you!
karen adams
This was so helpful! Thank you for putting information in easy to understand language. I'm definitely going to be doing more of this now that you've explained it so well!
Thanks soooooo much for sharing this info!!! My husband just handed me an Iphone last night!! yipee!! I can't wait to start using it! : )
Thanks for that i downloaded both apps.. That early photo effect is really cool.
Glad that you got up and running with the instagram pics! Great tutorial. : )
Thank you for the clear explanation and screen shots. I too had instagrams but wasn't not sure what to do with the pics once I messed on with them.
Does the postal pic app cost for delivery? I looked at the app amd it gave prices for the different size photos but not mailing. Also do you know why they have a price range for the different sizes?
I love our site and check in daily to see your beautiful work amd get inspired for PL.
Oooo he is sooo cute! Love the face in the third picture... i laughed out loud and remembered my past puppies expressions too when scolded... love it. Thanks for sharing him.
I don't have an iphone or instagram or anything but I must say that photo number 3 is the best picture EVER! the face! And those are some BFPs on that doggie. Big ________ Paws! he is going to be gigantic!
This is THE best info! I played with Diptic and Instagram for quite awhile tonight and this was HUGELY helpful. Once I saved my collage in Diptic to my photos, I was not able to open it in Instagram. Any tips on how to do this?
Thanks again! These tutorials and all of the lovely things you create make you one of my first stops everyday in blogland.
Brilliant! Will be perfect for Project Life and my Dec Daily this year. Thank you.
Post a Comment