March 28, 2013

Flower card...mixed media + Pan Pastels

So in my last post I showed you how I have been experimenting with adding some mixed media to my projects.  I used items from the Pink Flower Kit which includes some more products I'll be using today. I reached for the dictionary page which has Gesso and modeling past on it + a manila tag, a small white tag, a paper doily and one of the floral Instagram photos.  I also pulled a few of my favorite papers from the March Gossamer Blue kits.  
I trimmed the patterned papers down to a workable size then just started experimenting some more with Gesso.  I wanted my mini Instagram to be the focus of my card for today so I wanted the papers to be more muted.  I applied Gesso with my palette knife, just like you would if you were spreading frosting on a cake.  I let these dry and helped the process along with my heat tool.  When working with these mixed media products your paper may tend to warp and bend a little.  Since I like my papers to be as flat as possible I have been ironing my papers with an old cotton tea towel and a hot setting on my iron.  Works good.  
Pencil drawing was always my strong suit in art classes so I loved adding some sketching over my patterned papers.  I love a soft pencil lead and this Derwent 4B pencil works great, from Dick Blick but you can find art pencils at any craft shop.  I also got out some watercolors and added some pinks and greens around the circles.  I was careful not to let the colors bleed into each other as mixing the two complementary colors would have made brown.  The watercolor set you see on the left is a cheap set from Target. Works okay for now but I definitely want a better quality set.  
So here's the lineup of what I want to possibly use on my card for today. You can compare this photo to my first photo to see what a difference the Gesso makes.  Whatever I don't end up using will be tossed in my scrap basket to use for art journal pages, tags, or other projects.  
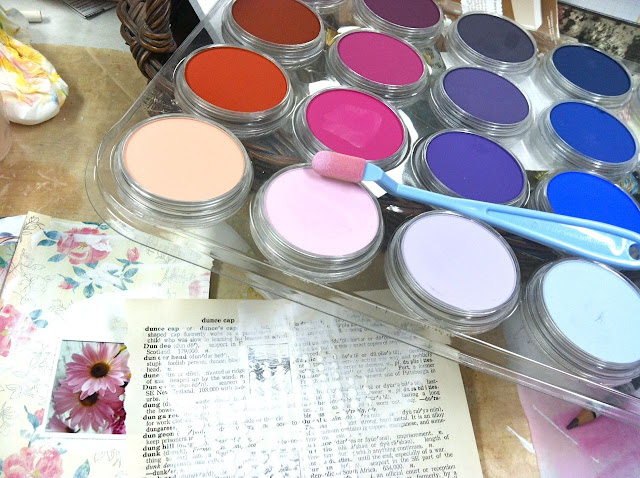
I then decided to add some color to the dictionary sheet.  I reached for my new Pan Pastels.  Aren't they beautiful?  I'll be doing a post dedicated all to Pan Pastels in the future but if you're wondering about them....Pan Pastels were developed by a couple of artists who wanted to make pastels easier for artists to work with.  They created these wonderful pans of ultra soft, low dust, pressed pastels that you can apply like paint with the Sofft tools which act like your paint brushes.  There are 80 colors available and the concentrated quality of the Pan Pastels is amazing.  They are super-blendable, paintable, instant dry time, erasable, mixable, and very compatible with other art mediums. You can purchase the pans individually, in small sets, in sets of 20 or the whole shabang of 80.  Now there are these wonderful plastic trays available too which can hold 20 pans.  Awesome.  I love them and can't wait to create with these more. You can find Pan Pastels at Dick Blick, Amazon and other shops if you care to google them.  There are some amazing videos out there too if you just do an online search.  
So here's a little sampling of the Pan Pastels in action.  I definitely need to experiment more but the learning process is so much fun.
Here's my card I created using all of my stash.  I kept the card very  light in nature, just adding layers that I stitched down.  
To tie in all the elements to my base card I added some more Gesso with my palette knife.  I even added a sprinkling of glitter to the wet medium.
Totally fun, totally an experiment in using my new art products.  I'm thinking I might use my this card and my previous card to place near my little vases of flowers around the house.
Thanks for stopping by.  Feel free to ask questions....although I've just barely gotten familiar with the Pan Pastels.  :)  Also, I've got some new items up in the shop.  It's junkin' season and I love it!

March 26, 2013

Grown with Love card....mixed media

Hi everyone, if you're like me and you live where it's cold & snowy outside.....but it should indeed be Spring.....welcome to the "I'm so over Winter" club.  How about some fresh and fun projects?  

If you follow me on Twitter, you'll have noticed that I've been dabbling in mixed media and all things artsy lately.  Call it a mid life crisis awakening or who knows what but I have felt the need to get back to my artistic roots, however humble they may be.  My college degree was in Interior Design but I soon learned from all of the art classes I took that my true calling was more in tune with the arts.  It's seems a shame to keep all that creativity locked up so I'm listening to what my heart is telling me.....get my fingers painty, create more, experiment, be more organic in my work, take a risk, see what happens.  

So I'm gonna do it.  I've recently invested in some new art supplies and I'd love to share my ideas with you as I go along.  Some ideas will be in the form of adding a new technique (new to me I should say) to my projects and scrapbook pages.....some ideas will be in the form of just experimenting with art journal pages.  I've been researching these more and I'm totally intrigued.  I hope that by sharing my findings you'll perhaps be inspired to try something new creatively and want to join in.  I'm working on new blog posts that will kick off my "art revival" of sorts where I'll list some great references/mixed media artists and the new supplies I'm using.  Please, please leave a comment to let me know what you think. Are you in?  Have I lost it?  Are you longing to try something new with your crafts?  

On to today's project. One of things I've been desiring is something new to use as focal images on my cards.  I love stamped images but sometimes I just want to reach for something else.  I recently compiled a new file of photos that I've taken and I've decided to turn them into mini Instagrams.  I'll be using them on my art journal pages which I'll share soon....but today I'm using this lovely photo below of some flowers I picked last summer.  
I turned the photo above and 2 other photos into a sheet of mini Instagrams.  You can see some of the cut photos below and I'll be sharing them in a new kit also.  So here's my finished card below.  
I used the small Instagram photo of my flowers as the focal point and then there are lots of fun layers underneath.  
The beautiful floral patterned paper is from Crate Paper, stamps are from Papertrey Ink and the tags are from the Pink Flower Kit that I'll talk about a little later.  In the close up below you can see some wonderful dictionary paper that has a beautiful texture to it.  You can also see some white texture on my photo and some on the rest of the card.
I'd love to share with you how I created the textured paper.  I've been experimenting with 2 new products in my artful arsenal of supplies.  The first is Gesso.  Gesso is a thick liquid primer that is used to prepare canvas and other surfaces for paint and other mediums to go on top.  It dries with a somewhat chalky finish and accepts other mediums very well.  What I love about Gesso is that is instantly mutes and tones down whatever surface you apply it to.  You can use a brush but I have found that palette knives which have a flat blade are what I like best.  This way you can apply the Gesso like frosting or perhaps think of it like buttering a piece of bread.  Simply slather it in thin or thick coats over your paper.  Then let it dry...you can use a heat gun to speed up the drying process. You can see that I applied a swipe of Gesso to the small Instagram photo and to a few places on the card front too. Since I like a lot of white space and softer colors, this stuff is going to be used a lot I can tell already. The brand I used is from the Claudine Hellmuth line from Ranger but you can find jars of Gesso in any craft store or online art stores like Dick Blick. 
The next product I've been experimenting with is Modeling Paste.  Modeling paste is a thicker medium that works just like Spackle.  It is used to build thicker, dimensional layers and is easily applied with a palette knife.  It dries to a hard finish and is very textured.  You can apply it by itself but it's most fun to use with stencils.  Below I used a small stencil from Studio Calico.  I'll be sharing some sources for more fun stencils as I build my collection.  To use a stencil with modeling paste you simply lay your stencil down on the surface you want to use and slather the modeling paste over the stencil, filling in the holes of the stencil.  I think it's best to cover just random parts of the stencil so that small patches of the paste are left.  You can easily color your modeling paste with acrylic paints, ink droppers, etc.  Refer the above photos of the card to see the finished texture.  With both Gesso and modeling paste, you want to clean your palette knives or brushes after each use.
I've also pulled my watercolors out of the drawer too.  I added a bit to my grid cardstock and some splatters to my dictionary paper before assembling my card.  To add a little pooling of color, I like to wet the paper first with clean water.  Then I mix my watercolor with my brush and let it bleed into the clean pool of water. This creates an organic look instead of brush strokes.  You can sop up excess with paper towels.  I use my heat gun to speed the drying process.  I use the Teflon craft mats like crazy when working with mixed media products.  They are so easy to clean and you can use your heat gun over them too without damaging the surface.  Right now I'm using cheapo watercolors but I'm looking into a few brands that carry travel sets of watercolor.  I need a little better quality that mixes better.  I'll report back on what I find.
If you've made it this far, thanks for joining me today.  Up in the shop I have a fun new kit that has a sampling of the dictionary page that has Gesso and modeling paste on it.  Plus the kit contains a full 4 x 6 sheet of 6 mini floral Instagrams.  The card I created today uses the Large Manila Tag, the small white tag + dictionary page, a mini Instagram and a snippet of a paper doily from the kit.  It's a fun little kit if you want to see if you like this mixed media look on your projects.  You can try misting the dictionary page, adding some watercolor or ink droppers, etc.  It's hard to see but the kit also contains a clear card box that can be used to package up some cards as gifts. 
I have my supplies I used today still out on my work table....maybe I'll see what else I can create today. And again....let me know what you think about adding some mixed media to your projects.  Would you ever consider doing an art journal just to get the creative juices flowing?  I'd love to hear your thoughts.

March 24, 2013

Longing for Spring...watering can cards

Here it is, almost the end of March and we got about 6" of snow last night.  What a way to wrap up Spring Break.  The girls are supposed to have a softball game and track meet next week....that just doesn't seem right.  

But while it's blowing and snowing outside, I'm longing for Spring down in the craft department.  I saw my collection of watering cans sitting out on the porch all covered in snow.  That sparked the idea to dig out one of my favorite Papertrey stamp sets called Garden Variety.  My good friend Melissa Phillips  developed the concepts for this set and I think of her every time I use it.  The images and sentiments are so her style.  
I used various ink pads for the watering cans and the floral images.  Some grey spray mist splattered onto the watering cans along with some of the sweet images from Garden Variety add a little more interest to the cans.  I added a little sketching to the flowers with a very soft 4B pencil.
Scalloped cut patterned paper, loopy twine, white paint spatters, machine stitching and dimensional flowers & enamel dots finish off the cards.  
 Since the resin flowers are so dimensional, I skipped the envelopes and chose Large Kraft Sacks to hold the cards.  I watercolored Small Manila Parcel Tags to use for to/from tags. They can be attached with a simple strip of coordinating Washi tape or a simple stapling to the sack.
I had such fun creating these cards.  I think I'll go dig out more flower stamp sets to work with.  I'll have a few of these up in my shop a little later on.  

If you follow me on Twitter then you know that I've been dabbling with some of my new art supplies.  I created my first art journal page and it was so much fun to just experiment with artsy supplies.  I'll be sharing that soon.....

March 22, 2013

Project Life 2013, Week 7...Valentine's Week

Today I'm sharing Week 7 of my Project Life 2013.  I had an insert his week, adding in our Valentine celebration.  
This is the 2 page spread. I kept this week's photos very light and airy, using a white border filter in my iPhoto editing program.  
The left page...
 The right page.....
 The Calendar Insert using chipboard letters, Crate Paper, SC PL labels and stamps.
 Here I used a Notebook Paper Label to add the journaling right to the photo instead of on an additional 3 x 4 card.
 Love this photo of sweet Charlie boy.  I used lots of the chipboard letters to add initials to photos this week.
 Here I used an Elle's Studio 4 x 6 card + a small library card from Banana Fish Studio.  I think it's fun to document the books that you're reading at the time..
The girls on Valentine's Day morning before heading out to school.  I used more chipboard letters + a Notebook Paper Heart Label for typed journaling. 
 Here I used a Studio Calico label topped with mismatched chipboard letters.  The circle accent is from Elle's Studio.
 Another photo of Charlie, this time with our cat Stormy.  I used a 4 x 6 Elle's Studio card accented with stickers, Washi tape and typewriter journaling.
 The 3 x 4 inserts. Pretty simple with small Instagram photos + typewriter journaling.
 Lots of small letter stickers and pieces leftover from my Gossamer Blue kit.
 More cute 3 x 4 inserts from Elle's Studio.
 I've developed a strategy for including lots of sports photos.  I'll share my method in separate post another day.  For this week, I included a photo of each of the girls dribbling.  I stapled their jersey numbers to the photo.  We have a local couple who are professional photographers and they've taken a liking to my  girls....probably the red hair.  They send me discs of photos and they take the best shots.  I love that they allow me to use their photos in my albums.
 This is the 6 x 12 insert which has a flipper card that I created.  The journaling cards are from Studio Calico. Paper is Create Paper. You can see more of this insert at the very top of this post.
 Here is the flipper card flipped up to reveal a photo of our Valentine's dinner with some journaling.
A very fun week in the book, full of things I love.  Thanks for joining me today.  

Right now.....the girls are still on Spring Break.  The weather has been in the 30's for most of the week and both girls have had outdoor track and softball practices.  It's not been Spring-like here at all & tomorrow they're calling for 3-7" of snow.  I would much prefer a nice Spring shower.  Crazy.  

March 18, 2013

Hello cards...March Gossamer Blue Kits

Well hello.  Today I have a few more cards to share with you that I created with my March Gossamer Blue kits.  There's lots of white space which keeps the cards very clean and simple looking.  I used some thin graph paper for a background so that the fun star overlay pieces would stand out.  I love how shiny they are. 
I also used some Bits & Pieces wood veneer speech bubbles.  I first backed them with patterned paper then used Glossy Accents to paint around the words.  I then sprinkled on some glitter.  In real life, the words are so shiny and shimmery.  It's hard to see but I also sprinkled some of the glitter under the overlay pieces.  Static cling holds the glitter in place to create a dreamy look with stars and sparkles.
I hope you enjoy!  I do have some cards from my stash, including this one in my shop at this time.  
I'll be back soon to share some Project Life pages....it's been a while.  :)

March 17, 2013

Mama Elephant guest projects....

Happy St. Patrick's Day!  I thought I would save my Mama Elephant guest projects for today since green was such a prominent color and very suitable for today.  I created these two cards using the On Target stamp set.  Two totally different looks on a feminine card & a masculine card.  You can view my guest post for these two cards here.   
This card was the birthday card we gave to my husband yesterday for this birthday.  He loves to hunt so the On Target stamp set came in very hand.  I love the layering you can do with the bulls eye and there's a fun variety of arrows to create frames like I did on my card.
This is a girly card I created with the On Target stamp set for my daughter during basketball season.  The "shoot for the stars" sentiment was just perfect.  I layered the arrow stamp with hearts.
My second guest post for Mama Elephant featured this card created with the Geotagged stamp set.  A great stamp set if you like travel themed images like the US map and the adorable suitcase.  There are lots of layering stamps that go with the suitcase so you can created fun straps and tags.  I used Large Manila Parcel Tags as the base for all the fun layers.  The glittery clothes is the Salmon Glitter Clothespin.  I'm thinking it will be fun to take photos this Summer by our new Airstream camper and send them off to family with travel themed cards.
If you haven't purchased Mama Elephant stamps, you can be certain that the stamps are manufactured with high quality photopolymer right here in the USA.  I love that!  I highly recommend their fun designs.
Thanks for stopping by today.  I'm working on projects for the upcoming Gossamer Blue April release + I've got some new artsy supplies I'm dying to dig into.  I've got a little catching up on Project Life to do too.  Hope your day is great....and green.  :)

March 14, 2013

Quick & easy cards using Gossamer Blue kits...

Hi there, it's Spring Break for my girls.  11 days of no school, woohoo!  I love this time of year...track and softball are starting up, the weather is getting warmer, it's getting to be gardening time, Charlie and I can take our walks down the road.  I just love it.  

Today I have a stash of cards I created with the March Gossamer Blue Kits.  This month's kits were full of bright colors but there were also lots of more subdued colors like in the photo below.  I picked the supplies below + a stack of Medium Manila Parcel Tags, some cardstock and twine from my stash.  
Here's what I created, a fun set of 6 cards.  Cards like these are a great way to use up a lot of patterned paper.  I created the backgrounds with large pieces of cardstock and then used strips of cardstock for accents. 
I varied the card designs slightly but they all have one thing in common....sentiments stamped on the tags + clusters of embellishments layered onto the tags.  
The chipboard buttons and shapes in this month's GB kits are fun to add to cards, especially if you get them in kits and prefer not to bulk up your scrapbook pages.  I always end up using these more dimensional items on cards.
All of the fun sentiments are from Papertrey Ink.  Love the little enamel dots in the center of the chipboard flowers.  These cards are pretty dimensional so I will most likely end up slipping them into a Large Kraft Sack or Large Glassine Sack and mailing them in a bubble mailer.
I also loved using the black Color Shine spray from the March Color Kit. Even if your projects don't have black on them, a few splatters here and there are fun.  You can see how I added tiny splatters to my Friendship Jar cards in this post.
Here's a few closeups of my cards.  When I tie twine around my cards I always do a double wrapping then leave really long tails.
If you got the GB March Bits & Pieces Kit then you're probably loving the rainbow stripe Washi tape. Don't be afraid to add some to your projects with more subtle colors.  I think it adds a nice twist.  
Hope you enjoyed my cards today.  Be sure to check the Gossamer Blue blog throughout the month.  There are lots of inspiring projects added throughout the month that use the current month's kits.  

Alrighty, I'm off to help the girls with some stacks of laundry......pack up some orders to take to the post office....then this afternoon I'm watching The Lucky One and breaking out more of my April Gossamer Blue kit items.  April is going to be a fabulous month with Gossamer Blue...some of my favorite new products are in each and every kit.  I hope you'll join us.  :)
Related Posts with Thumbnails