October 6, 2010

Fall notebook kits....

If Mishie needs a cute Fall themed notepad then you guys need one too, right?  I have lots of little listy items lately that I need to jot down and I thought I'd make a few kits to share too.  Visit my Etsy shop for  the kits, they'll be up soon in limited quantities.  If you purchase a cute kit, I've listed the instructions on how to assemble your notebook in the post below.  If you want to make your own notebook like mine, you can follow along too with your own supplies.  Enjoy!
 For my notebook, I used Papertrey's Vintage Cream Notepads.  You'll get a set of 10 for $6 bucks.  In the kit, you'll get a half sheet of Dark Chocolate cardstock.  Cut this to a tiny bit over 8" long, just to leave a little overhang.  The width of the cardstock is a little tricky.  My cut width ends up being almost 5-3/8"....but I never cut it to that width to begin with.  I lay my notebook down and score and fold as I go around what becomes the spine of the notebook.  Then I trim off the last part.  I do this because the spine of the notebook is so thin that it's tricky to measure....so I just make a little mark with my fingernail and score as I go.  Use Scor-Tape to adhere the notebook to the cardstock cover.
 Next, adhere the brown/green patterned paper to the notebook cover.  Trim the orange floral patterned paper to fit below the brown/green paper.  The papers I used for the kit are from October Afternoon.  Cindy at Star Lit Studio has a great selection.
 Next, adhere the yellow circle to the Metal Rim Tag.  The tags fir perfectly on the notebook fronts.  Love this!  Position the metal tag accent and the Small Manila Parcel Tag in place as shown, then adhere.  Notice that the Manila Tag reinforcement circle is positioned just above the line that joins the two patterned papers.
 This is where you'll add more Scor-Tape and adhere the fluffy, chenille ribbon snippet.  Thread the orange string through the button and adhere in place with small sticky dots or liquid craft glue.
 And viola, there you have it.  Easy peasy.
 So cute and I love the Fall colors.  This little notebook will take you through Halloween and well into the Fall season.  Perfect for all those party lists and Thanksgiving menus.
 In the kit, I've also included either a Marigold or Rusty Pumpkin clothespin and the supplies to embellish it with paper and a tied button.  This will come in handy for those loose papers, lists and clipped recipes.  You'll also receive one of my new Glassine Sleeve Wraps, perfect for packaging the tall notebooks.  Look for them in my shop soon.  Simply insert the finished notebook...tie the brown ribbon around the sleeve in a pretty bow...and clip on the clothespin.  Perfect gift!!!!  Love!

Note:  The stamp set used for my notebook today is Take Note...a must have for all your notebook making needs.  And looky there, it says *concept by Michelle Wooderson*.   Who is that girl?  :) hee hee
Hope you enjoy!  Off to create something else.

October 5, 2010

Etsy Shop Update

EDIT:  Okayyyy now.  It only took me 50 minutes but I found a Facebook badge to add to my blog.  Look to the left and you'll see a blue Facebook badge.  Click on that and you'll be able to friend me. 

Answers to some questions that I'll just answer here:  I wash all my vintage fabrics with my regular laundry detergent on a regular cycle.  Doilies and hankies get special treatment on the gentle cycle.  I line dry and use the dryer.  And then I press everything because I like to do that.  I have recently found some darling Christmas fabrics........just wait and see the goodies coming with that.  :)

Hey friends, many of you ask if there's any way for me to send email notifications about Etsy shop updates...I still don't do that but I try to update my blog when I add new items to my shop.....and it looks like now that Etsy has added a feature so that I can update new listings to Facebook.  So if you're not a fan of mine yet, you can friend me and I will update on Facebook.  :)

These are new to the shop with a few other Halloween items:
To create these tags on your own, simple stitch a snippet of patterned paper along the side of an aged Medium Manila Parcel Tag (my Etsy shop)...then add a few Halloween embellishments.  The paper bats I used were from Making Memories last year.  Sentiment is from Friendship Jar Fall Fillers  (Papertrey).

2010 Halloween Inspiration Station

Hi friends, it's October which means Halloween is coming.  I love all things spooky and scary....orange and black......frightful and delightful.  Pumpkins and gourds, witches and bats, black cats and ghosts.....it's all so fun!  Without further delay, it's time to show you my 2010 Halloween Inspiration Station.  I use this old wooden carrying tray with inserts to keep all my Halloween goodies tucked inside.  By keeping themed supplies all in once place, you get a good idea as to what supplies you actually have on hand.  It's fun to go shopping in your own boxes and bins.  Plus, it's very inspiring to see all the goodies grouped together.  You can pick and choose from all the trinkets and baubles and papers.  Of course I don't use each and every item that I tuck into my Inspiration Stations.....I just use what inspires me at the moment and the rest goes back into my stash when the holiday is over.  Fun stuff!
You all know that I love me some tags!  This season, I've aged a stash of tags so that they look worn and tattered.  The tags shown below are Small and Medium Manila Parcel Tags, Medium Orange Parcel Tags and Large Metal Rim Tags from my Etsy shop.
Love the little baubles and embellishments tucked into vintage jello molds.  Here I have felt ghosts, old checker pieces, bats, glittery flowers, buttons and rhinestone sequin buttons.
Vintage ribbons and laces and ric racs are always fun.  I've added some burlap in there too for so me great texture.
Vintage buttons in jars and jello molds....Martha Stewart glitters.
And my faves this year that I'm hoarding.....Bingo cards of all sorts and these vintage playing cards with the number 13 on them.
A little stash of my Rustic Clothespins, dyed in yellow and orange....
And Halloween papers of all sorts...some of my faves this year are from The Girls Paperie.
I love this old orange and black tin that I got a garage sale...perfect for tucking in a few Halloween goodies to display on my desk.
And how about a few projects made with my Halloween goodies?  I just love these little stuffed felt ghosts that I got on clearance last year from Making Memories.  I used them front and center on a few collaged tags.  Simply slap on some papers, sticker borders, ric rac, flowers, buttons.....an Orange Soda Carnival Ticket under the ghost....and stitch up the sides with dark thread to keep it in place.
I tied the tags to some Brown Paper Sacks that I will fill with candy bars or homemade treats.  I've got a few friends that I'm sure would love some fun Halloween mail!
I used black Wrinkle Ribbon, a snippet of orange lace and Kraft Silk Ribbon to tie the tags around the sacks.  As you can see in the background below, border stickers make for some quick and easy accent pieces....I used snippets on my tags and across the sack fronts.  Such cute little goody bags....with a vintage flair.
Hope you enjoy!  Please feel free to share what your plans are this Halloween.  Jordan's birthday party is finally is this weekend and we're making caramel apples, mummy looking pigs in a blanket and witches fingers....I haven't gotten much further than that.  I think I'll get out my Halloween decorations so it will look festive when her little friends come over!

October 4, 2010

Wrinkle Ribbon Tag Embellishment

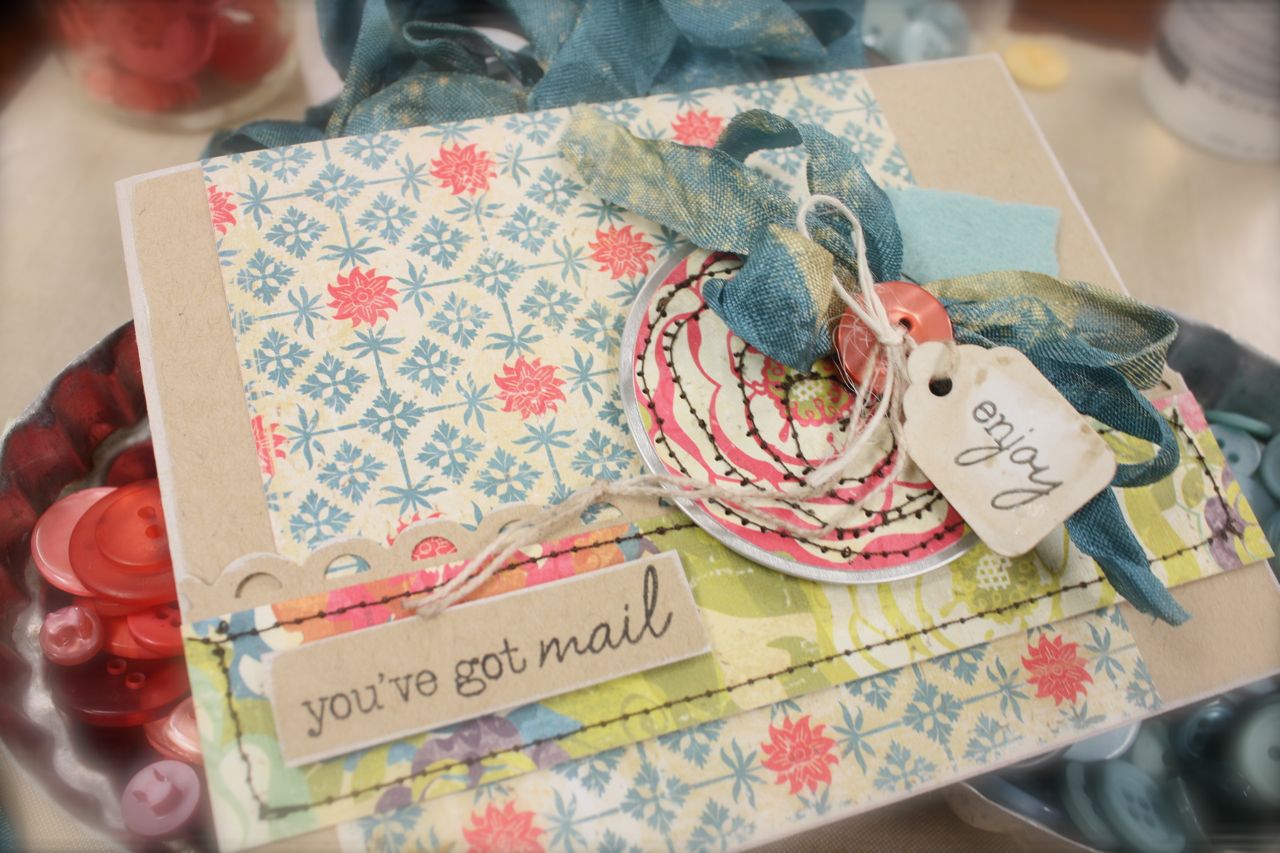
So I got a little crafty today in the Artsy Studio. Here's what I used for today's project.....Crate Paper's Restoration line, Papertrey Vintage Buttons and Felt, Wrinkle Ribbon, a Tiny Tag and a Metal Rimmed Tag from my Etsy shop.
 The inspiration for this project came from this card.....where the focal point takes center stage of the card.  I knew my 2-1/4" White Metal Rim Tags were just the ticket.  They're neat as is but they can also be embellished with almost any supplies.  Today I cut a circle from my patterned paper to fit on the circle tag.  I also cut a leaf from some Ocean Tides Felt using a leaf from the Delightful Dahlia Collection.
 I used a tiny bit of adhesive to secure the circle of paper and the felt leaf to my metal tag.  Then I used my sewing machine and brown thread to sew a spiral pattern on the tag.  Just be careful not to sew over the metal part of the tag or you might break a needle.  I just love this look, so artsy.
 Next up, I used some beautiful Vintage Blue Wrinkle Ribbon from this bundle.  It's got beautiful color variations to make your projects look a little vintage-y.  One of my favorite Wrinkle Ribbon colors yet.  To make beautiful, messy loops simply wrap a length of ribbon around four fingers three times as shown below.  This will create four loops that really help to fill out a Wrinkle Ribbon bow.
 Using a piece of Rustic Cream Twine, tie the loops off while the Wrinkle Ribbon is still wrapped around your fingers.
 Before tying a ribbon with the twine, thread the two ends through a Vintage Button.  Before tying the bow, lay the string part of a Tiny Tag on top of the button.  Tie up the twine....which in turn ties up the Tiny Tag.  Leave the long loop of the Tiny tag in tact.  I think it looks kinda cool dangling off the bow.
Next up, create the card base...I've shown some of the elements below.  The sentiments for this card are from Vintage Picnic Sentiments.
 Next, I adhered the metal tag to the card front using pop dots.  Then I secured the bow to the tag using a big blob of glue.  Let this dry completely.
 And you've got yourself a beautiful card.  The Metal Rim Tag with Wrinkle Ribbon embellishment definitely steals the show.  A very pretty card that someone will love to display.  Cards like these get a little bulky to mail, you can zoom in to see all the detail better.  I would suggest using a cute Brown Paper Sack for the envy and mail in a padded envelope mailer.
Hope you enjoyed today's little tutorial.  :)

This and that..

Hi friends.  I think I need a weekend to recover from our weekend.  We spent about 20 hours at the ball fields, watching the girls play in a softball tournament.  Good times indeed.  

I have no creative goodies to share with you today but how about a few photos of some recent finds?  Here's my loot from the latest trip to the thrift shop:

Vintage Buttons, fluted tins, cute little buzzy bees and old silverware.  Wait til you see what I make with those old spoons...coming soon.  I can't wait to sort through all these goodies.
 And this footed tin with my favorite *front porch blue* color.  I think I'll add my stash of office supply markers to this.  And lots of old seam binding and lace packages.  Love the yellow and grey color combo lately.
 This is from my mom.  She said it was her bread basket years and years ago.  I've added it to my collection.
 More vintage fabrics.  I'm really hoping to start some new quilts this fall when the weather turns cold and we have to stay cooped up inside.  I'm thinking the strawberry fabric will make some nice pillows for my outside porch chairs next year.
And these lovely little prints, I couldn't leave them behind. Again, I'm loving the color grey lately.
 And here's my stash from Archiver's yesterday.  My check out girl is an Etsy customer of mine.  Hi Courtney, it was nice to meet you in person!

These graphic papers from Basic Grey.  Couldn't resist them any longer.  Couldn't decide on what patterns I wanted so I just bought two full kits...plus a few extra sheets.  I have just the project in mind for these and will be sharing on Etsy soon.  Reminds me of my college days, drawing architectural floor plans and such.
 And these cute holiday prints from Jillibean Soup.  Can you say *Christmas notepads coming soon*?
 And these fun prints from My Mind's Eye...love red and white for the holidays.
 And a few shabby, glitterful prints from My Mind's Eye Lost & Found collection.  Really glittery.....I see a kit coming soon with these little gems.
And last but not least are these big, fat sweet taters.  They are gihugic, Mom and Dad really had a bumper crop this year.  Oh how I love them now that I have discovered sweet potatoe fries...move over marshmallows.  Definitely going to be searching for new recipes this fall too.  
 Speaking of fried, that is my mind today.  Just fried and tired.  Think I'll finish my coffee and then get on with the day.  I have green beans to pick...any volunteers?......vintage fabrics to launder and press....love pressing my old fabrics but not our real clothes.......new goodies to organize in the Artsy Studio........and lots of Christmas projects to work on for upcoming Etsy shop items.  But first, Halloween is calling my name.  I'll be working with items from my Halloween Inspiration Station.....wanna see?

October 1, 2010

Jordan's Birthday Card

Happy Birthday to Jordan.  My little baby is growing up!
We're headed out on Saturday for SIX softball games.  The girls each have a team in a tournament.  Go reds!  I thought I would share the birthday card I made for Jordan.  It matches her birthday invitations she made a while back.  The card features Enjoy the Ride from PTI.
Papers are from Cosmo Cricket.  I think I could die cut those little love bugs all day long!
All numbers and arrows are from Get To The Point, love this set!  Inside sentiment is from Birthday Bash Sentiments.
Well, I better make this post short and sweet.....5am is going to come reeeeeeeeeal early for me.  Have a great weekend everyone!!

September 30, 2010

Little Lady Revisited

Welcome to the Papertrey Senior Design Team Challenge for October.  This month the team will be making projects using Nichole's Little Lady stamp set.  This is an oldie but goodie set that features all the elements you need to layer some cute, stamped lady bugs.  

I always think of little girls when look at this stamp set.  They love little lady bugs because they're just so cute.  So my card today features the lady bugs with ribbon, buttons, frilly scalloped papers and glitter....everything a girl loves.  And how about stamping the lady bugs inside the Friendship Jar?  So cute and another great use for the jar set!
 To create the frilly scallops, it's very easy.  Select three patterned papers that have some contrast to each other.  I chose papers from Beautiful Blooms, Egg Hunt, and Green Tea Leaves.  Next, using the Small, Medium and Large Scalloped Border dies, cut three strips of scallops.  Use a different patterned paper for each size scalloped die.  With scissors, cut each scallop about 3/4 of the way through, leaving the scalloped strip in tact.  Adhere these to your card front, layering the scalloped strips with the biggest on the bottom...medium in the middle and the smallest scalloped strip on the top.  Ruffle up the scallops to create dimension. Tie a ribbon around the card to cover the top layer.  There you have it!
 For the jar, I stamped the lady bugs inside along with a few of the tiny flowers from Lady Bug.  I finished off the jar with glitter and Red Baker's Twine tied up with a Pure Poppy Button.  The *with thanks* sentiment snippets were created with a sentiment from the stamp set.
Don't forget to fancy up the inside.  I stamped another sentiment from Little Lady on a strip of white cardstock, then added glitter and a scrap of my tiny scalloped border.
These will make darling little thank you notes for the girls to have on hand.  To see what the other Senior girls have created, check out their blogs below:  

Ordering multiple items in my Etsy shop...

Hi friends.  I have had several issues with Etsy customers not being able to order multiple items in my Etsy shop.  Since there are tons of you that are able to order multiple items though, I think it is a minor user error.  Let's see if this helps.  Gayle, a great customer of mine, offered these tips for ordering multiple items...hope this helps:


When I want more than one item I click on the add to cart button...item comes up as one..then change 1 to number of items wanted /then hit update button below ...it will recalculate the amount wanted, and the shipping and show recalculated total on screen ...then goes to final review and payment section...Hope this helps.


Mish
Related Posts with Thumbnails