Okay my peeps, here's what many of you have been waiting for. A
Copic Marker coloring tutorial. Have you got some Copics yet? If you love to color stamped images, then YES, you need them! Head to Ellen's store and she will hook you up with what you need. And don't forget the Colorless Blender! She also sells the Airbrush System and the cool Copic Spica glitter pens.
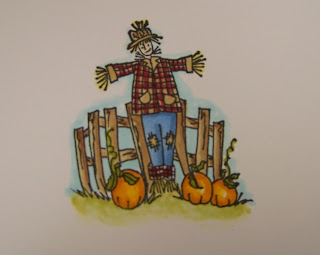
So here we go on the tutorial. I'm using
Karen Lockhart's cute Scarecrow stamp. The detail is small so this tutorial is about coloring smaller, multi color areas. You will learn lots of different coloring techniques so you might want to take notes. I hope you enjoy!
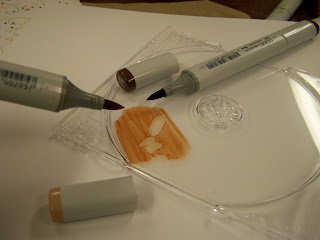
Okay, so I've got my image stamped, heat set and ready to go. I'll start with the pumpkins first. This technique is done by blending similar colors together on the paper. I start off by coloring my pumpkins in with a light color yellow/orangy marker. Always leave a white space when coloring objects that have dimension. This will give the effect of highlight or a light spot.
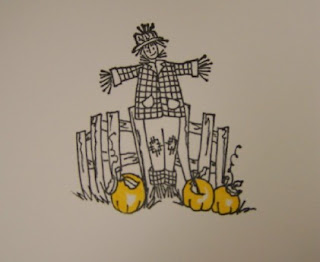
Next I color the outer areas of the pumpkin in with a darker orange color. You now will see three colors basically on the pumpkin: white, light orange, dark orange.
Next I take my lighter orange color and color over the darker area to blend the two oranges together. Any marker can act as a blender pen. Just remember to use the lighter color over the darker color to blend the two together. I still left hints of those white spots for a nice highlight.
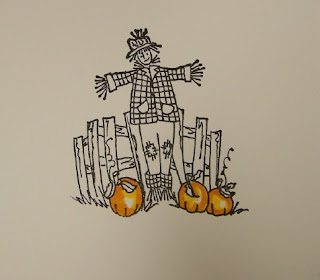
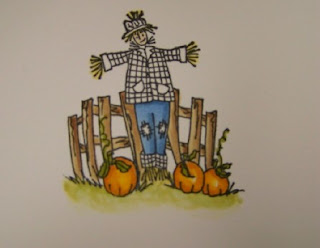
I colored the pumpkin stems in green and they are done. Next I move to the fence. For this coloring technique, I colored the fence planks in with a tan marker all over.
I then took a darker brown marker and scribbled some ink onto a CD case. Lay the CD case over the color of the paper you are coloring on so that you can get a good idea of what the colors will be. Then I took my tan marker that I colored the fence in with and picked up some of the dark brown color off of the CD case. Just like using a paint brush to pick up paint medium. I used this to shade in the darker brown on the fence planks. See photo above. Notice that I paid attention to my shadows and that all of the shadows on the fence fall to the right. This means that my light source is coming from the left. Lighter on the left where the sun might be shining and darker on the right where the shadow is. You can pick up more color as needed from the CD case. If it's too dark, you can scribble a little off on some scrap paper. Clean the tan marker when done cleaning to remove the darker brown ink. My tan marker is now back to it's original color.
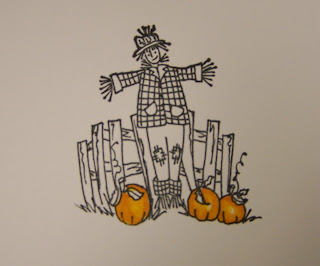
Next I colored in the scarecrows pants. I wanted him to be wearing some old farmer's jeans so I colored them a denim blue color. I simply colored them in solid then went back over the areas I wanted to be shaded with the same color marker. I love that you can use one color of marker to get darker shades. Just keep applying layers until you get the desired shadow. Notice again that my shadow falls to the right and a little bit under his shirt.
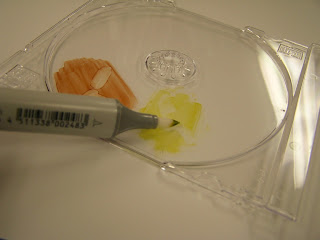
Then I moved onto the grass under the pumpkins. I once again scribbled a green color (looks yellow in the photo) onto the CD case. Then I took my Colorless Blender (same type of sketch marker but it just has clear ink) and picked up some of the green color. I color directly onto my image with the blender pen and kept adding color til I got the look I wanted. I then wiped my Blender Pen clean onto a scrap piece of paper then continued to blend the grass out. See above photo.
Next I colored the scarecrow's shirt. Of course he had to have an old flannel plaid shirt, right? So I colored the burgundy stripes of the shirt following the lines on the image. Then I went in with the same color tan that I used on the fence and colored in the entire shirt. I went over the plaid lines to soften the look of the burgundy marker a bit. I also colored in the face, hat and straw hands and feet with markers. Lookin' good, Mr. Scarecrow!
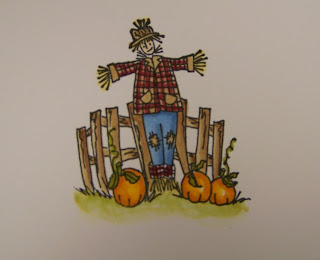
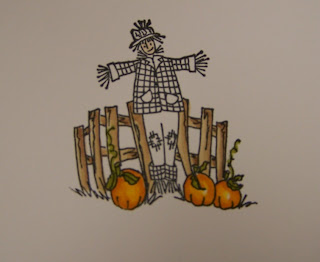
Now this is what really finishes off the colored image, in my opinion. I gave the image some depth by adding in a colored sky. Take a look at the photo above compared to the photo below. Doesn't the blue sky just make all the colors pop off the page. I thought so too! I do this with a lot of colored images just to get this cool effect. You don't have to color in an elaborate sunset or a whole sky either. Just a hint will do. To do this, I usually use a B00 or a B000 and simple outline around the colored image and in this case I colored in the spaces between the fence too. Let this set for a minute so you can see what the color ends up looking like. Then I take the beloved Colorless Blender and just blend the blue color into the white, fading it out so that there are no definite lines. Voila, now my image is finished! You likey?
Here is the finished card I made. I took my colored image and die cut and embossed it using the Wizard and a
Spellbinder's Scallop Square Die Template. No extra matting was needed because the image stands out so nicely. For the card base, I used a Memory Box notecard and four pieces of
Rubber Soul patterned papers from the Garden Variety 8 x 8 collection. I added some twinkle sequins to some flower centers for a little bling. A cute polkadot ribbon finishes off the card. I hope you learn a LOT from my tutorials, I am more than happy to do them. I just love these Copic Markers so much and I want you to be able to use them and get the desired look you want. So have fun and let me know if you are a Copic addict like me!! Ellen has markers back in stock but they are selling out as soon as she can get them in. So place your orders today, don't forget the Colorless Blender and have fun!!
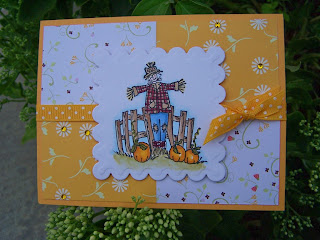
Tip of the day: To create the patchwork design on the card, simple cut two card fronts of patterned paper and then cut it into four pieces. In this case, I liked the flip side image so I used that. Then you have enough 8 pieces which will be enough for two card fronts. Just place them back into place on the card front like a puzzle and adhere. It's a good way to use more than one pattern on a card but it still has a nice clean look.

 When I received my goody box from Dani and Fred at Rubber Soul, they sent a fun collection of stamps for me to give away. It was like Christmas! And I get to share with you guys. So in honor of the new baby, I'm giving away my first blog goodies! If you are the lucky winner, you will receive the Baby acrylic set and some fun baby embellishments shown below. All you have to do is leave a comment with your name and tell me one of your favorite childhood memories. I think my fondest memories as a child was growing up with my mother at home. She was always there to greet us when we got off the bus and we never had to go to a babysitter. She always had some homemade goodies as treats and we got to play outdoors for hours and hours until Dad got home from farming. Those were GOOD days!
 I will select a winner on Saturday evening so be sure to leave a comment and feel free to tell your friends! I will ask the winner for an email address so that I can contact you for a mailing address. And a big THANK YOU to Dani and Fred at Rubber Soul for the wonderful opportunity they have given me!!!


