November 30, 2008

Cash & Carry Challenge

I couldn't wait to make my project for Nichole's Papertrey Design Team Challenge this month. Her challenge was to design a unique way to present gift cards. I had lots and lots of sketches and finally decided upon this one below. I made a few revisions but I kept the main idea in the final projects.
My finished gift cards came out so cute, I think! I would love to get a little gift like this and I know the girls will love to see them tucked into the branches of the Christmas tree...filled with IPod cards once I actually purchase them.
I made a gift card for Josey, using the Simple Alphabet stamp set and a Spellbinder's tag die.
And one for Jordan, just changing up the buttons a bit but keeping the same overall design.
I want to show you how to make the fun candy cane striped patterned paper. I'm so into the candy cane colors this holiday season...LOVE the red and white. You can see the strips used on my cards above, just under the buttons....sticking off the edge of the cards with a fun little notch cut out to resemble ribbon.

Using the Faux Ribbon stamp set and Pure Poppy ink, stamp lines at an angle on a strip of Stamper's Select White cardstock. I have two of the line stamps placed close together on my clear grid block.
Cut the finished paper into strips and they're ready to use on your projects.
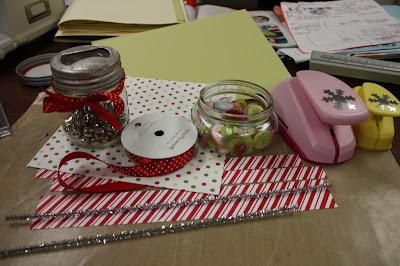
Here, I've gathered up the supplies for the gift cards....Spring Moss cardstock for the base card, Polka Dot Parade patterned paper, Swiss Dot Pure Poppy Ribbon, Foofala buttons, silver jingle bells, silver tinsel pipe cleaners, etc.
For the actual card, I created a miniature version of a pocket card. My finished cards measure 2-3/4" x 4-1/4". Start with a quarter sheet of cardstock, fold in half, and create your pocket from there. I added a piece of polka dot patterned paper to each pocket card front and then stitched around 3 sides with my sewing machine and white thread. Cut a long, skinny strip of the candy cane striped paper and fold in half. Wrap this around the front and back of the card with both ends ending up on the right. Cut little notches. Finish up the pocket cards with a pretty red bow and silver pipe cleaners. Wrap the pipe cleaners around a pen to form the curls. Tie on jingle bells with embroidery floss. Add the stamped name tags.
Below is a detailed shot of the ribbon, name tag, curled pipe cleaner and jingle bells.
And here's a shot of the big, fun buttons. I always wonder what to do with those big, honkin' buttons. Use 'em up! Once complete, the actual gift cards slide into the pocket at angle, so there is no need to untie the pretty ribbon embellishment.
Hope you enjoy my project! Be sure to check out Nichole's blog and the other designers' blogs for more great ideas. Links: Debbie Olson, Lisa Johnson, Heather Nichols, Lauren Meader. I can't wait to go blog hoppin' to check them out for myself!

Mini Holiday Lists

Edit: The notepads are lined junior notepads that measure about 5" x 8". To get them small, you have to take them to a printer type shop (like Staples, Kinko's, etc) and ask them to cut them in half. They charge by the cut so ask them to pile up 5-6 at a time instead of one by one. My local print shop does it for me for free if I purchase the notepads from them.

December will be here tomorrow! I have to say it's beginning to look a lot like Christmas around here. We saw snow flurries earlier, the fire is roaring already this morning, and the girls set up the Christmas village last night. I made a wonderful Mexican dinner last night especially for my mom. She loves Mexican food so I did the cooking to give her a break from all the work she did for Thanksgiving. After supper, we did a little sewing workshop and she showed me how to do a blanket stitch and French knots. Then it was my turn to do a little show and tell. I got out my basket of Christmas stamped goodies and let her pick out a notebook. These below were a few of my samples. I showed some a few days ago too, using the full size junior notepads. I used my fun K and Company papers and glittered chipboard accents again, along with some tied buttons and ribbon.
For the one above, I used Karen Lockhart's Rose Stocking. By paper piecing part of the stocking, I was able to use Copic markers to match and make a beautiful accent piece. Sentiment is from Papertrey Ink along with the polka dot ribbon and solid cardstock in Ocean Tides.
Here's the ones I made using the glittered chipboard accents and a mini alphabet. I can't wait to hand these out to some friends and family. I better hurry, they'll be needing their little notepads. Sooooo, have you started decorating and planning for Christmas? What do you have planned this year?

November 29, 2008

French Onion Soup for Two

Need a break from leftover turkey? Then you've GOT to try this recipe if you like French Onion Soup. I love it but never order it at restaurants much(mainly because McDonald's doesn't have it on their dollar menu!), and I have never made it at home either because I didn't have a recipe. While subbing one day for my librarian friend, I was browsing through a Taste of Home soup cookbook she had. I found this recipe for French Onion Soup for two and thought it sounded pretty tasty. I had one bowl for lunch and saved the extra bowl for lunch the next day. My family probably wouldn't like it so I made it all for myself! It's delicious!! A little time consuming but such a special treat.

Such a pretty presentation with Fall decorations.
All rustic looking with the thick pieces of French bread.
Zoom in even more, can you see the bubbling cheese? The aroma is to die for!
And of course I had to make a recipe card cuz it's a keeper! I used Karen Lockhart's Tomato and Scallion stamp from her Vegetable Couture line. Karen's got the perfect stamps for making recipe cards. I paired it with the Small Alphabet and a border from Just Rite Stampers. I colored my image in with Copic markers and then cut and embossed both circles with Spellbinder's Circle Dies. I used some Ranger Distress inks to give a little color to my circles. Main card is Papertrey Kraft Cardstock with a strip of K and Company patterned paper across the middle.
My recipe was long enough that I need to use the back side of my recipe card to continue the directions.

Here's the recipe for you to copy and paste:

French Onion Soup
2 medium onions, chopped
1 teaspoon sugar
6 T butter, divided
1 T flour
1/8 teaspoon black pepper
2-1/2 cups beef broth
2 T grated Parmesan cheese
2 slices French bread, 1" thick
4 slices Provolone Cheese
Saute onions and sugar in 3T butter until golden brown. Stir in flour and pepper til blended. Gradually stir in broth. Bring to a boil; cook and stir for 2 minutes. Reduce heat; cover and simmer for 30 minutes. Stir in Parmesan cheese. Meanwhile, melt remaining butter. Add bread. Cook til brown on both sides. Ladle soup in bowls. Place cheese in each bowl, top with bread and remaining cheese. Bake at 375 degrees for 10 minutes or until cheese is bubbly. Serves 2. From Taste of Home Soup Cookbook 2008.

Note: For the CK Becky Script font, click on the label attached to this post for the link.

November 28, 2008

Stocking Holiday Planners

Hi everyone, I hope you had a great Thanksgiving celebration yesterday! The fun continues today for our family as we head over to Grandma's house for dinner today. Yummy, more juicy turkey, my mom's fabulous cranberry sauce and her wonderful chocolate layered pudding dessert. And the best part is we still have two more days left of our Thanksgiving vacation time, woohoo!!

At this time of year, I always have requests for my Holiday Planners. My quilt teacher requested some and these are two of the ones I created for Trudi. I used the Lockhart Christmas Rose Stocking, a mini alphabet from my LSS and patterned paper/chipboard accents from K and Company. I colored the stocking images with Copic markers in pretty pink and green pastel colors to match the patterned paper. I paper pieced a part of the stocking with some coordinating patterned paper. You may remember that I used this design a while back but the theme was more distressed and vintage. I love that Karen's stamps are SO versatile. A few dressed buttons and chipboard accents finish off the notebooks.
The inside of the notebooks have a pocket on the left side and a patterned piece of paper to finish off the notebook top.
See instructions HERE for how to make the Holiday Planners. Note that I made my pockets straight this time instead of at an angle as the ones in the link.

November 25, 2008

Candy Cane Jar

I bought some candy canes for some Christmas projects and the girls spied them right away. So my first batch of candy canes got snatched from me! This holiday season I'm using a red and white candy cane stripe for my gift wrapping theme so I thought it would be fun to make some decorations to set out also. I love using canning jars for storage so I got out a quart jar, stuffed in some candy canes and made a cute display. Note the small jar, it's a junk store find that I filled with jingle bells and tied up with ribbon. I started out by painting the gold lid ring white and then dipped it in shimmery glitter while still wet. I cut a circle of candy cane striped fabric with pinking shears and slipped that under the lid. To decorate my jar, I used JustRite Stampers' Christmas Ensemble Borders and Centers stamp set. (Check out the buy one, get one free sale, the stamps I used are included!) The candy canes made the perfect border and the Merry Christmas sentiment finished off the center piece. I used Spellbinder's circle dies to cut out my stamped images. Papertrey polka dot ribbon in Pure Poppy was tied around the jar. I added two silver jingle bells and then finished off the ribbon with some silver tinsel pipe cleaners from my Holiday Inspiration Station. I used a fat pen to curl the pipe cleaner, LOVE THAT and will be using that idea again soon.
Inside the jar, I placed some irridescent scrunchy filler, some punched Marvy snowflakes and the candy canes.

Over the Thanksgiving break, we're cleaning the house and preparing for holiday decorations. Jordan has asked me several times now so we're making it a priority. Can't wait to set out the candy cane jar!

November 24, 2008

All For My-Selphy

P.S......I posted a card last night so be sure to scroll down one post if you missed it.

We delivered 3 loads of firewood this weekend, so we had cash in hand....which means we paid bills with it. Snort! If you believe that, I've got some ocean front property just outside my back door to sell ya! We went shopping, you sillies!

I got an early Christmas present because I needed it NOW. Well, actually December 1st I'll need it because that's when my Daily December Album starts. I got a new little printer!! It's the Canon Selphy CP 760. I found it at Wal Mart for $79.99 regular price...did some research online and it was $99.99 at Best Buy and a few other online stores.

PRODUCT REVIEW:
It only comes with a printer cartridge and 5 pieces of photo paper so a refill pack is a much needed purchase along with the printer. I found the refill pack KP-108IP right there beside it for $29.99. It has 3 printer cartridges and 108 photo refills. The Selphy model I got was the newest model and it didn't say that the refills fit this model #. But when I got it home, the instruction manual listed the one I got as a correct refill. Prints figure to be .27 cents each, not too bad.
The unit itself is about 5" x 7" or so, not including the printer tray that detaches. You simply put the paper in glossy side up and slip the tray in til it clicks. Plug in two cords to each other and then into the wall. Turn on the machine, plug in your memory card from your camera and you're good to go.
You scroll through your photos with the arrow buttons and can do multiple copies and change about 5 or 6 settings like minor photo quality, sepia color (cool!), multiple photos on one page (up to 8 but I can't figure that one out), add a white border, etc.
You insert the printer cartridge on the side by opening up a little door. Easy peasy. When it's making prints, it runs the paper back and forth, first making the yellow tones, then the red tones, then the blue tones, then once more I don't know why. I forget the process this is called but it's pretty cool whatever it is. (I'll get more technical for you once I ask my printer guru friends).
The prints come out on glossy paper with two white tabs at each end. They are perforated and you just bend them once and they almost *click* off. Or you can keep them in tact to write on or put a tack in. By the end of the learning session, the girls were pros at printing.
The quality of the photos really AMAZED me. I was skeptical....VERY skeptical of the photo quality because I don't like the look of hazy,home printed photos. I have to say I was very pleased with the photo quality. They really look like photos you'd get back from the printers.
I would HIGHLY suggest this little photo printer and give it a two thumbs up! It's small, portable, doesn't require a computer (but does have a cord so it will work with your computer), prints great photos, is easy to use and convenient. I won't be printing all my photos from home but when I need some for mini albums, school projects, family events, birthday party projects, etc., it will come in SOOO handy. I know my girls will be wanting to use it all the time.
So now I'm all set for my Daily December album. Can't wait for December 1st to roll around now!!

November 23, 2008

Angels Gather Near Card

It's been a while since I've added to my Christmas card stash. I have my stamping table totally covered with my new K and Company patterned paper and matching embellishments. I got a big 12" x 12" pad of the paper and it's just filled with the cutest patterns. It's fun to look at each piece of paper and see what stamps I have to match. I loved this paper that had big ornaments on it. Karen Lockhart has an Angel With Decorations stamp that works perfectly with the pretty paper.I colored my image with Copic markers to match the paper and added a paper pieced element to the Angel's flowing dress. For the background of the card, I used both sides of the patterned paper. Each piece in the paper pack has a coordinating design on the back side. I used Papertrey Ocean Tides for the base card and ribbon and added a little ornament embellishment from my K and Company chipboard box. Little sequins finish off all the ornaments.
I used a Karen Lockhart sentiment that fit in perfectly with my angel theme and also added a strip of patterned paper to the inside of the card. You can scroll back up and zoom in on the first photo to see that I added a coordinating Lockhart stamp to the outside of the card. It ALL coordinates to make a complete card, inside and out.

Hope you're wrapping up the weekend in a FUN way! My girls are on their way home after going to a dinner theatre at the college with my MIL. I can't wait to hear all about it.

November 21, 2008

Advent Craft Project

Hi everyone, December will be here before we know it and I have a big list of to do items. Last year, the girls and I made an Advent countdown box and created the tags for it. This year, we're continuing the fun with Advent events each and every day. For the first day of the countdown, I thought it would be fun to get into the holiday spirit by having the girls create some artwork for the refrigerator. The idea is that Josey and Jordan will each get a box of the same supplies. Their challenge will be to create a piece of Christmas artwork that will be displayed all month. They will have one hour to work on their project. A piece of each of the supplies included has to be used on their project. They will able to use generic supplies from my stamp room if they want to.


To start off, I gathered up some supplies including patterned paper, solid cardstock, felt snowflakes, ribbon, jingle bells, buttons, etc. from my Holiday Inspiration Station. I then packed the supplies up in some Papertrey stamp boxes. I'm going GREEN by recycling and I know lots of you often wonder what to do with your PTI boxes. Use 'em up girls! I added a strip of patterned paper around the box to cover up adhesive that was left on the box when I removed the original PTI label. I tied on some green ribbon that the girls can re-use for their project too.
I then reached for my JustRite Stampers Christmas Ensemble Stamp Set and made a quick label for the art supply box. I stamped the combined image of the border sentiment and center image with Papertrey Ripe Avocado ink onto Papertrey Stamper's Select White Cardstock. I then cut out my image with a scallop Spellbinder's Die Template. I adhered the labels to the front of the boxes with pop dots. The girls will be able to re-use the tag on their projects too. I also included a candy cane for the girls to have while they're creating their projects. They'll have cocoa and listen to Christmas music as they create.

I also added in a personalized holiday greeting from the girls, using WorldWin's Inkjet Printable Translucent Vellum. You can find it at The Paper Mill Store blog by clicking on the store link in the upper left hand corner. The ink dries really fast and prints a nice clean, crisp sentiment.
Do you do an Advent calendar countdown each year? What are you including for some of your days? I would love to have some new ideas this year.
Note: There's a sale going on at JustRite Stampers. Be sure to check out the Buy One, Get One FREE Special going on HERE. Sale is good until November 30th. There's also tons of ideas and inspiration in the gallery so if you have time, stop and take a peek.

November 20, 2008

Holiday Projects Notebook

Edited for Instructions: The notebooks are simply covered with one piece of cut and scored cardstock that folds around the back, spine and front of the notebook. It's best to take your own measurements because the notebooks can vary in size once cut in half and some brands are thicker than others. The books are generally 8" tall x 2.5" wide when cut in half. I leave about a 1/16" overhang on the edges so that my notebook is fully covered. I always cover the top portion of the notebook with a small rectangle scrap of patterned paper too. That's it, have fun!

My life right now totally revolves around my two girls. We are so busy with basketball practices and games, Girl Scouts, guitar lessons, homework, and filling up the gas tank that sometimes I am lucky to get a decent frozen pizza on the table at night. Other nights we're eating hot dogs and nachos at the ballgames. I wouldn't trade it for anything in the world but I am definitely going to have to organize more around here. Finding time to work in my stamp room is becoming a major challenge so when I finally get free time, I just let loose and totally enjoy my creative time.

Yesterday afternoon I found about an hour to create a blog project. While at my scrapbooking retreat over the weekend, the girls and I went shopping at our favorite local scrapbook store. 20% off everything too so that helped even more! I wanted some new holiday paper and stumbled upon K and Company's new Swell Noel line. The pastel-like colors were different than the vintage, old time colors I've been using so I thought it would be fun to work with. A few sheets didn't satisfy me, I had to purchase an additional 12 x 12 pad of papers. AND I found the last box of some adorable, glittery die cut images. The images from this line are so sweet and retro looking, they remind me of old movies like Rudolf and Frosty the Snowman. So they all came home with me and are now an addition to my Holiday Inspiration Station.


Wanna see what I made? I felt the need to make something just for me. So I thought a little Holiday Projects Notebook would be fun. I spread out all my new papers and just ooh-ed and aah-ed for a little while before selecting just one piece.
Then I cracked open this fun little treasure box of glitterfied chipboard accents from a ChipBox. Aren't the little images just adorable? I want to take all those little creatures and move into that wintry home, nestled in the snow!
I then got to work on my project after much drooling and some hot spice tea. I used Copic markers to color in Karen Lockhart's Pencils image. I LOOOVE this image, it's one of my all time faves from Karen's stamp collection. When I see it, it makes me think *CREATE*.
I then cut out my image...added a fine line, black border with a Copic Multiliner Pen....added my stamped title and then masked the pencil jar so that I could stamp an oval shadow using Pine's Papertrey stamp set called Warm Happiness(the coffee mug set).
I used an older notepad project as my inspiration. I used the junior lined notebooks that I had cut in half at the print shop. I love the long, skinny shape these have.
I threw together some embellishments real speedy quick like, just plopping stuff down on my notebook cover to see what looked good.
Didn't take long and I had my notebook completed. I liked my *plopped* arrangement of embellishments so I just glued them all down. Don't you want one???
I didn't fuss over this project one bit, I just had FUN with it. Christmas projects should remind you of getting out the craft box when you were little.....making paper chain garlands out of crappy construction paper...snowflakes out of folded white paper......pipe cleaner candy canes...Santa's that had cotton balls for beards....photo frame ornaments made with wooden popsicle sticks.......ahhhhhhh, doesn't that take you back to the good ol' days??

I didn't worry that my letters were crooked or smudged with ink. It's the look I was going for.
And I purposely glued my embellishments down kinda crooked.....like the wonky lace that I held in place with staples and hangs over the edge of the notebook, the strip of sequins that got adhered right were they landed on the paper. It just all fell into place and I know I will LOVE this little notebook. I'm going to fill it very soon with all the ideas that are stored in the ol' noggin.

I can't wait for Thanksgiving break.....nothing to do but spend time with family, enjoy the last of the decent Fall weather and CRAFT BAYBEE!! Until then I'll keep finding a few hours here and there to CReaTe!! Make it fun, my friends!

November 19, 2008

Hoping you're on the mend...

Edit: You can find inexpensive felt at craft stores, Wal Mart, Michael's, etc. Nicer felts and wools can be found at your finer quilting shops. It can get pricey but I am in love with felted wools.....oh the fun projects I've seen with those.

Get well cards are always in demand during this season so today I have some pretty sewing themed get well cards to show you. My quilting friends at the quilt shop have enjoyed seeing all my sewing themed cards so I thought I would add a few more to my stash.

For my cards, I used Papertrey's Quilter's Sampler stamp set along with some vintage looking background papers from K & Company (I think). Main images were all stamped on Vintage Cream Cardstock. Did you see that PTI now has matching Vintage Cream ribbon? I got out some felt and played around with some heart shapes too. For the spools of thread, I embossed them with Gold Embossing Powder and then colored them in with Copic markers. The main images were cut and embossed with Spellbinder's dies for both cards. The sentiments were also embossed with Gold Embossing Powder.

I finally got a new seeing machine. A cute little Baby Lock machine called Audrey. I hope Audrey and I get to play together this week before my quilting class. My last two classes have been postponed so I don't have any progress to show you. Hopefully Friday I'll get to have class.

Stay tuned for more samples to come. I'm going to lock myself in my stamp room and get some projects knocked out even if I have to stay up til dawn! Boy, time flies when you have kids going in opposite directions and a ballgame or other event every night. Have a great day everyone!!

November 18, 2008

Papertrey November 2008 Release

Good morning everyone! I'm subbing today so no time for me in the stamp room. I desperately need to get back in there to get some samples done. I'll be back with some fun stuff this week!

Today I have my Papertrey release projects to show you. All of the stamp sets and supplies used are available at Papertrey Ink. My first sample uses Lisa Johnson's new set called Out of the Box. There's also a matching sentiment set called Out of the Box Sentiments. I used Ripe Avocado, Sweet Blush, and Vintage Cream cardstock for my color palette. Check out the ribbon, we now have Vintage Cream! Main image was cut and embossed with Spellbinder's Dies. My next card features the Background Basics stamp set. It's a great background set that will soon get lots of use, just like Polka Dot Basics. Colors are Pure Poppy and the new Spring Rain that I used in the ribbon.
My pretty pink cards features a sentiment from Melissa Bickford's new set called Heartfelt Basics. It's a great set full of sentiments to use on card fronts or the inside of cards. I used Sweet Blush and Vintage Cream cardstock. The shimmery polka dots are from the Polka Dots Basic set and were inked with the Glue Essentials Pad and then sprinkled with Martha Stewart glitter.
And here's another set for those guy cards. Melissa Bickford has created a companion set to Women of Life called Men of Life. Great images and sentiments to mix and match for all the fellas in our life. Colors are Ripe Avocado, Ocean Tide and Kraft.
Here's a closeup of some details....white gel pen and Ranger Glossy Accents.
And as an envelope alternative, I used a large glassine sack from Papertrey Ink since my ribbon stuck off of my card.
And finally, my favorite set this month is Nichole's new Teacher's Apple set. I have envisioned a set like this for teachers and Nichole was right on the money with this one. The fun apple designs and sentiments are perfect for all those teacher gifts and cards. My clipboard design has a tutorial if you scroll down a few posts.
Well, it's pajama day at school and I'm being called for pony tail duty. Have a great day everyone!! No time for links to the sets but all of the new release products are right on the front page of the Papertrey Ink website HERE.
Related Posts with Thumbnails