Showing posts with label JustRite. Show all posts

May 25, 2010

JustRite 2010 Catalog & Idea Book

Hey everyone! The brand new JustRite 2010 Catalog & Idea Books are available for pre-order and will ship at the beginning of June. It will quickly become your JustRite Reference & Inspiration Book. You can check off the stamps sets you have and the catalog becomes an easy reference guide to what you own in your personal JustRite collection. And you can also make your JustRite wish list from this handy reference guide! Inside, you will find over 127 project ideas from the design team, including complete supply lists for over 75 projects! The 2010 Catalog & Idea Book retails for $6.95. Be sure to check the JustRite blog for all the juicy details.

Here's a little sample below of one of my projects in the new catalog. My card uses images from Plant A Little Love. I colored my pretty flowers with Copic Markers in YG23, YG25, 0, E00, R20, R22, BG10, Y19 and YR04.
Also, you can visit all the links below for a little catalog preview blog hop. The Design Team members have all posted a sample they made from the new catalogs on their blog today. Enjoy!

JustRite Inspiration Blog

Angela Barkhouse

Barb Schram

Becca Feeken

Debbie Olson

Heidi Blankenship

Kathy Jones

Kazan Clark

Kellie Fortin

Michele Kovack

Sankari Wegman

Sharon Harnist

Sharon Johnson

Stephanie Kraft

May 14, 2010

Big Fun Birthday Card

Hi friends and a happy Friday to you! Isn't it fun to just sit down and stamp? I love to pull out all of my fun stamps, papers and embellishments and just see what happens.

Today I have a cute little birthday card to share with you. I'm participating in JustRite's Friday Challenge sponsored by Spellbinders. This week's Friday Challenge is called KidsTime. And be sure to check out the May sale going on at JustRite right here.
I colored the cute little elephant from Let's Celebrate Decorative 2" Border & Center Set with my handy dandy Copic markers. I love to color elephants pink, they just look so cute and chubby that way. I cut my image and border out with a Spellbinder's Scalloped Square die template. Tied Vintage Buttons were added to the side with some loopy twine.
For the rest of my card I used papers from The Girls Paperie for the background. Along the bottom, I used some of my fun carnival tickets from my Etsy shop, stamped with Papertrey word stamps. I love all the uses for the carnival tickets...this time I thought the tickets and the cutie pie elephant went with kind of a carnival/circus theme. Wrinkle Ribbon in pink was tied around the card. A Tiny Tag with a cute flower stamp and pink sequin finish off the card. The Tiny Tags just add a finishing touch to the Wrinkle Ribbon.
Etsy News: I will be doing a big Etsy shop update by the end of the month, actual date coming soon. I will have more Wrinkle Ribbon colors, all colors of Carnival Tickets, Tiny Tags, Pretty Paper Pouches, Aprons.....and a whole bunch of new items. :) So stay tuned friends! Thanks so much for stopping by today.

May 10, 2010

JustRite CPS Sponsor

This week JustRite is sponsoring the CPS #166 sketch challenge. Be sure to check out the CPS site and the JustRite blog to view the sketch and check out the details on how to win a JustRite prize package.

For my cute card today, I'm using JustRite's Applique Decorative Border & Center Set 2"Square stamp set. The 2" square images from this set are perfect for this week's sketch challenge from CPS. If you check out the sketch from CPS, you'll notice that it's tall and skinny, not the shape of a regular A2 size card that I'm used to doing. I tried something a little different and cut my card base to 3-1/2" wide. This allowed me to adhere a piece of scallop cut patterned paper to the left side of my card. I love how it hangs out from the card base. My finished card size, including the scallops is about 4", still narrow enough to fit into an A2 size envelope. Love that idea and can't wait to use this on more cards.
For my card front, I really decked it out with all kinds of sewing themed goodies. I first stamped and colored my main JustRite image with Copic markers. I think this image looks like a piece of cut lace, perfect for my sewing themed card. Next I used pieces of patterned papers from Cosmo Cricket's Material Girl line. I am in deep love with it all. I really liked the mannequin image. I need a mannequin of my own and am on the hunt for one. (You'll see why later this week). I fancied up the mannequin with Papertrey Vintage Buttons tied with Rustic Jute Twine, using one piece of twine to thread all three buttons. The arrow is a punch out piece from some October Afternoon die cuts. The background also features some of my new Carnival Tickets from my Etsy shop. Several of the colors have sold out but I'll be stocking more soon. So fun! I even cut a little image of some scissors and adhered it to the center of one of the tickets. Cute! Peeking from behind the colored image is some of my Wrinkle Ribbon. I'll be having more of it in my shop within the next few weeks.
I stitched around the front of my card which left the stitching on the inside top of my card. I really don't like that look so I covered it up with some additional patterned paper from the Cosmo Cricket line. For the sentiment portion of my card, I used Quilter's Sampler Additions from Papertrey. Notice the blotchy colors of Copic coloring? That was my test strip...which I also tested out my sentiment. I thought it looked kind of fun so I just used it for card. I love how those little happy things happen.
Here's my Copic colors I used, matching them to the Cosmo Cricket patterned paper.
Hope you enjoy my card today and maybe you can even play along with the sketch. Be sure to check out the JustRite blog for how to win some stamping goodies. Good luck! Stay tuned this week for LOTS more sewing goodness. I'm on the edge of my seat, just itching to show it all to you!! Have a great day, friends.

April 28, 2010

Chocolate Chip Cheesecake Bars

Edit: To find the other recipes shown in the bottom photo, please click on the RECIPE label at the end of the post. There are several pages of my recipe cards located there.

Happy Wednesday my friends! I have another yummo-dee-lish-ush recipe for you today. On the menu is Chocolate Chip Cheesecake Bars. My friends at Scrapbooks, Etc in Topeka served these one day in the shop and I immediately requested the recipe. They are super duper easy peasy to make. Bonus! Perfect, decadent bar cookies for all those upcoming graduation parties...or end of school teacher treats....or track meet snacks that make every kid wish you were his mother.......or butter up your husband so he takes you to a giant flea market this weekend kind of treats. I embellished my 4 x 6 recipe card with some of my favorite papers from October Afternoon and the Recipe Borders and Centers Set from JustRite. The stamp set is still on sale through April. And Cindy at StarLitStudio has some great October Afternoon papers. I'm not sure if the ones I used are available at her shop at this moment though. See the mini staple on my scalloped circle? It's from the Tiny Tim as I call it. The official name is the Tim Holtz Tiny Attacher...but I call it the Tiny Tim for short. The rick rack die I used is from Papertrey Ink. The scripty font I use on my recipe cards is CK Becky. Thanks for thinking I could write that small and that neat...but alas I cannot.
Now check out this last detail I want to share with you today. I used Copic Sketch markers to highlight all the text on my recipe card. It was looking a little bland but I had run out of space to add embellishments. Viola, my trusty Copics to the rescue. I simply used the pointy tip to highlight my lines, just like you would when studying for a test. I love the subtle color it adds to my recipe card. Way cool. Love. Love. I think that would be a fantastic idea for scrapbook journaling too, don't ya think?

Here's the recipe for you to copy/paste/print. If you can't find the Pillsbury cookie dough in a tube, you can substitute probably 2-3 cups of homemade cookie dough.

Chocolate Chip Cheesecake Bars

8 oz. cream cheese

1/2 c. sugar

1 egg

1 tube chocolate chip cookie dough

Spread half of cookie dough in bottom of greased 8 X 8 pan. Soften cream cheese & mix together with egg & sugar til smooth.Pour over cookie dough. Crumble remaining cookie dough on top.Bake at 350 for 35-40 minutes. Can double recipe & bake in a 9 X 13 pan. Can also use regular size muffin tins, with cupcake liners (Still doubled the recipe). Press half of cookie dough in bottom of cupcake liners. Fill 2/3 full with cream cheese mixture & crumble remaining cookie dough on top. From Scrapbooks, Etc.

Ahhh, another fun recipe card to add to my recipe book. I got the recipe book a long time ago so I don't know the source. I'm sure a google search can help you out though if you're interested.

April 26, 2010

Burst 0'Lemon Muffins

Hey, how about this late night posting? Lots to do so I'm burnin' the midnight oil. By special request, I'm posting the lemon muffins that were in this post. I had to make up a cute little recipe card...and it had to be yellow....and just full of cheery accents....because that's what lemon muffins are....cheery! And yummy.
I love making recipe cards because they're like tiny 4" x 6" scrapbook pages. There's a tiny area to add embellishments so it's quick....but oh so fun to find just the right little something that works. For my recipe card I used JustRite's Recipes Borders and Centers stamp set. And good for you, it's on sale this month along with all the 1-3/16" stamps. The rest of my recipe card uses paper from The Girls Paperie along with circle punches, Prima flowers and brads from Cindy's shop...StarLitStudio.

Here's the recipe for you to copy & paste or print. Recipe from Taste of Home 2000 Annual Recipes. Note: I added about two teaspoons of poppy seeds to my recipe, totally optional. And this recipe was a little dry, I had to a little bit of milk to moisten the dough mixture up a bit. It's still a sticky dough that you have to spoon into the muffin tins. I doubled my recipe. Oh, and it fill the tins more than 2/3 full...my muffins had big ol' muffin tops....which are Jordan's favorites. Every time we'd go to grab a muffin, the muffin tops were missing!! These are best eaten warm, on the first day. :) Oh, and use only fresh lemon juice from real lemons. That stuff in the bottle is gross.

Burst o’Lemon Muffins

1-3/4 cups flour

¾ cup sugar

1 teaspoon baking powder

¾ teaspoon baking soda

1//4 teaspoon salt

1 egg

1 (8 oz) lemon or vanilla yogurt

1/3 cup butter melted

1-2 T grated lemon peel

1 T lemon juice

½ cup flaked coconut

Topping:

1/3 cup lemon juice, ¼ cup sugar, ¼ cup toasted coconut

Combine flour, sugar, b. powder, soda & salt. In another bowl, beat yogurt, egg, butter, lemon peel & juice til smooth; stir into dry ingredients til moistened. Add coconut. Fill greased muffin tins 2/3 full. Bake 400 for 18-22 min. In saucepan, cook lemon juice & sugar til sugar dissolves. Stir in coconut. Using toothpick, poke 6-8 holes in each muffin. Spoon topping over muffins. Makes 1 dozen.

Edit: No need to send me emails that I misspelled sugar on my recipe card. My spell checker didn't catch it and neither did my 40 year old eyes til I pasted the recipe into my blog post. :)

Edit #2: A viewer wrote "I hate coconut...so do you think they would still be good without it?" *gasssssppppp* Be careful how you talk about the coconut....it's a personal fave. But if you don't dig it....the muffins would be fine. How 'bout a few white chocolate chips on top just for pretties? Seriously. You don't like coconut?

April 23, 2010

Stitched with love.....

TGIF....thanks for all your Etsy orders, friends. I'll have more shop updates next week!

JustRite has some fun, new stamps coming out this month, available for pre-order right now. Today's card was made from the Applique Decorative Border & Center Set 2" Square. There are four centers and four borders with this set. I layered my images to create a pretty focal point for my sewing themed card. Copic Sketch markers made for easy work, using colors that match the Cosmo Cricket Material Girl patterned paper. I adhered a tied button to the center to complete my hand made look of the card.
I finished off my card with some loopy bows from some of my Wrinkle Ribbon and a big clear button and green/white baker's twine. Sentiment is from Papertrey.
A pretty little card perfect for a birthday...or any day. Hope you have a wonderful weekend, my friends.

April 20, 2010

JustRite April Release Blog Hop

JustRite has some new stamps being released this month. The Design Team is having a little blog hop to preview some of the images. You can check out all the stamps HERE.
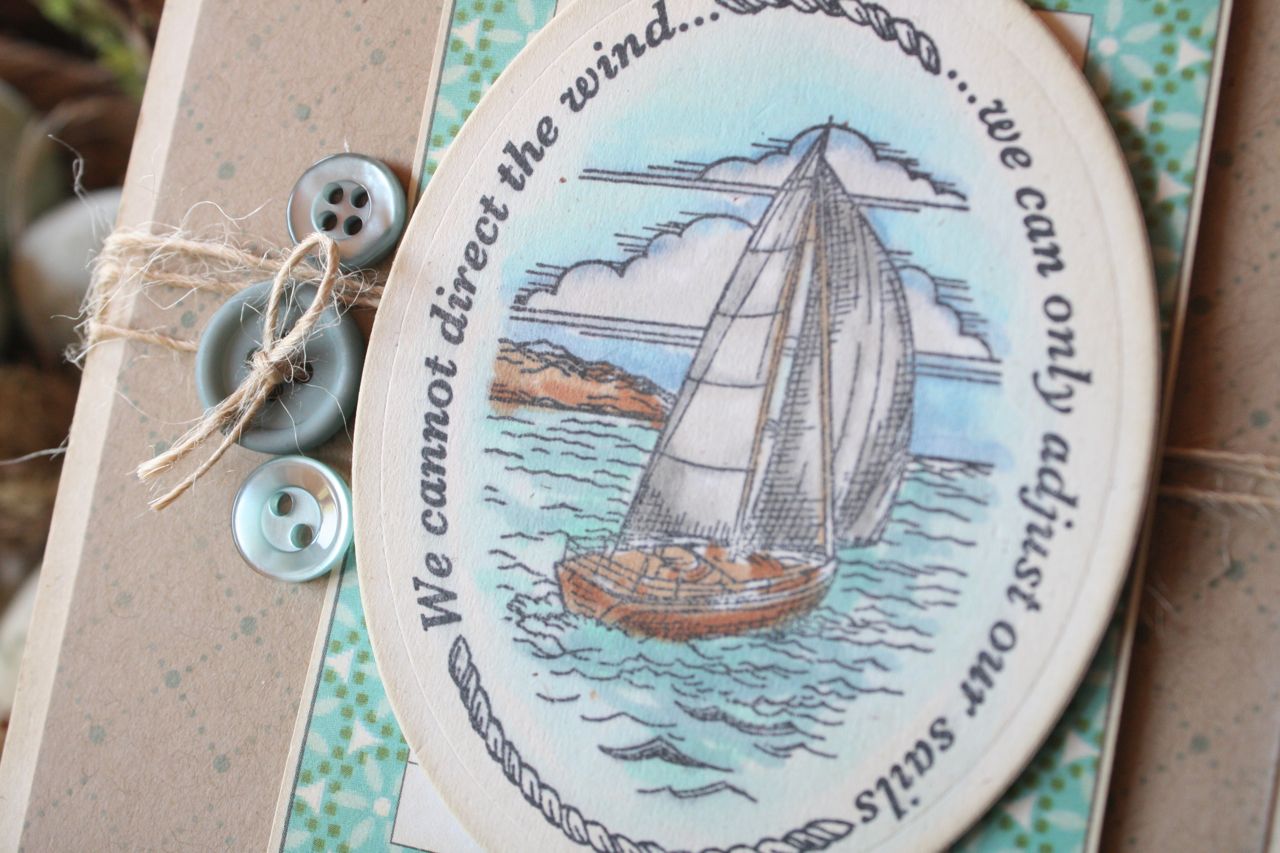
Today I'm using By The Sea for my project. I thought this sail boat image would make a nice card for my brother who has been in the hospital this week.
I stamped the border and center image onto cardstock then colored the image with Copic markers. (Company came and I didn't get to snap a photo of my markers, I'll try to update soon with the marker colors). Copic has the most beautiful shades of blues and greens that make coloring water and sky images so fun. I cut my colored image out with a Spellbinder's Oval Nestabilities die template. All edges of my focal piece and base card were distressed with distress ink. In keeping with a masculine theme, I kept my card design simple. I added a few buttons and wrapped some twine around the card front. Patterned papers and background stamp are from Papertrey. Such a nice, serene image to work with.
Be sure to check out the following blogs for even more inspiration:

Please note the new pre-order policy for JustRite:
New JustRite Easy Pre-Ordering – JustRite bills pre-orders when it ships!

· If any of your items are not in stock we will create a backorder. We will only bill you for items as they ship.

· We will bill you your entire shipping charge on your first order and we will pay all the additional shipping charges on any backorders.

· If you would like your order held until it can ship complete, Please write “Ship Complete” in order Special Instructions.

· PayPal orders require immediate billing (This is a Pay Pal Business Policy, not a JustRite Policy).


March 31, 2010

For my mother...

Hi friends. It's been a trying week. In the midst of my dad being gone to Germany for two weeks, I had fun plans for my mom and I. We were going to sew and craft and shop while the girls were in school. Well, the plans changed. My mom has really bad arthritis and a bad back and this week has been horrible for her. I've been taking her to doctor's appointments, etc and I'm so glad that I live right down the road from her so I can help out. But it saddens me deeply to see her in so much pain. And she's not the sittin' around type. She wants to be in her garden and out and about. So then she feels badly when she needs to ask for help. But for all the things she's done for me in my life, it is now my turn to take care of her.

I made her this pretty card today so she can sit it by her chair during those rare moments she actually takes a break and puts her feet up. The main circle image is from one of my favorite JustRite sets called Stitched with Love. The illustrations in this set are so charming. They fit in perfectly with all my homespun goodies.
And I finally tore into my Girls' Paperie patterned paper. I couldn't stand it any longer, I had to create something with it. I colored the sweet heart image in with Copic markers and then added a little glitter for some shimmer. I tied the cared up with some of my Robin's Egg Wrinkle Ribbon and a tag I distressed with the word hello from Papertrey.
The inside of my card features some snippets of paper from The Girls' Paperie collection. I love cutting little strips and mixing them up. So sweet.
Here's my Copic colors I used today for coloring the image. These colors are soft and pretty and work so well with the patterned paper.
Well, I'm off to send out some Easter cards and get this one ready for Mom. I know she'll love it. Do you have someone that could use a card today? Perhaps a little pick me up or a sweet Easter card? Maybe hand deliver a card with a sweet treat? It will make some one's day.

March 24, 2010

March Mega Blog Hop

Welcome to the JustRite Mega March Blog Hop!

Today I have a vintage looking card made with Plant a Little Love Borders & Centers Round 3-1/4". I created the focal point of my card by coloring the pretty hydrangea image with Copic markers. I then paper pieced the image and popped it up on my card with pop dots.
I used some crinkly ribbon to enhance the vintage look of the card.
I also used JustRite stamps on the inside of the card. It's fun to open up a card and see the inside embellished just as pretty as the outside of the card. I used a sentiment from Joyful Hearts which was distressed a little with inks then punched out with a circle punch.
I also stamped the hydrangea image from the front of the card on the inside too. There's just enough space to write a nice little thank you note. Patterned papers are from Basic Grey. Hope you enjoy!!
Now for the blog hop details: You will get lots of inspiration today as there are 28 designers and FIVE shopping sprees each day. No one knows where the prizes will be! Each day of the hop JustRite will have five Mystery Blog Candy Prizes hidden along the hop with a total retail value of $600. JustRite will randomly select five mystery blogs each day of the hop and randomly allocate each of the shopping sprees. For your chance to win, simply leave a little love (a comment) on each designer’s blog including the JustRite blog. The more designers you leave comments with, the better your chances of winning. Each day’s comments will remain open for three days. A winner from each of the mystery blogs’ comments will be randomly chosen using Random.org. Consult the listing of designers at the JustRite blog each day (each day’s designers will be different) and start out on your way! Beginning Friday, March 26, summaries of all the winners will be posted on the JustRite blog. Good luck to everyone and enjoy all the JustRite eye candy along the hop!

Today during the JustRite Mega March Blog Hop (Day Two) JustRite and its sponsors will be giving away the following five prizes:

· $200 JustRite Shopping Spree
· $100
Spellbinders Shopping Spree
· $100
Stamp Simply Ribbon Store Spree, and
· Two additional $100
JustRite Shopping Sprees!

Blog comments for Day Two will be open until Friday at 6pm EST. On Saturday, JustRite will announce on their blog which five blogs have the mystery candy for Day Two. You will need to go to the JustRite blog to determine where you need to go to find out if you are one of the five lucky winners.


Sharon Harnist

Sankari Wegman

Marianne Walker

Michelle Wooderson

Linda Duke

Barb Schram

Eva Dobilas

Liz Weber

Jeanne Streiff

Lori Craig

Sharon Johnson

Michelle Woerner

Sherry Cheever

Keri Lee Sereika

Lauren Meader

Michele Boyer

Lucy Abrams

Janine Blackwelder

Edna Morrisedie

Deb Saaranen

Melody Rupple

Charmaine Ikach

Michelle Giraud

Amy Crockett

Lydia Fiedler

Kelly Landers

Amber Hight

Margie Higuchi

Mary Pfaff

Debbie Seyer

March 21, 2010

Your kindness...

I'm in a cherry kind of mood lately, loving the red and aqua and cream color combination. Today I have some pretty little thank you notes featuring JustRite's Joyful Hearts Borders & Centers stamp set. The sentiment oval is front and center, adorned with a little Tin Type Papertrey background and two aqua sequins. Background paper is from October Afternoon, along with the reverse side featuring the typewriter print for the strip under the oval accent. Love that crinkly ribbon? I have a big surprise coming to my Etsy shop soon. :)
The bottom of the card is finished with scallops on the patterned paper and more of the Tin Types background stamping in Aqua Mist.
So. When is the last time you sent a thank you note? Did someone send you a nice gift? Bring you over a plate of cookies? Do something kind to make you feel better? Send them a thank you. Don't delay. We all love to get little thank you cards in the mail, so much better than an email. I need to make more thank you cards to keep in my stash. I think if they're on hand then we'll be more like to send them, don't you think. So go get crafty. Make some cards. You'll be glad you did. :)

P.S. Thank you for visiting my blog today. I'm so glad you stopped by. And a bigger thank you for those that leave comments. I know that takes a lot of extra time and it's so appreciated!!!

March 18, 2010

Cocktail Crackers

Here's another great recipe that I've made a bazillion times over the years. This one gets rave reviews and is great for teacher/neighbor gifts at Christmas time.....slumber parties....ballgames....anytime! And no baking, that is a plus. You can even freeze it in large batches.For my recipe card, I used some of those same papers as my last recipe card from We R Memory Keepers. The circle accent for the appetizers is from JustRite's Recipe Borders & Centers Set 1-3/6".
If you like the idea of making recipe cards, here's an idea for you: Create a few extra of the recipe cards and attach them to bags of the Cocktail Crackers. You know they're gonna ask you for the recipe so you might as well beat 'em to the punch. :) With the JustRite recipe set, you can customize any type of recipes from salads to sweets...to soups and desserts. It's fun idea to try.

It's a glorious sun shiney day here, you gotta love that! Hope your day is great too.

March 16, 2010

Microwave Sweet Party Mix

Hi friends. There's a party going on around here! My husband, Eric, turns 41 today! Happy Birthday Dear Hubster. We're taking everyone out to celebrate tonight at Eric's favorite BBQ joint. You've never seen someone skin a rib like Eric! And he waits til he's all done to use a napkin. It's quite a site.

To keep the party going, I have a sweet recipe to share with you today. It's called Microwave Sweet Party Mix. My crafty friend Carmen brought this to one of our first crops we attended together and I had to have the recipe right away. You prepare it in the microwave, usually double recipes when I make it.
Since this is one of the girls' favorite snacky recipes, I embellished my 4" x 6" recipe card with JustRite's *Family Favorite* stamp from the What's Cookin' Borders & Centers 1-5/8" stamp set. Right now this set, along with all the 1-5/8" stamp sets are on sale at JustRite for 20% off for a limited time. You can check out all the sets on sale HERE.
I love to create these hand made recipe cards so that my girls will have access to all of my favorite recipes. So many times, recipes get lost, tucked away in hard to find places, or we simply commit them to memory and don't write them down. Jordan, my little cook, has requested all of my recipes. Josey on the other hand just needs a map to the closest fast food joints. Maybe some day she will love to cook too. Maybe.

Anyway, my recipe card is embellished with papers from We R Memory Keepers, a great line I found at my local scrapbook store. I like to print off my recipe card, trim it down to size and then fill in the black spaces with embellishments. Machine stitching adds great detail too.
Hope you party like a rock star today! For us....probably more like a retired country western singer. We're pretty low key these days. But being with family is what it's all about!! Well, I gotta run....Jordan is painting Eric a KU Jayhawk for his office and I'm getting ready to wrap presents for tonight. Josey is still in bed. That girl. :)

March 9, 2010

JustRite Daisies

Hi everyone, hope you're having a great week. Today I have some cards to show you that I created with JustRite's Beautiful Blossoms Borders & Centers stamp set. I have two thoughts that I'd like to share with you today:

One is that you don't always have to stamp your images on white or cream cardstock to color them with the wonderful Copic Sketch markers. I stamped the pretty daisy bouquet onto PTI Kraft cardstock and still got beautiful results with my Copic markers. When I color on Kraft cardstock, I think of the colors I want to use and then usually reach for the next shade or two darker. This helps the colors really pop off the paper like my yellows in the daisy centers on my cards. If you want white, like on my daisies, Kraft cardstock is another excellent choice. Simply use a white gel pen to color in the daisies. If you zoom in on my photo, you'll notice that I left the black outline of the flowers and simply scribbled in the white color. It's not so much the artistic ability here but just giving the impression of the color white. Works for me. :) Glitter on white looks awesome too, so try that also,

The second thought I had for the day is that you don't always have to cut out oval stamped images with oval die cuts or punches (or circles for that matter). Most of JustRite's stamps are ovals or circles but what happens when you're not in an oval or circle mood? Simply cut your image into a square or a rectangle like I did on my cards today. I rounded the corners and inked all the edges with PTI Fresh Snow ink to make the image pop off the card. I really love this simple look.
To complete my cards, I used some Papertrey papers, ribbons and buttons along with the new PTI scalloped die. And see the little word *friends* on my card? I stamped a sentiment from Joyful Hearts and cut out the word *friends*, and adhered it to my card front with some small pieces of pop dots. Just another way to use sentiment stamps. Oh, and zoom in on the image above. You'll notice that my outline around my daisies image is a peachy color. That's a YR02 marker and it really makes the white in the flowers pop. Man, I'm just full of tips today.

I forgot to take a photo of my Copics but I used Y15, Y38, YR02 and the colorless blender....along with the white gel pen and some glitter to finish off the flowers. Hope you enjoy!
Related Posts with Thumbnails