Showing posts with label Make and Save. Show all posts

April 19, 2011

Make + Save: Peep Show Cookie Jar

Please note: The Make + Save link is not available just yet over at Papertrey Ink. I have listed the recipe ingredients and will walk you through the assembly process in my post here today. The information for this Make + Save will available soon at Papertrey Ink. If you have any questions on supplies, etc please leave a comment and I will edit my post with answers. :)

Welcome to another Papertrey Make + Save post, where you'll find nifty handmade gift ideas that you make from your own supplies. Today I'm featuring a Peep Show Cookie Jar just in time for Spring and Easter. Full instructions for how to assemble the jar ingredients and how to embellish the jar are at the Make + Save section of the Papertrey Ink website.

First up I'm going to show you how to make assemble the cookie ingredients in the jar. I've included the recipe for the Peep Show Cookies below so you can see what ingredients we're working with for jar assembly. Be sure to include the recipe with the jar when giving as a gift.

Note: A wide mouth canning jar + lid and ring work best for this project.

Peep Show Cookies
1 sleeve graham crackers, crushed
8 Peeps marshmallows
1-1/2 cups plain pastel M & M’s
1/3 cup brown sugar
½ cup butter, melted
1 teaspoon vanilla
1 quart canning jar

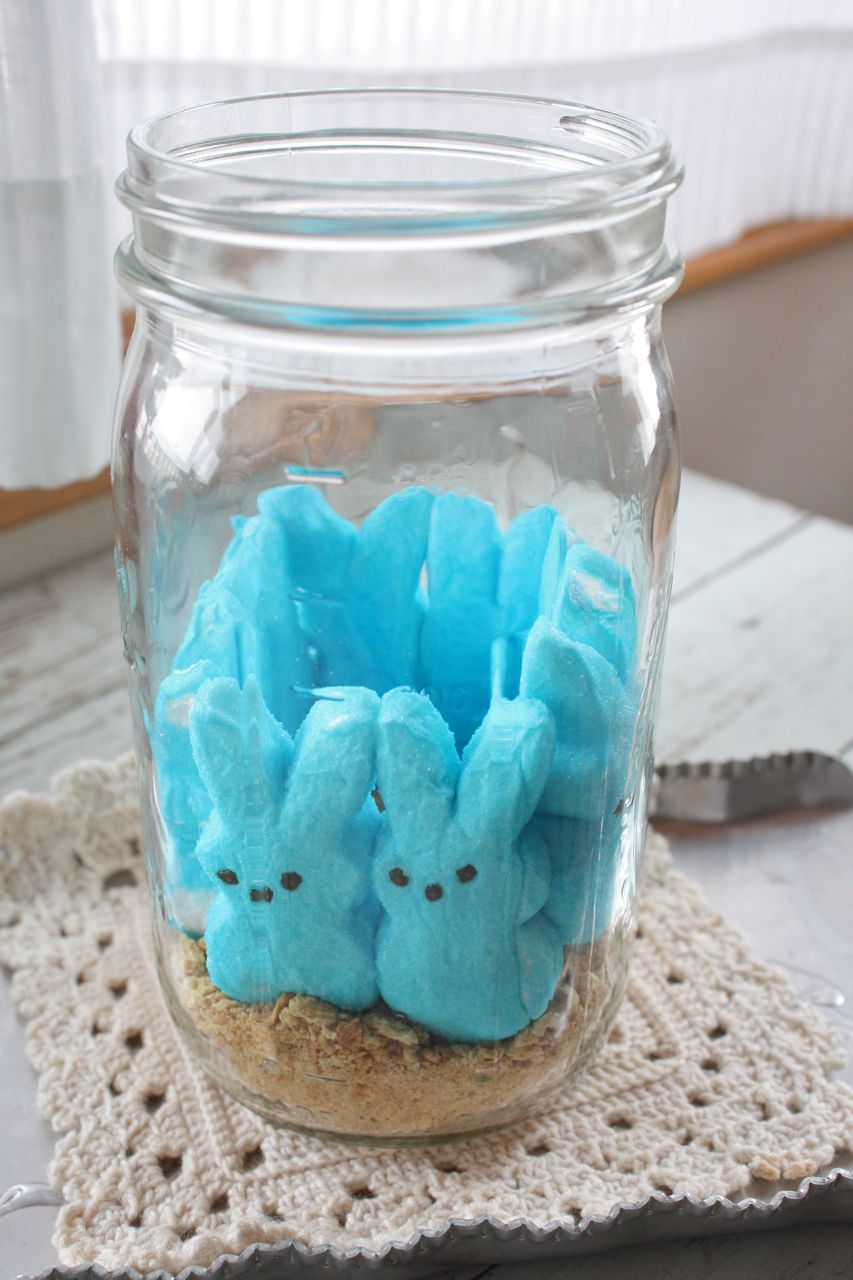
To assemble jar: Layer 2/3 cup graham cracker crumbs in jar. Arrange 8 Peeps on top of crumbs, around inside of jar. Spoon remaining crumbs in to support the Peeps. Pour M & M’s on top. Pack in brown sugar.
To make cookies: Dump jar ingredients into bowl. Snip Peeps into bits. Mix all ingredients with melted butter and vanilla. Pat into 9” baking dish. Bake at 350 degrees for about 15 minutes. Cut into bars. Enjoy!

Here's a photo of the ingredients you'll need to assemble the jar: Peeps Marshmallows, brown sugar, graham crackers and pastel, plain M & M's.
Using a clean, wide mouth canning jar layer 2/3 cup crushed graham crackers into bottom of jar. Arrange 8 Peeps marshmallows around the inside of the jar.
You will then spoon in the rest of the crushed graham crackers to support the Peeps. Pour in the M & M's. Then pack in the brown sugar. I used this unknown wooden tool that I got in a box of stuff at an auction. If you don't own an unknown wooden tool, just use a large spoon to pack the brown sugar. Place the lid on the jar and screw on the ring. Set jar aside while we make the jar embellishments.
Here's a photo of the supplies needed to embellish the jar. Again, the complete supply list and instructions are listed at the Make + Save section at Papertrey Ink. I'll be using Friendship Jar + Friendship Jar Spring Fillers plus lots of other fun products.
Start off by die cutting and stamping the jar + lid + topper + label images as shown below. The bunny in the jar is from Friendship Jar Spring Fillers.
Color the bunny image with Copic markers. Using the fine tip end of pastel Copics, make small polka dots on the jar.
Assemble the die cut jar pieces as shown below. I used pop dots to adhere the jar lid and the label. A portion of the label will be snipped off. Set embellishment aside.
Cut a 5" circle of fabric using pinking shears. The fabric I used is from Amy Butler (sorry, I don't know the exact name). Center the fabric circle over the jar lid then screw the ring over the fabric. Set aside.
Using spray mists (you could also use Copic re-inkers and an old toothbrush), splatter the ribbon with droplets of ink. I did not spray the ink but instead used the spray nozzle as a eye dropper of sorts. This gives the ribbon a great speckled egg look.
Tie the ribbon around the jar ring, using small glue dots to secure in place if needed. Wrap a piece of twine around the jar lid of the embellishment and tie around tied bow on jar.
And here is my completed Peep Show Cookie Jar. I'm using mine as a cute center piece decoration for now. So cute and colorful.
Place a few little chicks from the craft stop on top for even more adorable-ness.
So cute with the pastel M & M's showing through. All kids young and old LOVE these jars. Include a copy of the recipe so that the recipient knows how to prepare the cookies. So easy and fun. Hope you enjoy!

January 6, 2011

Papertrey Make + Save: Valentine Tag Portfolio

Today I have Papertrey Make + Save project for you called Valentine Tag Portfolio. You can find the direct link HERE over at the Papertrey website, complete with supplies and instructions on how to complete my project for today. To view all of my Make + Save projects in one convenient spot, click HERE.

The season of love is upon it...Valentine's Day. If you want to create a very unique gift for a crafty friend, try out my Valentine Tag Portfolio.
I've got all my supplies gathered so let's get started.
My project consists of an envelope booklet portfolio which will hold supplies to complete some Valentine goodie pouches with tags. For the base portfolio you'll need two envelopes, a large glassine bag and clear cardstock.
Start by fold a large glassine bag in half. Trim the ends off with a scalloped border die.
Place (2) A2 size Kraft envelopes together with the flaps inserted into each envelopes opening. This creates the portfolio. Unfold the glassine bag and place in the fold of the envelopes. Place clear cardstock over glassine bag. Sew down the middle of the portfolio contents. (Remember for a more complete set of instructions, visit the Papertrey link at the top of my post).
Next up, die cut, color and assemble tag and heart elements. I used a R81 Copic marker for my coloring.
I've created 4 sets of elements to create 4 completed, layered tags. Cute stuff.
Here's a sampling of how you can assemble the tag elements.
Using pop dots or flat glue dots, adhere all the tag elements to the clear cardstock, except for the tags (they go into the glassine pockets).
Next up, gather up supplies to use for some cute Valentine envelope pouches.
The patterned paper strips will be used as liners for the square envelopes. Add a little adhesive to the paper strips and insert into envelopes. Turn over to the back side and trim off the excess. Instant envelope liners.
Then divide the supplies for the tags and pouch pieces into the pockets created with the glassine bag. I divided the supplies in haf, two sets for each side of the portfolio.
So in my envelope portfolio, I have the tag topper accents adhered to the clear cardstock sheets.....and the rest of the supplies are in the scalloped glassine pockets.
A neat and tidy....and oh so crafty......Valentine Tag Portfolio.
To the left is the portfolio folded up and tied with an additional tag and ribbon. The photo on the right shows one of the envelope pouches that can be made from the kit contents in the portfolio.
A cute little envelope pouch that is all fancied up with a cute tag made from the kit contents.
And inside, you tuck candies into a smaller glassine sack...then tuck into the envelope pouch. Use some scrunchy filler if you like. A darling little gift that keeps on giving. Hope you enjoy!

December 7, 2010

Make + Save: Creative Card Packaging

Hi there. Today I have another Papertrey Make + Save project for you. It's all about Creative Card Packaging and some tips on creating my signature Tent Topper Cards. (Note: If you click on the *Tent Topper Cards* label at the bottom of this post, you'll be directed to all of my blog posts that feature Tent Topper Cards). My Make + Save feature is exclusively for Papertrey Ink. I'll feature the projects here on the blog and links will be provided for the project supplies over at the Papertrey website. You'll be able to easily access all my Make + Save projects in one place. And for your convenience, you'll be able to order the supplies right from the Make + Save links.

On to today's project. Today's Tent Topper Cards feature the Rustic Snowflakes Patterned Paper and the Signature Series Cupcake, Flower and Dress form stamps and dies.
I began by stamping and die cutting the dress form, flower and cupcake images. I also die cut some XL Pure Poppy Felt, cut some Aqua Mist Twill Ribbon and cut strips from the Rustic Snowflakes Patterned Paper. Tip: At this time of year I choose to use colors that could easily be used for the holiday season...but could also be used for every day occasions. Notice that the colors used in my projects contains red and greens, but that I didn't use any actual snowflakes from the patterned papers.
To create Tent Topper Cards, the idea is that the card base is a smaller square and some sort of image sticks up above the card, thus creating a topper to the tent folded card. My card bases are usually 4.5" square when folded. The topper can be any size you want depending on what you will be using for embellishments on the square. If you zoom in, you'll notice that I used Guide Lines I Grid Sheets to add some visual appeal. If you want your Tent Topper Card to stay an A2 size card you just need to make sure that the finished card height is not more than 5.5" tall. I keep a ruler handy when making my Tent Toppers and adhere the topper portion slightly below the 5.5" measurement.
I chose to make 2 of each Tent Topper Card design. The basic layout is the same for each card. The tent topper part has a raised die image, some twill ribbon, tied Vintage Buttons and a stamped sentiment. All of the stamps are from the Signature Series sets. The base cards have various Rustic Snowflakes patterned paper along with strips of patterned papers and the Rick Rack felt borders.
Here I've taken photos of each design. The cute dress forms....
The flowers.....
And the sweet cupcakes.....
All of these cards are generic enough in nature that you can use them for a variety of occasions including birthdays, thank you notes, etc. This little stack of 6 cards with simple white envelopes would make a great gift for someone who loves homemade cards. And I haven't met a person yet who doesn't go ga-ga when they get a gift like this.
What makes giving cards as a gift even more special is the packaging. Using Papertrey's Clearly Creative Card Boxes are one of the easiest ways to package up pretty cards. And since they're clear, your beautiful work shines through. You don't need much else to make the finished packaging look really nifty.
The six cards and envelopes fit easily into my box. Just be careful that you don't use too many dimensional elements on your cards if packaging them into the clear boxes. I used some Aqua Mist Swiss Dot Ribbon to tie around my card box. Then I added a stamped and die cut cupcake that was fancied up with glitter, buttons and baker's twine. A simple eyelet through the top of the die allows it to be tied to the Aqua Mist Ribbon.And that's it. These little gift boxes travel well and look so cute tucked in with other presents under the tree. I hope you give them a try. Tip: Save a few cards from each stamping session and store them in a nice basket. When you need a gift, grab a variety of cards and tuck them into a clear box, all dolled up with ribbon and a fun embellishment. It makes for some very easy gifts that are always appreciated.

Remember, the links at the top of my post will lead you to supply lists and one stop shopping, all in one convenient place. Thanks for stopping by today. :)

November 5, 2010

Jolly Little Jellies

Hi friends, I'm here today with another episode of Make + Save for Papertrey Ink. With my Make + Save posts, you'll get great gift ideas that you make at home...and save money. Today it's all about the jelly. I love to can fruits and veggies, especially if they are harvested from our summer gardens. This year we had a bumper crop of jalapenos. Gallons and gallons and gallons, they just never stopped producing until the cold weather came. I used up my last few jalapenos and green peppers just last week while making homemade jalapeno jelly. I love to see that festive green color shining through the jars.
Homemade jellies make great gifts for the holiday season. Whether you need a hostess gift, teacher gifts or maybe you just want to take a great appetizer to a holiday party....my decorated jars and gift sack will be unique and much appreciated.
I found some really cute jars this year at Walmart in the canning section. I picked up some of the 1/2 pint jars and adorable gingham lids and white rings. They're cute enough by themselves that I didn't want to add too many embellishments.
I die cut some Rick Rack felt and tied little snippets up in Pure Poppy and Chartreuse Vintage Buttons with Rustic Cream Twine. These were adhered to the jar lids with pop dots.
To make labels for the jars, I die cute Papertrey Adhesive Sheets with the label die from Tea for Two. The *homemade* and *jelly* sentiments are from Just for you and Fruitful. I've been using the adhesive sheets a lot because they already have adhesive on the back that you peel off and they're also thinner than cardstock and will mold around curved items like jars.

The word *jalapeno* was stamped with individual letter stamps. So that the lids could come off with ease, I finished the jars off with Luxe Satin Ribbon just below the lids. So cute and quick too. Love.
For the packaging, I used a Large Coffee Sack that I embellished with more Luxe Satin Ribbon, some craft store ornament sprigs and a Small Clothespin from my Etsy shop. The stamped portion was made using Tiny Treats: Christmas (the gingham print matches my jar lids so well). I used the mistletoe image and drew in some jalapeno peppers on the sprigs using a fine tip Copic multiliner pen. Those are great for getting a fine line width that matches the stamp set. I colored these with Copic Sketch markers in red and green.

Using felt and a new Limitless Layers: 1-3/4" Circle die, I layered my stamped image onto the die cut gingham label image. These were adhered to a Dainty Doily from my Etsy shop and then adhered to the bag front with pop dots.

To make the gift complete, I always include a stack of crackers and a block of cream cheese along with the jar of jelly. To serve the jelly, simple lay the block of cream cheese on a decorative plate or tray. Dump the jar of jelly on top and serve with crackers. If you want to be really generous, you could also give the recipient a pretty plate and a spread knife along with the food goodies. Tip: Thrift shops have lots of plates, trays and silverware that you could stock up on all throughout the year.
I hope you enjoy Jolly Little Jellies. For a complete supply listing, instructions and one click supply shopping visit the Make + Save section at Papertrey website. This link has all of my Make + Save projects to date. Thanks for stopping by!

Note: Jellies like this one are plentiful by doing an Internet search for jalapeno jelly. There are lots of variations using berries and different seasonings.
Related Posts with Thumbnails