September 18, 2011

Etsy Shop Update!

Hi there. I have a big Etsy shop update today. Items are selling quickly! Note: If you want to get the first notifications of my Etsy shop updates, be sure to click on my Facebook Fan Page Link on the left and *LIKE* me. That's the first place I give updates for new items in my Etsy shop. From there, the same update goes to Twitter so you can click on my Twitter link on the left and follow me there too. Lastly, the updates come here on the blog...sometimes. Sometimes I don't. :) Either way, THANK YOU so much to all my wonderful Etsy fans. You guys are the best!

Coming soon: A holiday journal to use for December Daily mini albums, etc. It's going to be cute, cute, cute. I might be offering half of the journals as a pre-order item...and half at a later date. I'm working like a little elf on it and will have updates on release dates soon. :)

In the shop....instant collection of jello molds.
Small paper sacks featuring lined notebook paper, blue grid, gray grid, black chevron, aqua chevron, hot pink chevron, yellow, red and green. These will be regular stock items but some are selling out quickly today. I just ordered a limited amount this first time around.
Also, large lined notebook paper bags. So cute and perfect for packaging cards and gift items.
And polka dot brown paper sacks...oh so cute.
And striped brown paper bags....love the lines and I can see these used to stamp words in between. So cute.
Also new to the shop late.....my Mish Mash Junk Journals.
Fun journal filled with new + vintage papers...perfect for travel album, inspiration journal, teenage autograph book and more.
Comes with 25 pages stitched together with a unique cover that has a secret pocket stash more items + the tag selection show below.
Thanks for stopping by and come back tomorrow for my Mish Mash Monday post!!

September 16, 2011

Just Dandy Card...

Happy weekend everyone! Today I have a card to show you from this month's Papertrey release. The new stamp set I used is called Flower Fusion #8 and features this unique dandelion shape.
Patterned paper is from Crate Paper, ink droplets were made with Studio Calico Mister Huey spray mists. Ribbon color and coordinating buttons are from the new Autumn Rose color introduced at Papertrey this month. Sentiment is stamped on one of the new Holiday Photo Finishers dies.
Hope you enjoy! This card with a few others from this month's release are now up in my Etsy shop. :)

September 15, 2011

Project Life....Sept 4-Sept 10, 2011

Hellooooo Beautiful! Today I am back in the game of Project Life. I got behind. Way behind. But....I kept taking photos, I kept making notes, I kept on collecting little tidbits.....and Project Life was still there waiting for me. And I still love it so much. I thank Becky Higgins in my mind each time I get to work on my Project Life album. :) It works for me.

I'm past the point of keeping track of the weeks so my posts will now go by dates. Easier to keep track of. Here we go.

Project Life....Week of September 4-September 10, 2011

I love to use items from the Project Life kit + add in my own supplies. It's a great solution to my scrapbooking needs. I love to make full size layouts but in reality the Project Life pages are really about all I can handle time wise. Therefore I add in a few traditional page layouts every so often but most of the time I'm going to stick with Project Life pages. I'll have a new post up soon about how I treat 2 pages of the Project Life album as if they're a 2 page traditional layout. I shot a few photos of my process and I thought you might like to see them. Stay tuned.

The 2 page spread of the week. Love when another week gets completed. Woohoo!The left page. Title insert is always in the top left hand corner. Days start with Sunday...and next year I'm starting with Monday because that's how I use my family calendar. Looking forward to that switch over. Also I've been adding in a *blank* journaling card for the extra space. I really need to remember to use a smaller photo (need a Photoshop lesson on how to group and print smaller photo collages).....or perhaps an Instax photo or a receipt, etc.
The right page. 4 photos with 4 corresponding journaling inserts. Notice the photo of Josey making a heart....I added in an arrow and phrase from an Ali Edwards stamp set. Man, I love her stuff. Thanks for all the great products Ali....from Technique Tuesday. Plus lots of goodies from my Studio Calico kits. A great mixy matchy selection of products in their kits that is perfect for me. Plus Mister Huey...seriously love those spray mists.
A few closeups. On the main title insert, I used a sticker border from Sassafras, chevron paper, woodgrain letters, a brown marker for some of my own handwriting...and I used numbers from the Project Life kit so indicate 4-10, the days of the month I scrapped this week. Love how they fit into the little circles on the PL insert card. Note: I broke TWO sewing machine needles on those woodgrain letters. Don't try it people. I finally had to resort to my Tiny Tim stapler.

A few journaling inserts. Here I've used Small Manila Parcel Tags, Washi tape(I find on Etsy), letter stickers, patterned paper and my sewing machine.
These two journaling inserts use more patterned paper, stickers, Large White Tags and number stamps from 7 Gypsies and more machine stitching. This week's inserts use lots of numbers. I really love the white tags....add a little accent, stitch the tag onto the insert card....let the strings dangle and then staple down with Tiny Tim's stapler. Love that.
Here I've used sticker, punched hearts from patterned paper, Amy Tangerine star, sticker letters, number stencils that Eric brought home from work, and White Metal Rim Tags. For the stencils, I used Mister Huey spray mists and then wrote my journaling on top.
On the last journaling insert, I discovered that these adorable little grid sacks fit into the journaling slots. I embellished the front and then used a cut to size index file divider as the insert. I'll be using these little sacks a lot more now. And I'll be carrying them in my Etsy shop soon too in lots of styles. :)
Whew, feels so good to be back in tune with my Project Life. I've seen the two new styles on Becky's blog and I'm wayyyy excited. Come back soon for another Project Life post on how I go about my layouts. And have a great day!! Off to watch my red Jordan play some volleyball this afternoon. :)

September 13, 2011

Holiday Photo Finishers

Hi there. I'm back today for the second Papertrey Group Post for this month's release. Today it's all about creating holiday cards...especially ones that can add photos to. Nichole's new Holiday Photo Finishers is a great set that allows you to create photo cards with the perfect finishing touches. Included in the lineup is the Holiday Photo Finishers stamp set + a set of 4 coordinating Photo Finish Strips dies.

Today I've created two projects to show how you can use the stamp + coordinating dies with a photo or without.
First up is a 6 x 6 Christmas card that features a 4 x 6 collage photo I created with my Canon Selphy. You could also create something similar with Photoshop or Walgreens has a collage editing feature on their website too. My card will double as a scrapbook page that can be added to a small album. I'm thinking that perhaps this could be a good tradition to start for the grandparents....6 x 6 holiday, birthday, vacation cards, etc that will fit right into a small album.
I embellished the side of my card with patterned paper + a few paper items. The *wonderful* is a sticker from my stash and the *memory* block is one of my favorite stamps from the featured set.
On the bottom of the page I used one of the new dies + a coordinating stamp that nestles right into the die perfectly. I notched the left edge with scissors. The circle *Christmas Cheer* accent is another favorite stamp from this set. I stamped the image onto some ledger paper then punched it out with my 1.75" circle punch. A trio of tied Vintage Buttons and machine stitching finish off the card.
Next up I've used more of the same supplies, minus the photo, to create a regular holiday card.
I love the graphic images + fonts in this set. Here I used a metal rimmed tag with a stamped piece of ledger paper for an accent. The *warm wishes* sentiment was stamped on another Photo Finish Strips die. Each of the dies has a built in set of embossed lines...a great finishing touch. Papers on the card are Dawn's new Candy Cane Christmas + some October Afternoon. I also used some machine stitching, October Afternoon spray mists, and Vintage Buttons tied with baker's twine.
Hope you enjoyed my projects today. Be sure to link up to the rest of the PTI team blogs for more inspiration.

September 12, 2011

Christmas Labels & Winter Cheer

Hi friends. Welcome back to another Papertrey post. Today it's my day to highlight some wonderful new sets and dies coming out this month. It's about the holiday season so I'll be showcasing Christmas Labels by Lisa Johnson and Winter Cheer by Tiffany Pastor. Both sets will be released on September 15th at Papertrey Ink.

First up is a fun set of embellished envelopes I created using both of the new sets + images from Postmarks. I always create a few fancy envelopes to use as gift card holders...but these could be used for cards, recipes, thank you notes, etc. I used Kraft envelopes in the A2 and Gift Enclosure size for my projects. I wanted these envelopes to have a North Pole feel to them, perhaps like they are letters from Santa. The striped stamp + cancelled postmarks in the Postmarks set were just what I needed.
Here you see the new label image from Christmas Labels. A very retro set with fun sentiments, several label images and a coordinating die. Lots of possibilities for the holidays + the label images will lend themselves to any occasion. I added a few glittered clothespins to my envelopes so that they could be hung on the tree or clipped to a holiday garland. I know my reds always like searching for those hidden gift card envelopes in the tree.
Sparkly sprigs, glittered + painted jingle bells + red baker's twine add a festive finishing touch to the envelopes. You'll also notice that striped paper which is a new collection debuting this month from Dawn McVey. The envelopes were also stamped with Fresh Snow ink using snowflakes from the Winter Cheer set. A very whimsical set that will take you through the holiday season and well into the cold, winter months. The circle images you see are also from Winter Cheer and were stamped and punched from White Adhesive Sheets. Those will go on the back of the envelopes and will act as cute little seals.
On the large envelope, I made some snowflake postage stamps from a snowflake image in Winter Cheer. I cut them out, adhered them to the corner....then stamped them with Postmarks images + added a tied Pure Poppy button. Definitely a festive duo of gift envelopes for this holiday season.
Next up, I have some fun gifts that would be perfect for gift swaps, teachers, neighbors...and I think the girls' friends would love these too. I've cut pieces from Dawn's new Candy Cane Christmas patterned paper and have wrapped Hershey candy bars. I like to use Scor-Tape to make sure the wrapping stays adhered.
Here you'll see the die cut Christmas Label with another stamp that goes with the Christmas Labels stamp set. The *Tis the season* was stamped from Winter Cheer and the *for chocolate* was stamped with Hero Arts mini wooden letters. A fun little twist on a holiday sentiment. I also stamped more of the snowflake squares which have a distressed look to them. I adhered the squares to my labels, stitched with my sewing machine and then trimmed to match the label. A Moss rhinestone finishes off the center of the snowflake.
More sparkly sprigs, glittered jingle bells and red baker's twine were used to embellish the candy bar treats. I find that these types of embellishments are often used over and over again on my holiday projects. Each year I find a few decorative embellishments that I like so I keep a big stash available for cards and gifts. (note: I've had a few inquiries and yes I plan on having the glittered jingle bells in my shop again this holiday season)
Using some leftover stamped labels + patterned paper I created a fun clothespin clip magnet. Big, Vintage Buttons were tied together with red baker's twine and adhered to the clothespin front. I used Scor-Tape to adhere the clothespin to the label and then backed the label with a strip of magnet. Perfect for hanging on the refrigerator to clip up incoming holiday cards....or use for letters to Santa, advent projects and more.
Here I've shown an example of how you could clip the clothespin to a sack + doily for gift giving. Perhaps this could be stuck to a magnetic, vintage tray that has been covered with holiday papers or spray painted a pretty color for the holidays.
Lastly I've got a layered tag sample to show you. I always have lots and lots of tags on hand each holiday season. I use them to tie onto wrapped packages and gift sacks like these brown paper bags or glassine bags. You can never have too many tags and these handmade ones look so much nicer than the pre-packaged type.
I used two tags, one which was layered with Candy Cane Christmas patterned paper + one that has been stamped with snowflake images and a sentiment from Winter Cheer. I used a stamped and die cut label from Christmas Labels as a little flap that I folded around my manila tag. The layered button embellishment with jingle bell and baker's twine was adhered with Scor-Tape.
So now I have a fun grouping of goodies that can be replicated to create a good stash of gift giving items this holiday season. I hope you've found some inspiration to get a craftin' on some holiday goodies of your own. Be sure to stop by Nichole's blog for her post today + lots of links to more Design Team + Stamp Designer creations. Thanks for stopping by today.

September 11, 2011

Love Lives Here for the Holidays

Welcome to today's Papertrey Group Post. This month we're sharing creations for the upcoming holiday season. It seems a little early to be discussing the holidays in September but we all know that the earlier we make a game plan, the better off we are when it comes to crunch time.

I'm starting off today with a few projects created with Melissa's and Nichole's new Love Lives Here: Holidays stamp set and coordinating mitten dies. I love that I now have a holiday rendition of the Love Lives Here stamp set. The images and sentiments are so homespun and meaningful.
For my card I created a cozy little scene complete with a star studded pine garland + hanging winter mittens. There are lots and lots of little images in this set to create holiday scenes. You'll definitely get your money's worth with this stamp set. For the mittens, I used some October Afternoon patterned paper that was die cut with the mitten die. It also has the cute little scalloped edge on the same die. The hearts were stamped and trimmed with scissors. Sparkly, red foliage from the craft store + a gold jingle bell + red baker's twine finish off the card. And you may notice the fun application of the sentiment...stay tuned this week for more on that. ;)
Next up I got a head start on some neighborly gifts that I deliver each year. You may have read yesterday's post on my summer canning. You can see that I'm all ready to fancy up some jelly jars.
This year I'm going to create some pretty little toppers using Love Lives Here: Holiday. It's so perfect for my little country creations. I started with a big metal rimmed tag that was covered with patterned paper. I then layered on a die cut and stamped mitten...so cute in Kraft and Fresh Snow. I chose the *homespun* sentiment because it's perfect for homemade creations like my jelly jars. Some more sparkly sprigs, bells and baker's twine finish off the layered tag.
To top my jars, I'm using brown paper sacks this year because the paper is easily wrinkled and becomes very pliable. I simply cut a round out of sack using a tin lid as a circle template. Wad the circle up and spray with water if you want even more wrinkling. I centered the circle on top of the jar and tied with cotton twine. My embellished tag is tied onto the topper using baker's twine.
And now I'm well on my way to having some wonderful samples to use for holiday cards and gifts.
Please join me as I hop around to the other Design Team Members' blogs today to see what they've created with Love Lives Here: Holiday:

Summer Canning...

Edit: Someone asked if you should store the jars with the rings on or off. My mom and I always take the rings (bands) off once the jars have sealed. We usually wait 24 hours, take them off and then wipe the jars shiny clean. I've never had any problems with the jars unsealing, etc. Calling all experienced canners, what's your opinion?

Hi there folks. Hope you're having a most relaxing Sunday. After spending 7 hours at Josey's volleyball tournament yesterday, my little family is ready to chill out. We have no plans for today and it might just stay that way. :)

I thought I would show you a little bit of my summer canning. Each summer my counter tops are cluttered with garden goodies such as zucchini, jalapenos, tomatoes, cucumbers, etc. This summer I scored this old, green wagon that I have in the corner of my dining room. It was perfect for all my giant zucchini.
I don't mind the cluttery counter tops one bit though because it means I get to create some wonderful concoctions like my homemade jellies. Making jelly is a complete mess, I have to tell you. With the sweltering 105 temperatures we had daily this summer, there were times that heating up the stove to make jelly was not top on my list. But I love it so much that I just had to. The key to making great jellies is to have everything organized and ready to go. The timing has to be just perfect. Aside from one bad jelly making session, my jellies turn out nearly perfect every time. I've got it all down to one smooth process....just stay out of the kitchen for 2-3 hours and I'll do just fine in there by myself. Although the girls do like to help out sometimes and Eric is a great jalapeno slicer. ;)

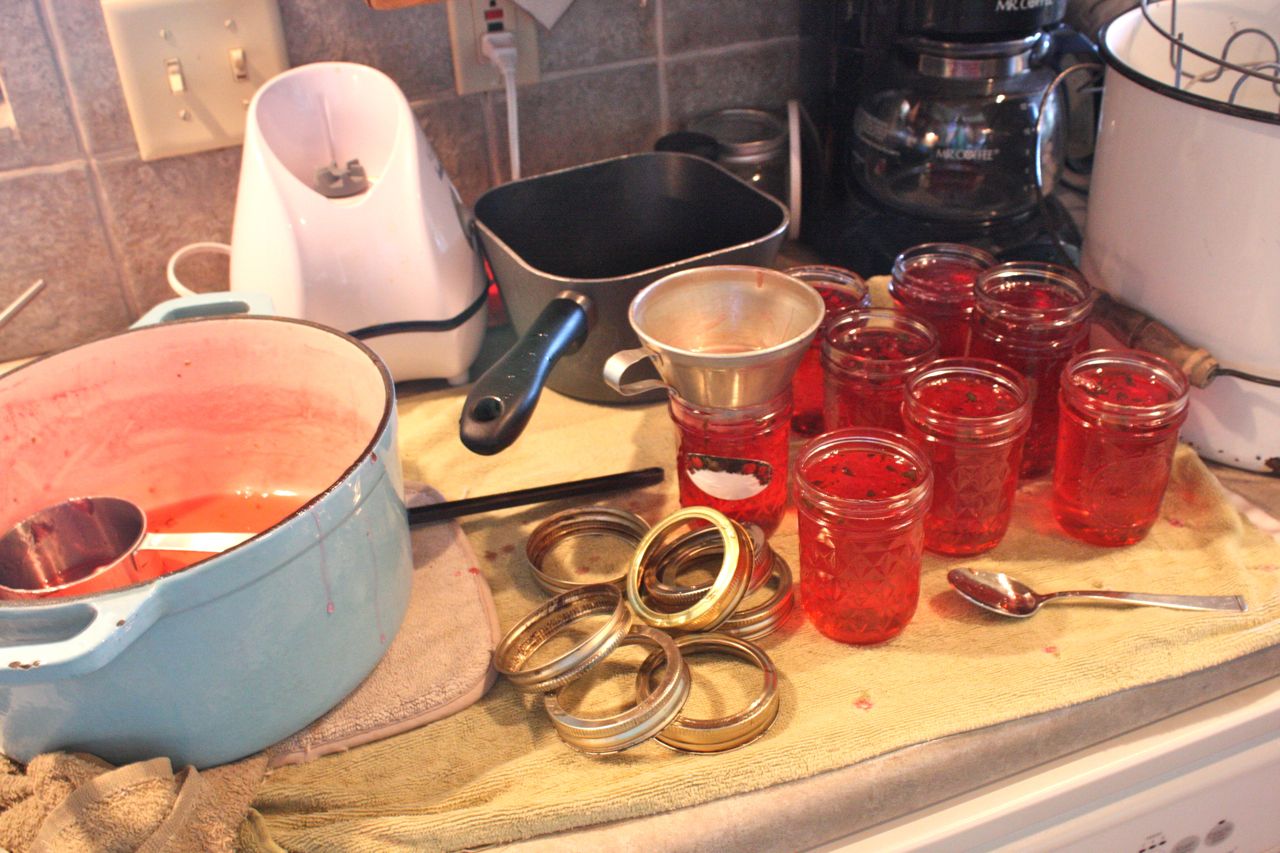
So here I am with a batch of fresh jelly. I've got all my sterilized jars filled and ready to be water bathed.
I carefully transfer jelly to the jars using a wide funnel.
My lids have been heating up in a little water bath and they're ready to top off the jelly jars.
My favorite tools of all time for canning.....the beat up metal funnel from my mom....the green jar retriever thing from my mom and a new, handy dandy magnetic lid picker upper that my mom recently learned about. I can't do without these items when canning.
And this. Oh my beloved, enamel canning cooker. My brother got it from Mrs. Staley, the neighbor down the road years ago. We used to mow her yard and take care of stuff for her. I treasure this pot because of it's sentimental meaning. It was a little rusty on the bottom and this summer the rust spots wore through. I had water leaking everywhere onto my hot stove when I discovered the leak. My mom said there was actually a sealer made for enamel pots but I think more leaks will be coming as it's wearing pretty thin. I'm on the lookout for a new canning pot but this little baby won't be going too far. I'll use it as my compost bucket or perhaps it will have a new job like carrying picked veggies from the garden.
One of the best things about making jelly is the little bit of leftover jelly at the bottom of the pan.
I transfer this to a bowl and I love it for two reasons. One is that it's obviously fun to taste your creations before you can them up. Two is that I can tell within about ten minutes if my jelly is going to set up in my jars. You can tell by the jelly sticking to the spoon that this batch was killer. It got thick really quick which means that the jelly will most likely do the same in the jars.
Here the little jars of jelly are sitting out on a folded tea towel. I always have a fresh, clean towel waiting for the little jars to rest on. My most absolute favorite part about canning is to hear the little *pop* that happens when a jar lid has sealed. My mom has a special way of tapping on the lids to hear if they've sealed. I have to turn the jars this way and that way to see if the center seal has sucked down. But when you hear that pop you know the jar has sealed. Every time I hear the *pop* I suck in a breath....just imagine a little kid hearing Santa's sleigh bells at night. That's the excitement that the *pop* brings to me. And I've got a good ear for the *pop*. I can hear it clear in the basement.
Once the jars are cooled, I take the rings off and wipe the jars down with a clean washcloth. Now they're all ready to be stored away for the winter down in the basement. Some of the little jars will be fancied up and decorated for gift giving too.
Here's some more pretty jars of peach jam just waiting to be fancied up. I particularly love these new embossed jars from Better Homes and Gardens, available at Walmart. Now if they'd just come out with NEW, BLUE canning jars I'd be in hog heaven.
My family has been canning since as far back as I can remember. My grandmothers too. I am so delighted to see all the young people today that are getting into canning. It's a family tradition for us and I hope it becomes one for some of you too. Recently, the girls at Our Best Bites did a great blog post called Introduction to Home Canning and Preserving. It's a great resource for getting started. Plus their website has some really great recipes.......annnnd they have a new cookbook out....which I need purchase still. Hope you give them a visit.

And that's it for today. I'm busy getting projects completed for this month's Papertrey release + I am eagerly awaiting some brand new packaging items to arrive for my Etsy shop. Come back soon as I have something special planned for a few of my jelly jars. ;)
Related Posts with Thumbnails