August 22, 2010

Happy Fall Card

Happy Sunday Friends. Whew, what a weekend. We've had company from Colorado here since Thursday and now we're just winding down. Winding down our long month of trips and surgery, winding down the summer....counting down the days til school starts. A new routine is coming, a new school, a new route. Going to enjoy our last week at home.

But Fall will be here before you know it. I see a few leaves changing color already on the trees out in the timber. So here's a perfect card to get you thinking of Fall. This is one of my release cards from Papertrey this month. It features Falling Leaves and Fillable Frames #7, along with patterned papers and and a new Impression Plate from PTI.
Hope you enjoy!

August 20, 2010

Birthday Tag Card

Hey friends. I had a few scraps leftover from my Butter and Brown kits so I thought I'd whip up another little goody for you today. There are still kits left in the shop that you can check out here. Company is here so I'm posting this for you early tonight.....it's your late Friday and into Saturday card fix. ;)
Am I totally self centered if I say that I love to use my own little kits? It's true. Sometimes I get so caught up in creating kits and projects for design teams or the shop that I just love it when I steal away a little time to create some goodies just for me. And when I see bits and pieces of a kit leftover I love to use them because I know it all coordinates and is ready to be assembled on a project.

Take this adorable birthday card, for example. I used the last snippets of the butter and brown floral fabric (wish I had more!) to create a fun background on a medium parcel tag that comes with the kit. These tags make it so easy to create a focal point for cards, I just love them.

Layered on top of my fabric covered tag is one of Pine's Fillable Frames. Fillable Frames #5 to be exact. Along with it's coordinating die. They're my favorite of the Fillable Frames, I think. Love. Double Love. The sentiment and the big word YOU are from Melissa's All About You stamp set. It's another favorite set of me. Gotta love the graphic words in this set. On the background of the card, I stamped an image from Background Basics: Tin Types with the tea duo inks.
Here's something else I love that you'll be seeing more of. It's the torn strips of fabric that I turn into ribbon. I love the torn look and the homespun feel. By using the fabric flat on the tag it looks like patterned paper.....but then to see it all loopy like a ribbon....wowzers! I used a little snippet of the vintage buttery lace on the tag too and kept the pieces all gathered up by using my Tiny Tim stapler. Love that little gadget. Cindy, my friend from Star Lit Studio can hook you up with one along with my fave-O -rite October Afternoon papers. I finished off my card with tied buttons, both the buttons and twine are included in the kit.
Love this shot.....see all the dimension and layers. Pop dots are amazing little doodads. Love them.
Hope you enjoy! I might just have to break open another Butter and Brown kit for myself, I really really love this butter and brown color. Better get one before I sneak all the fabric out of the kits. For once I was being frugal in the quilt shop.....and now I need more of that sweet little fabric! Figures.

Oh and more goodies came in today. I'm gathering up all my new items for a grand shop update coming soon. I can't wait for you to see.

There's no place like home...

Hi friends. TGIF. The girls were out the door bright and early for volleyball practice. These early mornings are for the birds. Need coffee.

Anywho, I'm up and at 'em so let's start the day off with a cute card. This month's Friendship Jar Fall Filler set was a hit at Papertrey. I'm so glad you liked this set. The witchy feet image was so wonderfully illustrated by Nichole. She drew it up just like I imagined she would. I couldn't wait to use it on a card.
As a Kansas girl, you can't see these cute witchy feet and not think of The Wizard of Oz. I just recently bought the movie for the girls to watch. You can't go through life not knowing about Dorothy and Toto and their fantastic journey.
In ode to Dorothy, I created some wonderful ruby shoes, a burnt broom and a Dorothy's picnic basket. For the jar image, I first stamped the polka dot filler into the jar using Chamomile ink from the Vintage Touch Tea Dye Duo. I then stamped the witchy feet image and colored it in with my handy dandy Copic markers. I added ruby red glitter to the witch's boots and to some Vintage Buttons for lots of glitz. I always thought those ruby red slippers of Dorothy's were like magic!
I also added Dorothy's picnic basket to my card front. The wicker basket from Vintage Picnic along with the napkin liner was just the ticket! I colored it with Copic markers also, then cut it out and attached it to the card with pop dots. For my card sentiment, I knew just where to look. Boards and Beams has sentiment that is perfect for the Wizard of Oz theme..."There's no place like home." Love. For the rest of my card, I used blue patterned paper that reflects the color of Dorothy's dress and some fun red and white polka dot paper. The blue ribbon is from my Etsy shop here.
Here's the Copic colors I used to color in all of my images.
Hope you enjoy my card today! We have company for the weekend so I'm off to start my day.

P.S. The orders are starting to trickle in for my new fall Etsy items. Soooo fun! I can't wait to share.

August 18, 2010

NeW KiT in EtSy ShOp ToDaY

Update: Okie dokie, my Butter and Brown Crafty Kits are now up in my Etsy shop. Full of savory butter and brown goodies for you to use on cards, gift packages, tags, scrapbook pages, and more.
I thought I would share a few ideas of some tags you could make with the kit contents. Isn't it fun to see a beautiful mess spread out on your crafty table?
Using the three manila parcel tags from the kit, I chose to make a tag trio ensemble today. There's lots of fabric, lace, ric rac, etc in this kit. Instead of using glue which will warp the tags, I like to use double sided tape. Copic has a new tape that I tried out today and it works great to adhere fabric to paper, fabric to fabric, etc. Very high tack and easy to use. You can read all about it here on Marianne's blog.
With the kit, you'll get a long strip of buttery, floral fabric. You can cut it with scissors, pinking shears....or use dies like I did for the large tag using Papertrey's small scallop border die. See tags below. You can also rip fabric very easily to get a great homespun ribbon effect. Simply cut a snip in your fabric and then gently tear the fabric in half. I used the torn strips as ribbon to tie my tags onto cards, gift bags, etc.
Here's my little tag trio, you can zoom in to see all the homespun goodness. I used the Chamomile Vintage Touch Tea Dye Duo ink to stain my small clothespin. Love!
For my two larger tags, I used the Tiny Tag that comes in the kit to stamp on a yellow apple from Lisa Johnson's Just for You set. Great idea for back to school teacher gift, attached to a goodie bag. For the smaller of the two tags, I used a handmade doodad that comes with the kit. It features Papertrey flower dies cut from patterned paper and felt.
Here's a little samplet of gift idea.....attach a small tag to the coin envelope that comes with the kit. I'll give it away with a jar of my fresh peach jelly that I made yesterday. Inside the envy, I can add a small snippet of cardstock and hand write a few recipe ideas for the jelly. Note: Jelly recipe came straight from the Certo packages. Note: Certo is the stuff you use to make jelly get firm. Which mine is not setting up. I digress.
Anywho, the kits are up in the shop....all packaged up cute like and ready for new homes. Thanks for stopping by today!
Also, I've spent a good part of the week searching out new products for my Etsy shop. I've ordered lots of new goodies which should be arriving soon. Wait til you see what I have planned. Waaaaiitttt for ittttt. ;)

August 16, 2010

Etsy Shop Update

Hi there again. Just an update for my Etsy shop........I've added a few more items and am currently updating my Etsy shop to offer international shipping. You've asked, you've got it! Thanks for stopping by!

Friendship Jar Fall Fillers Eyeballs Card

Hey friends. I am back from beautiful Colorado and ready to get back into my Artsy Studio. We had a great time but just like Dorothy says, "There's no place like home." Definitely true for this Kansas girl! I'm feeling pretty much back to normal from my surgery too, thank you so much for all the well wishes and inquiries. I go back to the doctor today to get my staples out so hopefully I'll get signed off for normal activities here soon. Don't tell my family that though. I've been milking the "but I've just had minor surgery" gig and don't want it to end quite yet. ;) I've gotten great mileage out of that!

How about another card for today using Friendship Jar Fall Fillers? What a great response to this set, I'm glad you love it as much as I do. Nichole did a fantastic job with bringing my little chicken scratches to life. And I hear you want a Christmas/Winter fillers set, huh? Well, I can't let the cat out of the jar but we'll see what we can do. ;)
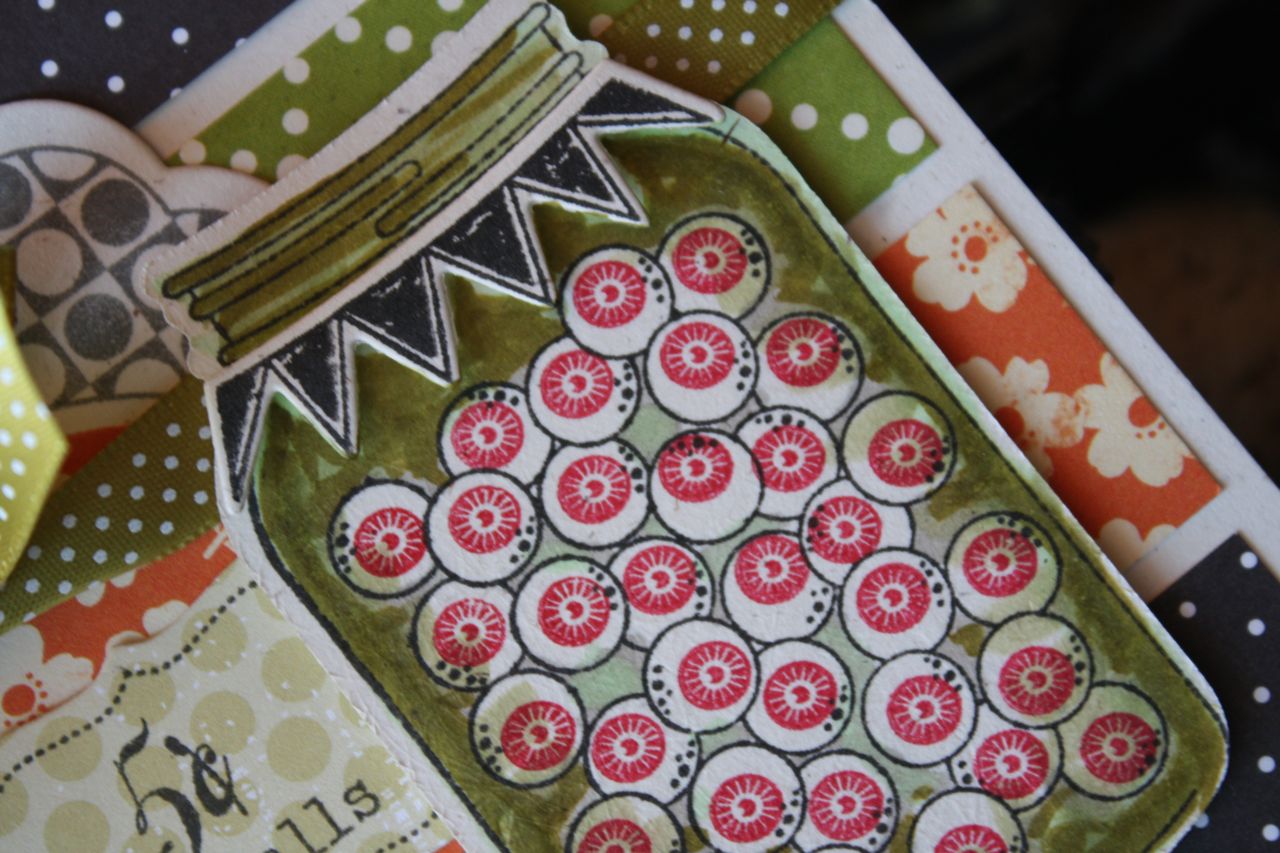
Today I have a whimsical Halloween card to share. I've taken you through school cards, Fall cards and now Halloween cards with this new Fall Filler set. Aren't the eyeballs just the craziest ever? When sketching out ideas for this set, my mind took me to all things spooky and Halloween-y. I thought that a simple little addition of an eyeball center would be great for the marbles. I can't wait to make more projects with the eyeballs because I love to freak the kids out for Halloween.
For the jar, I used the original Friendship Jar stamp and the pennant topper stamp and coordinating die. I then stamped the marbles and added red eyeball centers to each circle. The background of the card is equally fun. I stamped the label image from Tiny Treats: Halloween with Smoky Shadow ink, then layered on some October Afternoon paper in an orange floral....then topped that with a die cut label from the new Fall Fillers set that has a new dotted border stamp. Don't forget to use these label images from all the sets in a mixy matchy fashion. They are so versatile and can be used on all sorts of projects, not just for the stamp set they originally come with. I finished off my card with some Simply Chartreuse ribbon and more PTI patterned paper.
Here are the Copic colors that I used to color my jar with:
Well, I'm off to see the Wizard. Ha ha. Love the Wizard of Oz. Speaking of that, stay tuned for a delightful new card using Friendship Jar Fall Fillers and the adorable witches feet image.....my mind is a thinkin' of something fun!

August 13, 2010

Friendship Jar Fillers Fall Card

Hi friends. So glad you enjoyed Nichole's post yesterday and my card for the Friendship Jar Fall Fillers set. I have another card to show you today which takes you into a Fall theme.
The Fall Fillers set still works great with all the original dies. On this card I used the topper with the tag and the jar die.
It's so fun to layer images on the large manilla tags available in my Etsy shop. The Vintage Buttons also make great accents for the Fall cards.
Here's my Copic colors I used below....
So tell me........what's your favorite image from the set so far?

August 12, 2010

Friendship Jar Fall Fillers Teacher Card

There's been a lot of chatter about this month's Friendship Jar Fall Filler set. Oh my. It's cute people. Nichole took my sketches and transformed them into amazing illustrations. There's just no other sets on the market like the Friendship Jar and Filler companion sets and matching dies.

I want to show you all of the amazing ideas I have for the Fall Fillers stamp set so check back often to see lots more projects. The Friendship Jar Fall Fillers set has images that will take you through early Fall, including school ideas for teachers....all the way up to Halloween and Thanksgiving. I think you'll just love adding it to your collection.

Let's start with a back to school, apple themed card. Isn't it cute? As the girls are getting older and will both be in junior high this year, I like to still give cards to teachers....but with more than the little kiddo images/themes. The apples on the sticks are just the ticket.
So you get an idea of the stamp assembly, this card has the jar stamped, the sticks stamped and then the apples stamped on top of the skewer sticks. There are two more images that top the skewer sticks. You will love them! I colored the apples with my Copic Sketch markers, using the true colors of a red apple with caramel on top.
The jar image was stamped with a polka dot filler from the original Friendship Jar set. The jar label image was die cut using the coordinating Jar Label die cut and then was stamped with a red label image from Friendship Jar. The *back to school* sentiment is from School Time. The label was stamped with a scalloped label from Friendship Jar and die cut with a coordinating label die.

I stitched around my main image piece with black thread. Wrinkle Ribbon from my Etsy shop along with red and white twine finish off the card front.
The Candied Apple Carnival Tickets in the background can be found here. The scalloped edge on the left of the card is from Dotty Biscotti and is die cut with the large scalloped edge die.
The die cuts and ribbons add so much dimension to this card. I love to see it sitting on my desk. It reminds me that school will be starting soon for my little reds.
Here are the Copic colors that I used to color my caramel apples.
I hope you enjoy my card....whaddya think? I'll be sharing more Fall themed cards soon so check back often. Be sure to check Nichole's blog for her preview of Friendship Jar Fall Fillers. I know she'll have some cute ideas up her sleeve.
Related Posts with Thumbnails