Showing posts with label Lily Bee. Show all posts

November 8, 2013

Project Life 2013..Week 43 using Lily Bee's Urban Autumn...


It's a blog hop kind of day.  Today I'm excited to share the brand new Lily Bee collection called Urban Autumn.  This fantastic assortment of products is designed by my crafty friend, Amy Heller.  She did a fantastic job creating a fresh new lineup, perfect for documenting all of your Fall stories, creating greeting cards, packaging and more.  You can get a feel for the collection below....there are the beautiful Fall colors + a few fun apple greens and purples thrown in.  Just a delight to see in person.
 In addition to the physical product there are print files available so that you can print even more fun accents.  I love all the assortment of words that I was able to cut out.
I knew right away that the timing was perfect for me to use the Urban Autumn collection on a Project Life spread.  Week 43 was just perfect.  
Here's the two page spread.  You can see how I was able to choose just the right Fall colors that worked well with my photos.  I chose tans, browns, greens and oranges mostly.  
Here's the left page...lots of trees and leaves to document.  If you see photos that look overly red and bright....or golden....it's because it's just THAT bright around here this Fall.  It was spectacular.
Here's the right page, all about celebrating my dad's 80th birthday.  He loves the color brown so I loved the "so cozy" journaling card.
I also had two inserts this week. I snapped a photo so you can see what those pages look like layered between my 2 main pages. I always try to keep my inserts smaller in size than a 12 x 12 layout.  This way, the main pages are still easily seen.  I love weeks with inserts because it means we had even more stories to share.
On to the journaling cards and photos.  Here I used two journaling cards to create my 4 x 6 main, dated insert.  The chipboard letters are from my stash but everything else used today is from the Urban Autumn collection.  I loved using gold stitching this week, it just reflects this golden time of year. You can see peeks of printables, badges and the fun wood veneer arrows + a snippet of Washi tape.
This insert is all about picking the last of our jalapenos and canning up some hot pickle slices.  Nachos here we come. 
I used more of the word printables on the left insert, paired with gold stitching & an ampersand wood veneer piece.  On the right I trimmed a printable to fit the bottom of my journaling card.
The "so cozy" insert is my favorite thing of the collection.  I love the fonts and who doesn't like to feel all warm and cozy on a crisp Fall night.  I stitched through some wood veneer leaves.  These are unique in that they have an etched zig zag pattern through them.  On the right is my dad with his birthday cake.
On with the additional inserts.  I like to print large photos that reflect on a particular season, hence these large leaves.  I just couldn't resist showing them in a larger format.  I used a few printable cut out + a badge for some simply embellishing.
The back side of the above 5 x 7 insert has the photo of our dog, Charlie, below on the left.  On the right I used a trimmed page protector from We R Memory Keepers that I had on my stash.  I trimmed it from a 12 x 12 down to a 9 x 12.  I used 12 x 12 background paper to mount the larger photo.  The "love" square is a trimmed down journaling card.
Here's my golden boy, Charlie.  The keeper of the stray pumpkin. Maybe I should call him Charlie Brown, ha.
Now here is something I'm rather excited about.  I didn't have photos to fill the back side of the 9 x 12 insert.  So I went to my Fall Pinterest board and printed out some photos that just really created a beautiful collage of what I love about this season.  These photos are for my personal viewing pleasure and nothing more so I just wrote the website on the backs of the photos just in case I need the reference.  I think I'll keep doing this with every season and holiday.  It's just a fun way to capture the era we're in and what my personal tastes are.  And now I want to go decorate my entire house like these photos.
Did you notice the three ampersands.  I placed them randomly on the outside of my page protector for whimsy.  Love the ampersand badge so much.  For my journaling I typed a few thoughts onto a journaling card and trimmed it down.
Here's that pretty little ampersand below.  And that does it for this week of my Project Life.  I'd like to thank Amy Heller and the folks at Lily Bee Design for having me join in the fun today.  Congratulations to Amy on her brand new collection.....please give her a warm and cozy comment when you visit her blog.

Now it's time to see what other designers have created for the Urban Autumn blog hop.  You can follow the hop by visiting Amy Heller's blog right here.  Amy is the mastermind behind this wonderful collection of goodies so I'm sure she has some more amazing creations to share.  If you want to start at the Lily Bee Blog you can visit them right here.

Thanks for stopping by today.  One more thing.....each blog hop participant is giving away a prize so be sure to leave comments on each blog hop post.  I'll be giving away a set of the Urban Autumn printables that you see below.  Just leave your name, email address and tell me what's on your Fall project list.  It can be anything to do with scrapbooking, card making, decorating, sewing, etc.  Contest will remain open until Thursday, November 9th.  Winner will be notified by email.

June 13, 2013

Gossamer Blue meets Lily Bee.....a notebook

Hey there, today I'm back to share a creation made from the June Gossamer Blue kits.  This month we teamed up with Lily Bee to create some fun filled kits.  Be sure to check the Gossamer Blue blog + the Lily Bee blog to see more team creations.  

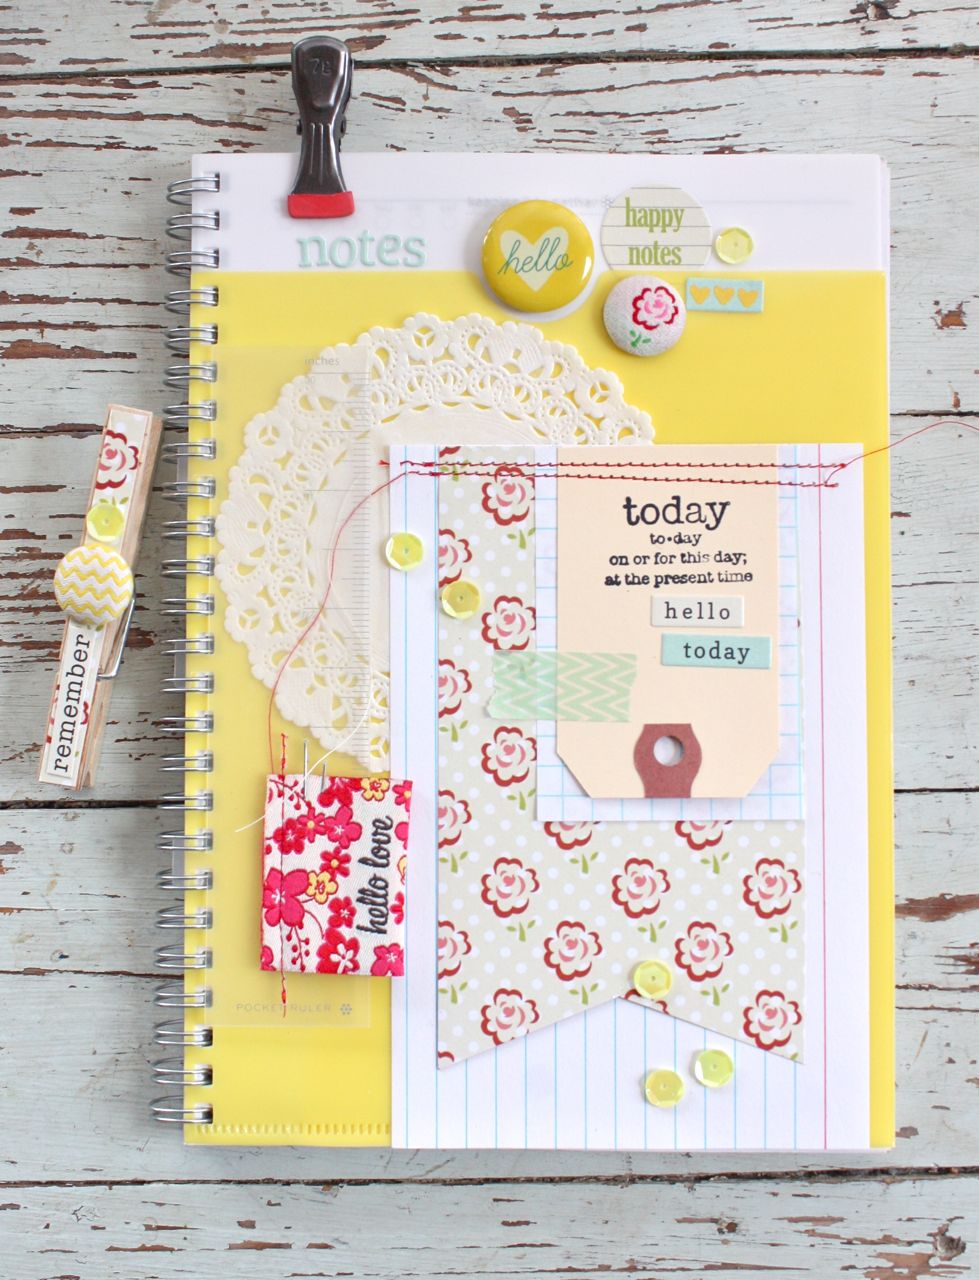
I created this cheery notebook because I just love to make notebooks.  I saw this yellow one in my stash that I picked up from Target (I don't see them carrying this style anymore, boo!) and decided it would look great with the fun yellow accents from the Lily Bee products.  
My favorite part about my notebook is the whimsical brad and flair from the Lily Bee Sweet Shoppe pack that was in the GB June Main Add-on kit.  Such a fun little grouping and I added a little sequin from my shop as a finishing touch. For the layers on the notebook I used red stitching and Dainty Doily. 
 The pretty floral patterned paper that I created the notched piece with is from the June Add-on Kit #2.  I also used the exclusive "today" stamp from the June Main Add-on Kit, Washi tape and stickers from the kits.  The fun "hello love" fabric tab is from the June Bits & Pieces Kit & the Medium Manila Parcel Tag is from my shop.
 To coordinate with my notebook I also created a fun clothespin clip using leftover bits and pieces.  I like to use the clothespins to mark a page in the notebook or to clip other loose notes to my notebook.
Notebooks are great to have on hand and I keep mine in a basket.  I sometimes will pull out one to use when I want a fresh, new notebook to use.....and they make the best gifts for teachers, secretaries at the school, Christmas stocking stuffers, etc.  Everyone loves the notebooks!  I find the best notebooks to embellish at Target it seems.  Thanks for stopping by today!

June 1, 2013

Gossamer Blue June Reveal Day!

Hello everyone, yep it's June already and that means it's reveal day at Gossamer Blue.  This month we've teamed up with Lily Bee for some crafty fun.  Be sure to check the Gossamer Blue website and blog all month for new creations.  The shop items and Design Team projects will be available at 10am PST.  I'll be sharing my Gossamer Blue projects all month long here on my blog.  I have lots to share and I'm still using up kit items so please visit often.

Today I'm kicking of my June Gossamer Blue projects with a set of cards. The kits are so full of goodies that I just love to pick out some products, spread them out on my work table and see what I can come up with.  Notice that I used the fun wooden stamps that are included in a few of this month's kits.  
There's of fun layers on my cards today.  Here I used a delightful little floral patterned paper by Lily Bee layered with oodles of tags and sticker words.  I started the base of my layers with a simple index card and red stitching + a Dainty Doily.  I stamped the quote bubble and a Small Manila Parcel Tag with the stamps.  Then I added the sticker words, some Washi from the kits, and a tied button
For this card I used more of the same kit items + I added one of the cute flair buttons from a kit.  I sprinkled on a few sequins and added some fun birthday themed stickers.  
On the inside of this card I embellished it with another Happy Birthday sentiment using a sticker and the exclusive Gossamer Blue stamp.  I love the pack of embellishments this month that includes a bunch of these labels.  I stitched over the label with red thread leaving the end strings long.  I love that they look like little streamers hanging down.  A portion of a Dainty Doily is peeking out from the patterned paper. 
Thanks for stopping by today.  I'm off to do a little yard work then I can't wait to come back to see the Gossamer Blue gallery for this month.  :)

December 23, 2011

Paper Bag Gift Pouch..

Sooo, how is the holiday going for you? About this time of year, I'm ready to just enjoy time with my family and let all of the preparations go. What's done is done. What didn't get done can wait. There always seems to be people that I forget to get gifts for. Just those little thank you type gifts to show your friendship and appreciation. Usually for me, these gifts are of the paper crafted variety which most of my friends and family love. So as always I end up making some gifts well after the holiday is over and they become lovely little New Year's gifts of sorts.

Last year those gifts were my paper bag pouches with notebooks and little cards tucked inside. Here's a creation I created while guesting at Cosmo Cricket. Some of my favorite projects ever. You can see the full post with all the little details here.
I stitched together little pouches from paper bags, made notebooks and little coordinating cards. Very cute and well received.
Here's another batch I made. I remember using these for teacher treats. So easy to tuck in packaged candies, cookies in glassine sacks, cards and more. You can see the full post for these pouches here.
This year I used a similar design but went with a more neutral color palette to match the little notebooks I made here. Inside I tucked an embellished notebook and 2 small thank you cards. I plan to write little note telling the recipient that if they choose they can keep the goodies for themselves or re-use the embellished pouch another gift. Just tuck more goodies inside.
For the pouch I used my Paper Bag Pockets. Very neutral so they can be embellished a million different ways. I used a Dainty Doily and stamps from My Mind's Eye along with their tiny circle garland. I tied the pouch up with Wrinkle Ribbon from the shop plus a stamped Large White Tag. An Elle's Studio tag is tucked under the Wrinkle Ribbon. Studio Calico Mister Huey mist was splattered over the finished pouch.
For the small thank you cards, I used a sentiment from a My Mind's Eye stamp set along with a paper doily, Washi tape and brown baker's twine. I stitched pockets for these from vellum. These will be great to tuck into a little thank you gift or along with a home baked treat.
The embellished notebook was made from my Plain Jane Notebook Kits which are on sale now in the shop. They include a fun variety of lined, grid and ledger papers plus a few embellishments to add on.
A great little gift set. I need to make up lots of these for little New Year's gifts + they will be nice to just have on hand. For mailing, simply wrap in tissue and place in a bubble mailer. Flat packaged candies like little chocolate squares, etc are always a fun treat to tuck in also. You could also leave out the notebooks and cards and replace with fat quarters of fabric for the sewer on your list. So many possibilities.
Hope you enjoy! Back to the holiday fun for me. I'll have some updated Project Life layouts for you the rest of this week + some fun packaging Jordan made using Papertrey goodies. See ya soon.
Related Posts with Thumbnails