
June 10, 2011
Art Quilt....rescheduled
Hi friends. Today I meant to have my first block of my art quilt up on the blog. I have a family member that went in for some unexpected surgery today so I won't get to my post today. Look for it next week sometime. Have a great weekend.

Papertrey Stamp - a- Faire...
Have you heard the news of Papertrey's upcoming, full day retreat? I'll be there along with other talented designers from the Papertrey team. Check it out on Nichole's blog right here.


June 6, 2011
More summer sewing.....Quilty Bag
Back again with some sewing goodness. Recently found the pattern to make this bag while visiting a local quilt shop......
 And was so inspired by the colors on this bag found on Pinterest by Blueberry Park.
 Picked out these fabrics plus a few more + some wonderful linen I found at my local thrift shop.
 Can't wait to find time to stitch it all together.
 And I found a new shop that sells the coolest stuff. I bought this coin purse made from upholstery + this fun crocheted flower that I'll add to my quilty bag. Love to shop local.
 Got any sewing projects of your own happening in your neighborhood? I'd love to see hear about them!
 And was so inspired by the colors on this bag found on Pinterest by Blueberry Park.
 Picked out these fabrics plus a few more + some wonderful linen I found at my local thrift shop.
 Can't wait to find time to stitch it all together.
 And I found a new shop that sells the coolest stuff. I bought this coin purse made from upholstery + this fun crocheted flower that I'll add to my quilty bag. Love to shop local.
 Got any sewing projects of your own happening in your neighborhood? I'd love to see hear about them!
June 5, 2011
Summer Sewing...Art Quilt
Hi friends. Hope your summer is going great!! Have I got something fun planned for you guys. My dear friend Melissa Phillips and I are teaming up yet again for some blogging fun this summer.


If you follow our blogs regularly, you know that Melissa and I both just swooned over Tara Anderson's art quilt. To quote Tara, she said, "with this project there were no rules, no boundaries, no directions, just creating something fun for myself!"
And that's exactly what Melissa and I are aiming for this summer. We're each going to make an art quilt.....or at least start out with the blocks....and see what we end up with. Here's Tara's beautiful art quilt below.

(photo from Tara Anderson)
This is one of the blocks up close. So many cute layers. I love the *no rules* approach.


(photo from Tara Anderson)
And so you can get a feel for my approach I'm sharing some photos from my Pinterest boards that have given me inspiration for my art quilt. Love the embroidery on this one.


(from Pinterest.....I don't know the creator but will certainly give credit if anyone knows)
And this beautiful pillow below with a row of quilted scraps + pretty fabric covered buttons.


(from Pinterest....Fig Tree Quilts)
Love the idea of this scrappy quilt made from layered squares. My art quilt might even inspire a larger sized quilt of the same fabrics.

(from Pinterest....via Lucy and Norman)
This is a beautiful piece with muted colors and stitched on elements.

(from Pam Garrison's blog, creator Charlotte Lyons)
Love this piece with all the vibrant fabrics + series of words.

(from Pinterest.....via Didee's Art Cupboard)

Today Melissa and I will be sharing a few photos of the supplies we've gathered up for our very own art quilts. Not everything will make it into our art quilts but it's been fun gathering up supplies. This is a stash of vintage + brand new fabrics. I've come to the conclusion that I love to sew with new, contemporary fabrics + mixing in older, vintage fabrics. I want my projects to show a connection to the days of old but also add in what's new and fresh right now.
 And just for fun, can you tell which floral is old and which is a brand new piece? Love them both.
 Some other little additions that I've chosen for my quilt are possibly a few vintage hankies.
 Lots of little trims + laces + doilies.
 And just for fun, Melissa and I prepared a little care package for each other...picking out items with the colors we've chosen for our art quilts. Look at this fun stash of goodies Melissa chose for me.
 The fabrics are especially gorgeous. The colors she chose are just perfect + they're tea stained too. And I swear they have the faintest scent of warm, sweet cinnamon. Soooo *melisssa* and I can't wait to use them on my art quilt.
 Soooo, please visit Melissa's blog later today to see what she has in store for her art quilt. Our plan is to show you our completed art quilt blocks a little at a time over the summer. Come back on Friday, June 10th to see our first finished pieces. I can't wait to start working on mine. :)
 And just for fun, can you tell which floral is old and which is a brand new piece? Love them both.
 Some other little additions that I've chosen for my quilt are possibly a few vintage hankies.
  Lots of little trims + laces + doilies.
  And just for fun, Melissa and I prepared a little care package for each other...picking out items with the colors we've chosen for our art quilts. Look at this fun stash of goodies Melissa chose for me.
 The fabrics are especially gorgeous. The colors she chose are just perfect + they're tea stained too. And I swear they have the faintest scent of warm, sweet cinnamon. Soooo *melisssa* and I can't wait to use them on my art quilt.
  Soooo, please visit Melissa's blog later today to see what she has in store for her art quilt. Our plan is to show you our completed art quilt blocks a little at a time over the summer. Come back on Friday, June 10th to see our first finished pieces. I can't wait to start working on mine. :)
June 3, 2011
girly birthday cards
Hey friends. What a week it's been! I don't even want to know the amount of $$ I've spent on gas this week hauling the reds around. And we're off for a weekend ball tournament tonight. The fun never ends!
Jordy has a birthday party to go to next week and I've noticed that I never have any teenage/girly type cards in my stash. So my goal this summer is to add a few fun cards in here and there. When I want teenage girl type cards, I always reach for my Stamping Bella stamps. I love the whimsical images, especially the one I chose to work with today called presentahbella.
I stamped the images on solid cardstock and then again on some new My Mind's Eye patterned paper. Most of the papers and twine I used today are from the Lime Twist collection. I used my Copic markers to color in the girls on the solid cardstock and a few more to color in some spots on the paper pieced presents.
 I adhered the presents to the main images and added a few quote bubbles that I cut out from this adorable paper. I stamped *happy birthday* sentiments onto the bubbles and popped them up with pop dots.
 Next up it was time for a few embellishments. Using more of the Lime Twist paper I cut some strips and then notched the end to create little flags.
 These were adhered to my card fronts and then buttons were added using some Lime Twist twine.
 I also added some staples using my Tiny Tim stapler + some clear rhinestones that I colored with my Copics. Instant matching.
 And here's my little stash-o of birthday cards for the girls to choose from.
 I stitched around the focal image to add a little interest to the white + I added some glitter. Love all the mixy matchy colors in this one line as you can see on all my little notched strips of patterned paper.
 Again, I love those little quote bubbles. Just too cute.
 Hope you enjoy! Do you have some favorite stamps to use for teenage girl cards? I'd love to hear about your favorites.
 I adhered the presents to the main images and added a few quote bubbles that I cut out from this adorable paper. I stamped *happy birthday* sentiments onto the bubbles and popped them up with pop dots.
  Next up it was time for a few embellishments. Using more of the Lime Twist paper I cut some strips and then notched the end to create little flags.
  These were adhered to my card fronts and then buttons were added using some Lime Twist twine.
  I also added some staples using my Tiny Tim stapler + some clear rhinestones that I colored with my Copics. Instant matching.
  And here's my little stash-o of birthday cards for the girls to choose from.
  I stitched around the focal image to add a little interest to the white + I added some glitter. Love all the mixy matchy colors in this one line as you can see on all my little notched strips of patterned paper.
 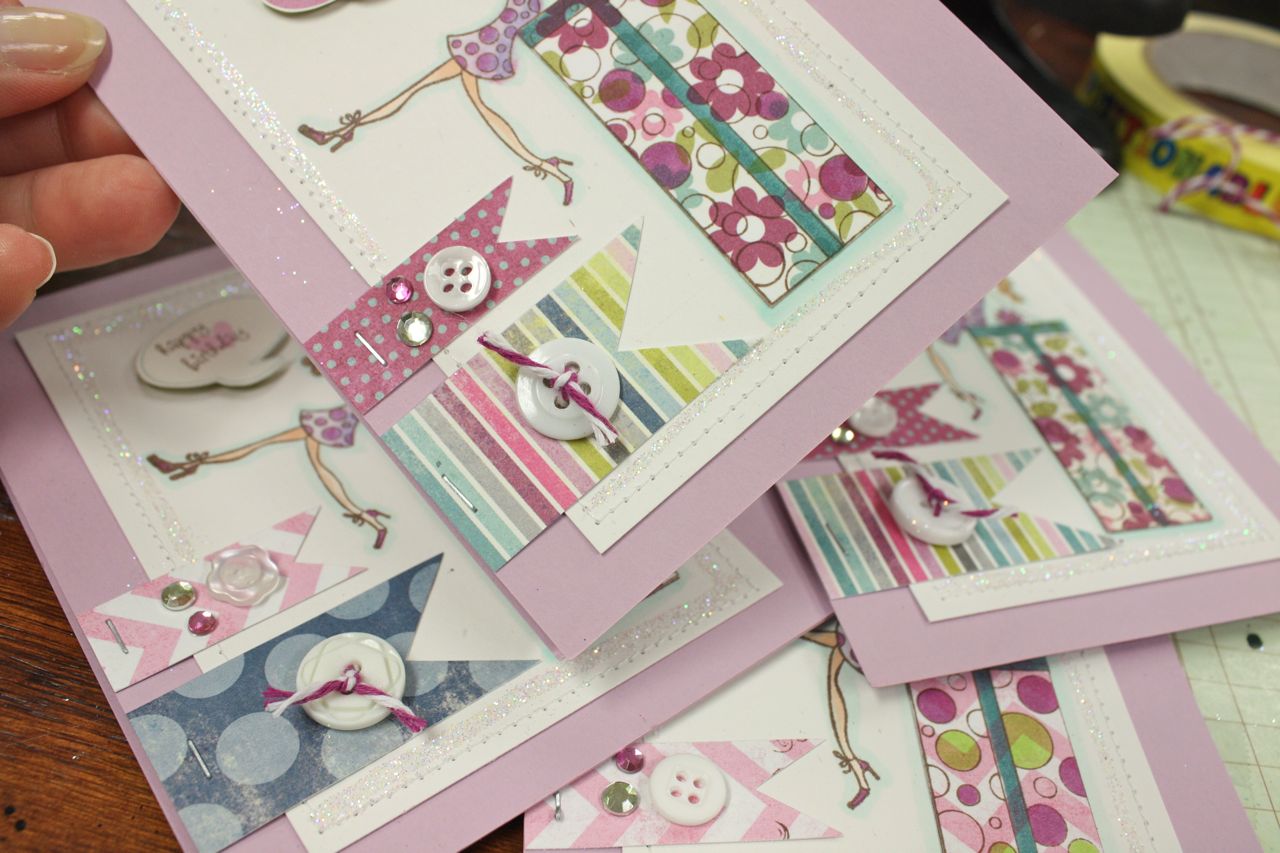 Again, I love those little quote bubbles. Just too cute.
  Hope you enjoy! Do you have some favorite stamps to use for teenage girl cards? I'd love to hear about your favorites.
 Okay, we're off to see the Wizard. Well not really. We're really off to see Bud the softball coach. Catch ya later, peeps. Have a great weekend! Stay tuned because on Monday I'm teaming up with a crafty friend for an ongoing summer project. We'll be blogging our progress and I'll tell you all about it June 6th!
May 31, 2011
Scattered Showers Revisited
Today I'm revisiting an older Papertrey Ink stamp set called Scattered Showers along with its companion set Scattered Showers Additions. I love that the images and sentiments from both of these sets can be used for rainy day or sunshine-y types of projects. With all the storms we've had lately I thought a sunshine-y type card was much needed.
 It's fun to pair our older Papertrey stamp sets with new products. Using embossing powder, I heat embossed both the sunshine image and the umbrella topper. A text block from Green Boutique was used at the base for the umbrella.
 For the sentiment I used the yellow swirl paper from Pretty Pastels, snipping the ends to form a notched flag. Along the bottom of the card I used one of my favorite border dies, Simple Circles. I punched smaller circles of patterned paper from my stash basket and then topped the circles with twine tied Vintage Buttons. The base card of Rustic White was splattered with yellow spray mist.
 Brown machine stitching and small scalloped cut scraps finish off the card. I love adding little snippets onto my projects that are just lying around on my desk.
 Hope you enjoy my new project. I found a few of my previous projects made from Scattered Showers that you can see here.
Feel free to check out the rest of the Nichole's + the Senior Papertrey team's projects for today:
 It's fun to pair our older Papertrey stamp sets with new products. Using embossing powder, I heat embossed both the sunshine image and the umbrella topper. A text block from Green Boutique was used at the base for the umbrella.
 For the sentiment I used the yellow swirl paper from Pretty Pastels, snipping the ends to form a notched flag. Along the bottom of the card I used one of my favorite border dies, Simple Circles. I punched smaller circles of patterned paper from my stash basket and then topped the circles with twine tied Vintage Buttons. The base card of Rustic White was splattered with yellow spray mist.
 Brown machine stitching and small scalloped cut scraps finish off the card. I love adding little snippets onto my projects that are just lying around on my desk.
 Hope you enjoy my new project. I found a few of my previous projects made from Scattered Showers that you can see here.
Feel free to check out the rest of the Nichole's + the Senior Papertrey team's projects for today:
Etsy shop update....
New items going up in my Etsy shop today. All new items should be uploaded by 2pm Central time. Enjoy!!


May 30, 2011
red bird thank you cards
Hi guys. Decided to do a little doubling up on some thank you notes. Josey needs to send graduation thank you notes and I need to send birthday thank you notes. Here's what I had out on the desk so it looked good to me: papers from Studio Calico, October Afternoon and/or Cosmo Cricket (?) and The Girls Paperie.
 Using Medium Manila Parcel Tags I heat embossed a large thank you sentiment from Papertrey Ink using SU! red embossing powder.
 Be prepared, Washi tape is my new favorite thing. I added strips to the tags for some easy pattern + color.
 Using a circle punch and buttons + twine, I added a few additional embellishments to the tags. These would be great as is for little gift sacks.
 But I really need the cards so I cut up papers all mixy matchy style for my card fronts.
 I pulled some yellow Wrinkle Ribbon from my stash. I chose the yellow because I spied a teensy spot of yellow in the flower centers on the patterned paper. You can zoom in closer on the photo below to see.
 I tied the ribbon to the tags and adhered to my card front with pop dots. Easy peasy.
 Love that the tags are so easy to reach for when you need a focal point on a card. The raised surface of the embossed sentiment really helps to add dimension to the tag. The entire series of Papertrey Think Big Favorites stamps fit nicely on the medium parcel tags too.
 A nice little stack of thank you cards, ready to be sent out. Think I'll go write my thank you notes right now.
 Hope you enjoy! Tomorrow starts a month long taxi service for me. Josey is embarking on her new role as a freshman, with all the events and camps that come along with it. Jordan is following closely behind with all of her summer activities too. June is jam packed for us....so much so that I had to make a weekly calendar to carry around just so we know if we're coming or going. I will be in the SUV so much that I think I need to pack a basket of things to work on/books to read while we're in between activities. Now if someone can just tell me how to handle suppers when we're out and about 4 nights a week + the weekends for softball. Here we go, folks!!!
 Using Medium Manila Parcel Tags I heat embossed a large thank you sentiment from Papertrey Ink using SU! red embossing powder.
 Be prepared, Washi tape is my new favorite thing. I added strips to the tags for some easy pattern + color.
 Using a circle punch and buttons + twine, I added a few additional embellishments to the tags. These would be great as is for little gift sacks.
 But I really need the cards so I cut up papers all mixy matchy style for my card fronts.
 I pulled some yellow Wrinkle Ribbon from my stash. I chose the yellow because I spied a teensy spot of yellow in the flower centers on the patterned paper. You can zoom in closer on the photo below to see.
 I tied the ribbon to the tags and adhered to my card front with pop dots. Easy peasy.
 Love that the tags are so easy to reach for when you need a focal point on a card. The raised surface of the embossed sentiment really helps to add dimension to the tag. The entire series of Papertrey Think Big Favorites stamps fit nicely on the medium parcel tags too.
 A nice little stack of thank you cards, ready to be sent out. Think I'll go write my thank you notes right now.
 Hope you enjoy! Tomorrow starts a month long taxi service for me. Josey is embarking on her new role as a freshman, with all the events and camps that come along with it. Jordan is following closely behind with all of her summer activities too. June is jam packed for us....so much so that I had to make a weekly calendar to carry around just so we know if we're coming or going. I will be in the SUV so much that I think I need to pack a basket of things to work on/books to read while we're in between activities. Now if someone can just tell me how to handle suppers when we're out and about 4 nights a week + the weekends for softball. Here we go, folks!!!
Come back on June 1st for the Papertrey Senior Design Team post.
Subscribe to:
Posts (Atom)


 Posts
Posts


